https://blog.dennisokeeffe.comDennis O'Keeffe blog2026-10-24T00:00:00.000ZDennis O'Keeffehttps://dennisokeeffe.com/aboutYet another dev blog.All rights reserved 2026, Dennis O'Keeffe<![CDATA[Building the Matcha Byron Bay website]]>https://blog.dennisokeeffe.com/blog/2026-10-24-building-the-matcha-byron-bay-website2026-10-24T00:00:00.000Z2026-10-24T00:00:00.000ZFollowing on from the Pocket Rice marketing website, the next website I have been working on is for Matcha Byron Bay.
Matcha Byron Bay started as a stall at the Byron Bay Farmers Market in July 2022. The business is run by Japanese locals who source their matcha from Uji (near Kyoto), and these days they sell online Australia-wide and supply matcha and hojicha to cafes, retailers and other businesses.
This blog post gives an overview of the new website, some of the technology behind it (kept at a high level), the design choices we made, and where things are at with wholesale, SEO and sales so far.
Where we started
The previous website was built on WordPress with WooCommerce. It did the job, but it had some issues that were costing the business:
Scroll-jacking on the home page that would stop you scrolling all of a sudden.
Adding to cart was slow, and some layouts broke at certain screen sizes.
The blog only ever showed 9 articles, even though there were roughly 37 of them.
The guiding principle for the rebuild was that the website is the means, not the end. It exists to sell products, generate wholesale enquiries, build trust in the brand and reduce the effort it takes for someone to buy. Every decision below was weighed against those outcomes.
The new website launched in July 2026. As part of that, we migrated the products, collections, customers, historical orders, articles and media across to Shopify, and mapped the legacy URLs over with redirects so that existing search traffic still landed somewhere sensible.
The new Matcha Byron Bay home page
Website at a high-level
Shopify is the commerce backbone. It owns the catalogue, pricing, checkout, customer accounts, orders, payments, subscriptions and (more recently) wholesale companies.
The storefront itself is headless. It is a TanStack Start React application that talks to Shopify through the Storefront API, using Shopify's new framework-agnostic Hydrogen developer preview (what I have been referring to as "Hydrogen 2.0").
This version of Hydrogen describes itself as a toolkit rather than a framework. The original Hydrogen was tied to Remix (and later React Router), whereas the new core is plain JavaScript with thin bindings on top. That gives you a typed Storefront API client, cart handlers that work before any client JavaScript has loaded, and consent-aware analytics, without being locked into a particular framework. TanStack Start is not one of the officially listed frameworks in the preview, but because the core is framework-agnostic, wiring it in was straightforward.
The storefront is server-rendered on Cloudflare Workers, so pages render close to the customer and static assets are served from Cloudflare's edge. Checkout is still Shopify's hosted checkout, so payments stay with Shopify.
The following is a simplified look at the architecture:
architecture-beta
group cf(cloud)[Cloudflare]
group shopify(cloud)[Shopify]
service visitor(internet)[Visitor]
service assets(disk)[Static assets] in cf
service worker(server)[SSR Worker] in cf
service storage(database)[Storage] in cf
service jobs(server)[Queues] in cf
service api(server)[Storefront API] in shopify
service checkout(internet)[Checkout] in shopify
visitor:R --> L:worker
worker:T --> B:assets
worker:R --> L:api
worker:B --> T:storage
api:B --> T:checkout
checkout:L --> R:jobs
jobs:L --> R:storage
The Worker renders pages using data from the Storefront API, and Shopify's checkout takes over for payment. Paid orders and other events then flow back into our background jobs, which write to storage. How the code gets deployed is covered further down.
A few reasons for going headless over a Shopify theme:
We have full control over the design, the markup and the performance budget.
Features like the wholesale portal (more on that below) need real application logic, background jobs and storage, which would have been awkward to bolt onto a theme.
Search engine work such as structured data, canonical URLs, redirects and sitemaps all live in code that we can review and test.
The trade-off is that we own more. Things Shopify themes give you for free (like predictive search and account pages) needed to be built or handed off to Shopify-hosted pages.
Under the hood
Similar to Pocket Rice, I wanted the infrastructure to be reviewable and repeatable rather than clicked together in dashboards.
At a high level:
Pulumi manages the long-lived resources: key-value storage, queues, a database, private object storage, and the GitHub deployment environments and their secrets.
Wrangler owns the Worker itself: the build, versions and bindings.
GitHub Actions orchestrates releases. A merge to main runs the tests, applies any infrastructure changes, builds the app, runs database migrations and then deploys the Worker.
flowchart LR
Merge[Merge to main] --> Tests[Tests]
Tests --> Infra[Pulumi apply]
Infra --> Build[Build]
Build --> Migrate[Migrations]
Migrate --> Deploy[Deploy Worker]
Deploy --> Live[Live site]
Feature branches each get their own disposable preview Worker with a stable URL. That makes it easy to share changes with the business before anything goes live, and previews are never indexed by search engines.
Anything that does not need to happen during a page request is pushed into the background. Form submissions and Shopify webhooks (for events like paid orders) are recorded and handed to Cloudflare Queues, where consumers handle things like enquiry emails, wholesale invoices and purchase attribution. For the work that really matters (like invoices), a scheduled job picks up anything that gets stuck, so a dropped message does not mean dropped work.
For observability, errors go to Sentry, each request emits a single structured "wide event" to Cloudflare's logs, and product analytics go through PostHog once a visitor has given consent.
On the code side, the server is written with Effect so that failures (Shopify being slow, a bad response, a missing permission) are typed and handled explicitly rather than silently turning into empty pages.
Design choices
The design leans on the brand's colours (deep green, olive and cream), with photos from the market stall and the tea fields in Uji doing a lot of the storytelling.
One small trade-off worth calling out: some of the light yellow text on green does not meet colour contrast requirements, so the site will not score a perfect accessibility audit. We decided to keep the brand colours rather than water them down.
The home page puts proof up front. The hero carries a Google rating badge, and directly underneath it is a "Found at" strip with logos of the cafes and markets where you can find the matcha, followed by a carousel of real Google reviews.
Found at and loved by, right under the hero
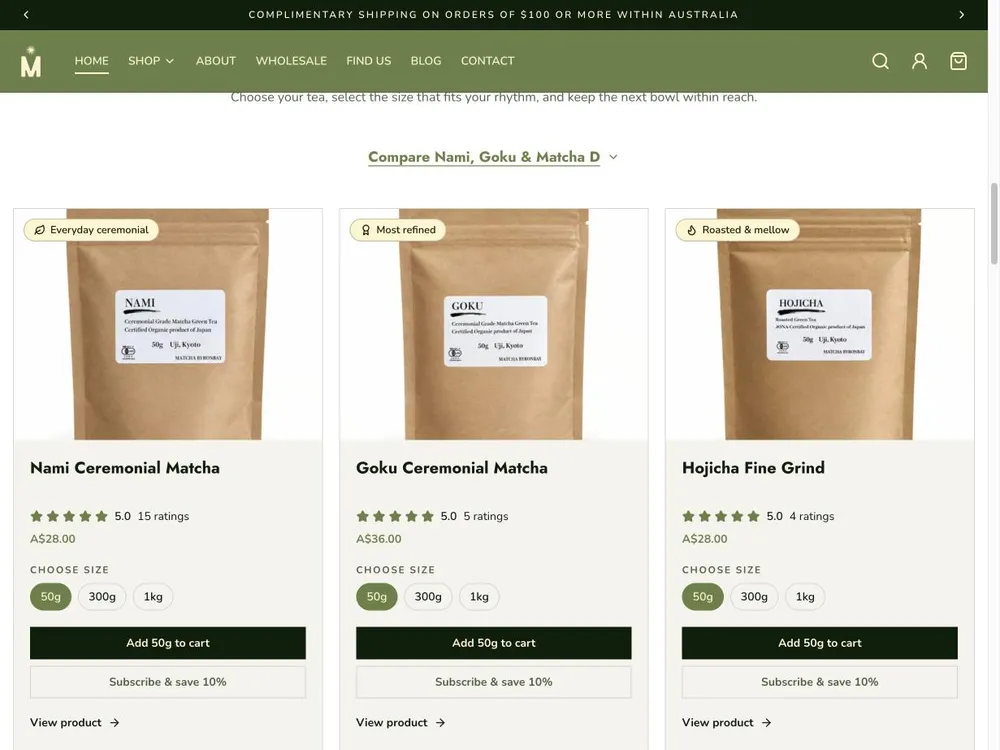
From there, the focus is on helping someone pick the right tea quickly. We added a comparison between the three main teas, badges for what each one is best for, and size selection with add-to-cart directly on the card.
Product cards with sizes and subscriptions
The shop is broken up into collections such as ceremonial matcha, culinary matcha, hojicha, tea tools and ritual sets.
Collections page
The product pages went through a conversion review after launch. The goal was to answer four questions as quickly as possible: which tea suits me, what will it taste like, how much tea am I getting, and what will delivery cost? That led to things like an approximate number of servings and cost per serving next to the price, delivery information next to the add to cart button, and a subscription option at 10% off.
The Nami product page
Since launch we have also added moderated product reviews with verified-purchase badges, plus a free delivery tracker and a complementary add-on in the cart.
The flow for a retail customer looks roughly like this:
The market QR codes are worth a mention. The stalls are still a big part of how people find Matcha Byron Bay, so for physical placements like the stall we generate QR codes with campaign tags baked in. That way offline traffic can be attributed like any other campaign.
A Japanese-owned business
The owner, Ayumu, is Japanese, and the business began as a dream between Japanese friends living in Byron Bay. The brand story is very much about the connection between Uji and Byron Bay, and the about page tells that story directly, including the team's names in katakana.
From the mist of Uji to the rhythm of Byron Bay
The about page walks through the journey from that first market tent to where they are today.
Our journey of a thousand mornings
This had some practical implications for the build as well:
The wholesale buyer guide and staff guide are published in both English and Japanese.
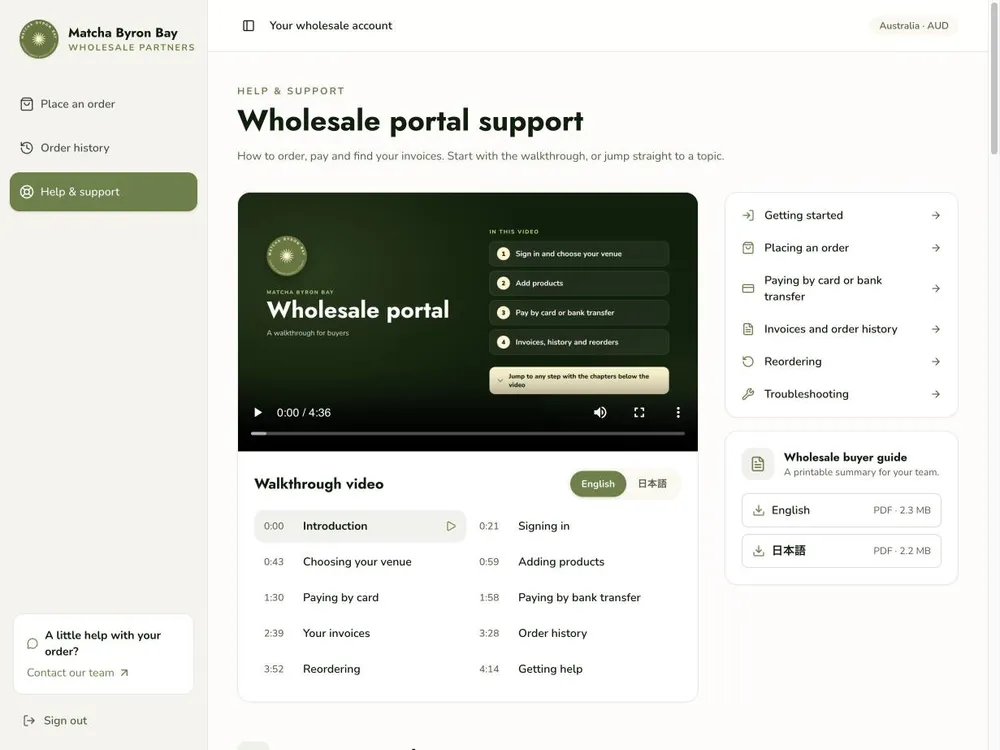
The wholesale walkthrough video is narrated in both languages with captions, and you can switch between them on the support page.
Japanese copy needs a review from a native speaker before it goes out, including Shopify's menu names, which differ between languages.
Some customers write in Japanese (a few of the Google reviews on the home page are in Japanese), so anything that renders customer-provided text has to handle it. The one place that does not yet is the PDF invoice renderer, which uses standard Latin fonts. Rather than silently mangling a name, anything it cannot render is flagged for review.
The Japanese version of the wholesale buyer guide
Wholesale
Commercially, the wholesale page is one of the most important pages on the site. Cafes, retailers and workplaces buy in much larger quantities than retail customers, so every new wholesale partner matters.
The wholesale page hero
The page went through a dedicated SEO and messaging review. The first version had a lovely brand story, but its main heading ("Bring beautiful matcha to your business") did not say what the page was actually for. The heading was changed to say exactly what the page is for, and the page was restructured to answer the questions a cafe owner actually has before they enquire.
Social proof comes first, with logos from the wholesale community.
Poured, stocked and shared by our wholesale community
The business started in Byron Bay, but it supplies cafes Australia-wide. Rather than create a thin landing page for every city (which tends to backfire), the page talks about where we supply in one place and answers the city-specific questions in the FAQ.
Australia-wide wholesale, with support for key cafe markets
One of the bigger decisions was to publish guide pricing. It is common for wholesale pages to hide pricing behind a form, but cafe owners want to compare cost per gram and cost per cup before talking to anyone. Publishing it builds trust, and it also gives search engines something concrete to rank for. The prices a buyer actually pays come from their own catalogue in Shopify.
Wholesale pricing, cost per gram and cost per cup
Further down, the page explains exactly how ordering works, from first enquiry to paid invoice.
How the wholesale portal works
The enquiry form asks for enough to qualify the lead (business type, location and what they are interested in). Submitting it emails the business our wholesale pricing and partnership PDF and notifies the team, so nobody is left waiting for a reply to find out the basics.
The wholesale enquiry form
Finally, the FAQ covers the long-tail questions cafe owners ask (and search for), such as whether we supply Sydney and Melbourne, which matcha suits lattes, and how many drinks you get out of 1kg.
Wholesale FAQs
The wholesale journey end-to-end looks like this:
flowchart TD
Find[Search or referral] --> Page[Wholesale page]
Page --> Enquiry[Enquiry form]
Enquiry --> PDF[Pricing PDF emailed]
Enquiry --> Team[Team notified]
PDF --> Chat[Samples and product fit]
Team --> Chat
Chat --> Setup[Account set up in Shopify]
Setup --> SignIn[Portal sign in]
SignIn --> Order[Choose venue and order]
Order -->|Card| Checkout[Shopify checkout]
Order -->|Bank transfer| BankReview[Review total in portal]
BankReview --> Unpaid[Unpaid order]
Checkout --> Invoice[Invoice emailed]
Unpaid --> Invoice
Invoice -->|Reorder| Order
The wholesale portal
The newest piece of the website is a wholesale portal where approved cafe and retail buyers can place orders themselves.
Without a portal, every wholesale order and invoice is a manual back-and-forth. That works with a handful of partners, but it does not scale.
Signing in to the wholesale portal
The split of responsibilities is intentional:
Shopify owns identity, company permissions, wholesale pricing, orders and payments. Buyers sign in with Shopify's hosted email sign-in and receive a one-time code, so there is no new password system to maintain.
Our website owns the portal experience: choosing the venue you are ordering for, the order form, order history, reordering and the invoices.
Each venue is a Shopify company location with its own pricing, delivery address and order history. Buyers can pay by card through Shopify's checkout, or choose bank transfer. For bank transfers, the portal shows Shopify's calculated delivery and GST for review, places an unpaid order and emails an invoice with the payment details. Staff mark it as paid in Shopify once the money arrives.
Placing a wholesale order (demo data)
Invoices are generated in the background from Shopify's order events. They are stored privately, versioned when an order changes, and only served after checking that the buyer still has access to that order.
sequenceDiagram
participant Buyer
participant Portal
participant Shopify
participant Jobs as Background jobs
Buyer->>Portal: Sign in
Portal->>Shopify: Hosted email sign in
Shopify-->>Portal: Verified buyer and company
Buyer->>Portal: Choose venue and products
alt Card
Portal->>Shopify: Cart with company pricing
Shopify-->>Buyer: Hosted checkout
else Bank transfer
Portal->>Shopify: Calculate delivery and GST
Buyer->>Portal: Confirm order
Portal->>Shopify: Create unpaid order
end
Shopify->>Jobs: Order webhook
Jobs->>Jobs: Render invoice PDF
Jobs-->>Buyer: Email invoice
Onboarding was treated as part of the feature rather than an afterthought. The support page works before you sign in and has the walkthrough video with chapters for each step, plus the printable buyer guides in English and Japanese.
Wholesale portal support with the bilingual walkthrough
Other key pages
The find us page lists every market the stall attends with the day, hours, location and a link to a map. It is also marked up with local business structured data for search engines.
Find Matcha Byron Bay at local markets
The blog holds the preparation guides, tea explainers and local guides. Like Pocket Rice, the posts now live as MDX in the repository rather than in a CMS.
Notes on matcha, preparation and everyday tea ritual
SEO and backlinks
SEO for a small local business has been the hardest part of the project, and it is very much still in progress.
The first challenge was the migration itself. After launch, a number of old WordPress URLs were still indexed, and some of them led to pages that no longer existed. We audited the legacy URLs, added redirects for anything with value and made sure the sitemap only contains the pages we want indexed. Indexing is also locked to the production domain, so preview deployments never end up in search results.
Locally, things are in good shape. The Google Business Profile ranks first in the map pack for searches like "byron bay matcha". One lesson here: rank trackers can be misleading for local queries. Our tracker reported a big drop for "best matcha near me", but it turned out it was being served Sydney results rather than what someone in Byron Bay would see.
Backlinks are where it gets hard. Third-party tools show hundreds of referring domains for the site, which looks great until you look at them. Nearly all of them are automated spam and "checker" sites that started linking in May 2026 and carry no value. The genuine links are few and far between (and one of them is Pocket Rice, which I will admit is not exactly an independent vote).
What we really want are links from the cafes and businesses we supply, as well as the markets and local guides that already mention the brand. That is harder than it sounds:
Most of the cafes we supply are small, busy hospitality businesses. Adding a link to their supplier is understandably not high on their list.
Some are more active on Instagram than on their own website, so there is not always an obvious place for a link to go.
Market organisers' stallholder pages and local guides often already mention Matcha Byron Bay by name, but do not link to the website.
The blog has been the weakest area so far. It gets plenty of impressions but very few clicks, and some of the older articles overlap and compete with each other. The plan is to consolidate those into fewer, stronger guides with named authors and proper updated dates.
Results so far
It is still early, and the numbers are small enough that I want to be careful with them, but there are some encouraging signs.
At launch, Google's PageSpeed lab tests across 11 equivalent pages had the new site scoring 96 to 100 on mobile and 100 on desktop. For comparison, the old home page scored 83 on mobile.
From the September report (compared to August):
Paid online order value was up roughly 79%, with average order value holding steady.
Google organic clicks were up about 22% and impressions up about 8%, with the average position improving from 11 to 7.8.
The wholesale page roughly quadrupled its organic clicks, and its average position improved from around 19 to around 10.
Experimenting with Google Ads
In September we started running Google Shopping campaigns for the ceremonial matcha and hojicha. Getting there took more work than expected: the Merchant Center feed and the website needed clear shipping, returns and business information before Google was happy to show the products.
The campaigns are delivering clicks, but it is too early to say whether they are worth it. Attribution is the hard part:
Analytics only run once a visitor has consented, which is the right thing to do but leaves gaps.
Checkout happens on Shopify, so the click and the purchase live on different systems.
Google's own conversion tracking has only recorded a small number of purchases so far, and some ad-assisted sales are likely going unattributed.
To close that gap, we built our own purchase attribution. With consent, the campaign tags from the landing page are carried through to the cart, and when Shopify tells us an order has been paid, a background job records the purchase against the original campaign. Until that data is reliable, we are holding off on increasing spend.
What is next
Onboarding the existing wholesale partners onto the portal and measuring how many orders move across.
Getting purchase tracking to a point where we can make real decisions about Google Ads.
Consolidating blog content and earning genuine local backlinks.
Asking customers for reviews once they have received their order.
I may write a follow-up once we have a few more months of data, particularly on the wholesale side.
]]><![CDATA[Building the Pocket Rice marketing website]]>https://blog.dennisokeeffe.com/blog/2026-06-08-building-the-pocket-rice-marketing-website2026-06-08T00:00:00.000Z2026-06-08T00:00:00.000ZOn weekends, I pitch in my time to help my partner run her Onigiri business "Pocket Rice" here in Byron Bay.
As part of her recent push for the business, we set up the Pocket Rice marketing website as means of generating reach within the local region and having a more professional presence.
This blog post gives an overview of the marketing site build and the backend with a core pillar of the build being to keep build costs low.
Website at a high-level
I added the marketing website and backend to a monorepo that I have already been maintaining for other apps that manage our ordering system.
The website itself actually started as a Next.js website that my partner "vibe coded" which I had to take over and optimise for certain desired outcomes (asset optimisation etc.) as well as figure out the infrastructure for.
Initially, the website handed over used the Next.js app router for the backend which I migrated over to a Go HTTP backend with their standard library router. After the migration, I converted the Next.js website to be a static website only.
For hosting, the code is (currently) hosted on GitHub and using GitHub Actions to deploy to AWS via the AWS CDK infrastructure. The repo already had this configured from the order management system application I had already configured, so all I needed to do was add a new stack.
This stack itself hosts everything behind AWS CloudFront which has a number of benefits, but one of those was the ability to alter behaviour based on the route.
All key Next.js static pages are redirected to a private S3 origin to serve static assets and pages, while anything under the /api/* path will be directed to an AWS API Gateway which has a proxy integration to an AWS Lambda running the Golang server.
The following is a simplified look at the architecture:
architecture-beta
group aws(cloud)[AWS]
service visitor(internet)[Visitor]
service cloudfront(cloud)[CloudFront] in aws
service s3(disk)[Private S3 bucket] in aws
service gateway(server)[API Gateway] in aws
service lambda(server)[Go Lambda] in aws
service github(server)[GitHub Actions]
service stripe(cloud)[Stripe]
visitor:R --> L:cloudfront
cloudfront:R --> L:s3
cloudfront:B --> T:gateway
gateway:R --> L:lambda
lambda:B --> T:stripe
github:L --> R:s3
github:B --> R:lambda
There are a number of benefits to this:
The lambda at the expected volume will remain in free tier.
There are no cross-origin resource sharing setups that I need to configure.
We get the benefit of all the security rules and DDOS protections that can be applied directly with a CloudFront origin.
These benefits alone have me incredibly bullish. Because we are using the Golang standard library HTTP router, if we ever outgrow lambda or costs become non-insignificant, it is easy enough to migrate over to an alternative like Elastic Container Service (or anywhere I decide to change hosting to, but ECS can also be an API Gateway target and is easy to migrate to).
It is still early days here, so we will be looking to drive traffic and partnerships going forward for this.
Online store
As part of our expansion online, my partner also wanted to introduce a store to sell Japanese home goods.
Australia is currently going through it's "Japan phase" where everyone is holidaying in Japan and being introduced to Japanese culture. The hope is that this can be a way to connect those positive feelings that Australians have towards Japan and to bring them into homes here.
The website itself has a landing page for the shop.
Online store
As you would expect, each item and variant has its own page for adding to a cart.
Item detail page
We are using Stripe checkout to manage our payments and manually doing shipments ourselves.
Other key pages
In addition to this, we also have a few other key pages to help with organic traffic or things that we wanted to highlight.
Our markets page highlights where people can find us.
We list all the markets we participate or have participated in
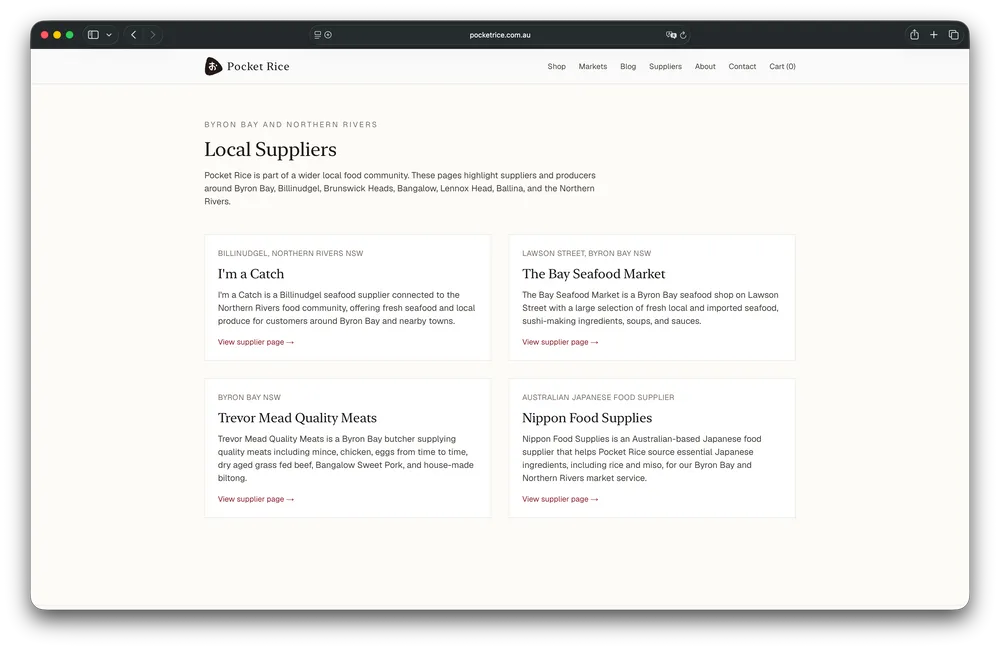
We list our suppliers that we use for our onigiri as well to also highlight our local community members and importers.
Our suppliers page
Finally we have a contact page to have a way for others to contact us.
Things that I am also doing at the moment include indexing for other search engines as well as working through some SEO books. I've given myself 12 weeks from the first release of the website in order to see if I can start ranking highly across the web for our Pocket Rice brand in key categories such as markets to see and food you must eat. I may even write a follow-up post on how success is going in that area.
]]><![CDATA[Two Pointers]]>https://blog.dennisokeeffe.com/blog/2026-05-07-two-pointers2026-05-07T00:00:00.000Z2026-05-07T00:00:00.000ZTwo pointers is one of the highest ROI patterns for interview prep.
The main reason is not that the implementation is complicated. It usually is not. The value is in learning how to recognize when the problem is giving you permission to do less work.
If an array is sorted, or if a string can be scanned from both ends, or if you are really maintaining a shrinking window, there is a good chance a pointer-based approach is available.
This post starts with a walkthrough of one of the more common patterns you begin with online and then adds some other examples and visuals for other solutions.
Pair Sum - Sorted
Let us start with a classic prompt:
Given a sorted array of integers nums and a target target, return the indices of the two numbers that add up to the target.
The expected answer is [1, 5] because nums[1] + nums[5] = 2 + 8 = 10.
Brute force intuition
The most direct thought is normally: try every pair.
export function pairSumSortedBruteForce(nums, target) {
  for (let i = 0; i < nums.length; i++) {
    for (let j = i + 1; j < nums.length; j++) {
      if (nums[i] + nums[j] === target) {
        return [i, j];
      }
    }
  }
  return [];
}
This is a perfectly fine place to begin in an interview because:
It is correct.
It gives you a baseline.
It makes the inefficiency obvious.
The problem is the nested loops. In the worst case, you check almost every pair, which gives O(n^2) time.
What the brute-force version misses is that the input is already sorted.
That one detail changes everything.
The two pointers idea
If the array is sorted, then the leftmost value is the smallest and the rightmost value is the largest.
That means each comparison gives us directional information:
If the sum is too small, move left right to increase the sum.
If the sum is too large, move right left to decrease the sum.
If the sum matches, we are done.
Instead of restarting work for every element, we keep squeezing the search space inward.
export function pairSumSorted(nums, target) {
  let left = 0;
  let right = nums.length - 1;

  while (left < right) {
    const sum = nums[left] + nums[right];

    if (sum === target) {
      return [left, right];
    }

    if (sum < target) {
      left += 1;
    } else {
      right -= 1;
    }
  }

  return [];
}
This drops the runtime to O(n) and keeps space at O(1).
Why the sorted property matters
Without sorting, moving a pointer left or right would not reliably tell us whether the sum should go up or down.
With sorting:
Moving left right always gives a value that is the same or larger.
Moving right left always gives a value that is the same or smaller.
That monotonic behavior is what makes the pointer movement safe.
Faster alternatives when the input is not already sorted
This post is centered on the sorted version of the problem, but in practice you will often be asked the unsorted variant too.
There are two common follow-up paths.
Sort first, then scan
If you want to keep the two-pointer strategy, you can sort first.
The catch is that if the problem asks for the original indices, you need to keep them around while sorting.
export function pairSumWithSort(nums, target) {
  const pairs = nums.map((value, index) => ({ value, index }));
  pairs.sort((a, b) => a.value - b.value);

  let left = 0;
  let right = pairs.length - 1;

  while (left < right) {
    const sum = pairs[left].value + pairs[right].value;

    if (sum === target) {
      return [pairs[left].index, pairs[right].index];
    }

    if (sum < target) {
      left += 1;
    } else {
      right -= 1;
    }
  }

  return [];
}
Complexity:
O(n log n) time because sorting dominates.
O(n) space because we store value/index pairs.
I like this version when the conversation is specifically about pointer patterns, because it shows you understand how to preserve the property you need.
Hash map lookup
If the array is unsorted and you want the fastest lookup-based solution, a hash map is usually the better fit.
export function pairSumHashMap(nums, target) {
  const seen = new Map();

  for (let i = 0; i < nums.length; i++) {
    const complement = target - nums[i];

    if (seen.has(complement)) {
      return [seen.get(complement), i];
    }

    seen.set(nums[i], i);
  }

  return [];
}
Complexity:
O(n) time.
O(n) space.
The trade-off is clean:
Two pointers needs sorted order but uses constant extra space.
Hash map works on unsorted input but spends extra memory.
Identifying the pattern
When I read a problem like this, I mentally check for these clues.
1. Is the input sorted?
This is the loudest hint.
If the data is sorted and the task involves pairs, ranges, or comparing extremes, two pointers should immediately be on the shortlist.
2. Am I asked about a pair, triplet, or contiguous range?
Problems involving:
two numbers,
three numbers,
a window over a string or array,
often become pointer problems once ordering is useful.
3. Does each comparison eliminate possibilities?
This is the real question.
If one comparison tells you "everything to the left is now too small" or "everything to the right is now too large", the problem is probably pointer-friendly.
4. Am I repeatedly rescanning work?
If your brute-force version uses nested loops, ask whether a pointer can carry forward information from the last comparison instead of starting over.
Tips and tricks
Say the invariant out loud
For this problem, the invariant is that the answer, if it exists, must stay inside the current [left, right] range.
When the sum is too small, moving right would only make things smaller or equal, so the only useful move is left += 1.
Ask whether the array is already sorted
If the prompt does not say so, ask.
That one clarification can change the best solution from hash map to two pointers.
Watch the output requirements
If the question wants original indices and you decide to sort, preserve the indices before sorting.
Distinguish pattern from implementation
The pattern is not just "have two variables called left and right".
The pattern is using structure in the input so pointer movement is meaningful.
Two-pointer traversals
There are three two-pointer strategies to know about:
Inward traversal.
Unidirectional traversal.
Staged traversal.
Inward traversal
The two pointers start at opposing ends and work towards each other.
Common examples:
Valid Palindrome
Two Sum II - Input Array Is Sorted
Container With Most Water
Unidirectional traversal
Both pointers start at the same end of the data structure.
Common examples:
Is Subsequence
Remove Duplicates From Sorted Array
Move Zeroes
Staged traversal
One pointer establishes context first, and then another pointer pair or follow-up pointer traversal takes over within that smaller search space.
Common examples:
3Sum
4Sum
Trapping Rain Water when you reason in phases around boundary pointers
Similar problems worth practicing
These names are often used as standard interview-problem titles, but the useful part is the pattern hiding underneath each one.
Valid Palindrome: compare characters from the outside in
You place one pointer at the start of the string and one at the end.
If the characters match, move both inward. If they do not, the string is not a palindrome. This is one of the clearest examples of two pointers on a string.
Is Subsequence: scan one string while trying to consume the other
This is another useful string variant, but the pointers do different jobs.
One pointer walks through s, the smaller string we want to match.
The other pointer walks through t, the larger string we are scanning.
When the characters match, advance both pointers.
When they do not match, only advance the pointer in t.
If the pointer in s reaches the end, then every character in s appeared in order inside t.
function isSubsequence(s: string, t: string): boolean {
  let i = 0,
    j = 0;

  while (i < s.length && j < t.length) {
    if (s[i] === t[j]) {
      i++;
    }

    j++;
  }

  return i === s.length;
}
Two Sum II: find a pair in a sorted array
This is basically the same shape as the pair sum problem we just walked through.
The array is sorted, so each sum tells you whether to move the left pointer right or the right pointer left.
The main twist is that the answer must be returned as 1-indexed positions.
One small correction to the implementation you pasted: right should start at numbers.length - 1, not numbers.length, otherwise the first lookup is out of bounds.
function twoSum(numbers: number[], target: number): number[] {
  let left = 0;
  let right = numbers.length - 1;

  while (left < right) {
    const sum = numbers[left] + numbers[right];

    if (sum === target) {
      return [left + 1, right + 1];
    }

    if (sum < target) {
      left++;
    } else {
      right--;
    }
  }

  return [];
}
Quick guidance:
left starts at the smallest value.
right starts at the largest value.
If the sum is too small, move left right.
If the sum is too large, move right left.
Return left + 1 and right + 1 because the problem is 1-indexed.
3Sum: reduce a triplet problem into repeated pair searches
You sort the array, fix one number, and then use two pointers on the remaining suffix to look for the other two values.
This is a good example of how one pointer pattern can become a building block inside a larger solution.
function threeSum(nums: number[]): number[][] {
  nums.sort((a, b) => a - b);
  const results: number[][] = [];
  const n = nums.length;

  for (let i = 0; i < n - 2; i++) {
    if (i > 0 && nums[i] === nums[i - 1]) continue;

    let left = i + 1;
    let right = n - 1;

    while (left < right) {
      const sum = nums[i] + nums[left] + nums[right];

      if (sum === 0) {
        results.push([nums[i], nums[left], nums[right]]);

        while (left < right && nums[left] === nums[left + 1]) left++;
        while (left < right && nums[right] === nums[right - 1]) right--;

        left++;
        right--;
      } else if (sum < 0) {
        left++;
      } else {
        right--;
      }
    }
  }

  return results;
}
Notes on the solution:
Sorting is what makes the inner left and right movement meaningful.
The outer loop fixes one value, then the inner loop solves a pair-style search for the remaining two values.
You must skip duplicate fixed values, or you will produce duplicate triplets.
After finding a valid triplet, you also skip duplicate left and right values before continuing.
The runtime is O(n^2) because for each fixed index, the inner pointers scan the remaining suffix once.
Container With Most Water: move the side that limits the answer
You start with pointers at both ends and compute the area formed by the two heights.
The key move is to advance the shorter wall, because the shorter wall is currently limiting the area.
Remove Duplicates From Sorted Array: use a slow writer and a fast reader
This is still a two-pointers problem, but the pointers do different jobs.
One pointer scans forward through the array while the other marks where the next unique value should be written.
Squares of a Sorted Array: compare the extremes and fill from the back
When negatives are involved, the largest square may come from either end of the sorted array.
So you compare both ends, place the larger square into the result from right to left, and move the pointer that produced it.
A quick decision guide
If I had to compress the choice into a few lines:
Already sorted and need a pair: start with two pointers.
Unsorted and need the fastest lookup: use a hash map.
Unsorted but want to leverage ordering: sort and then run two pointers.
What comes next
I will keep extending this post with more two-pointers examples.
Next up will likely be problems such as valid palindrome, where the same idea shows up in strings instead of arrays.
The main thing I want to reinforce is this: do not memorize the pointer movement rules in isolation. Train yourself to ask what property of the input makes pointer movement safe.
That is the part that transfers across problems.
]]><![CDATA[Software Interview Guideline 2026 (Australian edition)]]>https://blog.dennisokeeffe.com/blog/2026-05-01-software-interview-guideline-20262026-05-04T00:00:00.000Z2026-05-04T00:00:00.000ZFor reasons outside the scope of this post, I am putting the feelers out there to explore the market.
My last interview was back in November 2023, which in this day and age can be appropriately measured by available LLM models: Claude 2.1, GPT 4-Turbo and Gemini 1.0 Pro. Yes, that long ago.
As Seneca says, "Luck is where opportunity meets preparation". This post covers my attempt to reconcile previous approaches to software interviews alongside any tidbits of information I can find from my network and beyond.
I will be covering resources around the following topics:
The job market.
What job interviews look like.
How to prepare for interviews.
Advice on your applications.
Given the scope of software engineering, there is no point in pretending there is a one-size-fits-all scope.
Instead, this post is more of an anchor that links out where appropriate and gives my two cents (it is my blog after all).
A guiding principle to abide by in the age of agents
Before going any further, there is a quote from a tweet that I have been thinking about a lot:
You can outsource thinking but you cannot outsource your understanding.
In this day and age, this hits hard.
AI is tool to be used, but it can be a slippery slope. You need to best be able to determine when the use and costs are a net win and have the discipline of when to say no.
My current mindset: there is a place for delegating, vibe coding and multitasking, but it is your responsibility to be aware of the where and when. When it comes to guiding AI for anything mission critical, you need to be the driver. Don't slip into the habit of spinning the poker machine.
We will touch on AI a bit more later, but I think addressing the elephant in the room early is an appropriate starting point.
The job market
TrueUp is a great companion on our search to understand the job market. It scans the tech job market in realtime and provides a trends section.
Some of the positive notes (from the time of writing):
The number of tech jobs has been steadily increasing since the low of 2023.
The remote job options have remained fairly steady, with a recent increase happening.
(For more own sanity) Australia sits at #10 for top countries for tech.
The latest data here from April 6th, 2026 indicates that in Australia there are 55,200 employed software engineers.
Based on TrueUp's data, there looks to be around 663 software engineer jobs advertised, which would indicate ~1% of the total employed work force.
As a not-very-science-y pulse check on LinkedIn for software engineering jobs in Australia, I paginated through ~34 pages of 20 jobs each (680) and they all still had "engineer" in the title. Make of that what you will (I will come back with a better approach when I get a free moment in future).
All-in-all, if you have come here fearing doom-and-gloom then fear not my friends. Our time is coming again!
As for finding available jobs, here is a list of potential job search websites (in no particular order):
If you are interested in specific companies, then I also recommend going straight to their own advertised jobs board.
If you are open to any jobs and don't mind someone coming to you with options, chat to a recruiter.
What do the job interviews look like?
In my general experience, the bulk of the interviews you will do are this:
First screening.
Technical interview(s).
System design interview.
Behavioral interview.
Depending on the your field of engineering (e.g. if you are a solution's engineer), you may find some variance but these have been at the core of my experience.
This looks to be aligned with the Tech Interview Handbook, a guide that I came across which has a walkthrough on interview preparation.
The link also contains some really good links to courses and preparation tools, but my own personal comments on that link from my own experience:
The site puts "Take home assignment" as rare but my experience has been to get one ~40% of the time.
A "quiz" is said to be occasional for a quick filter, but admittedly I've never really done one.
It also recommends a coding interview study plan of 11 hours a week for three months. In my honest opinion, that feels overkill (assuming this is not your first time with preparation).
What I would do before committing to a timeline is look for feedback on the existing interview processes of the jobs you are interested in and then narrow down what you need to be prepped for.
An example: In Australia, one job link shared with me was a role as a Software engineer at Macquarie Group. I'm not personally interested in this role, but assuming I am then I generally do a few things:
As an example (from the above three links), I can grok the follow for mid-level software engineers:
They earn AUD$90K-130K per year.
Their interview process has a minimum of three rounds.
Previous interviewees indicate a technical interview with a live coding session over (at minimum) a four week process.
Understanding this process goes a long way to getting a better idea about the process prior to your initial contact.
Technical interviews
My honest experience with technical interviews is this: if I grok the question and can quickly ascertain the correct path to go down, it's normally pretty straight forward. If I don't, it's a massive slog and sometimes a miserable failure.
Few love the idea of writing code under interview conditions, but it is still something best to prepare for.
For Leetcode-style interviews, Algomonster have a "return on investment" style layout for tech interview preparation that reflects a lot of my own experience.
It outlines problem-solving approaches and your likelihood to run into those style questions:
Approach
Difficulty to Learn
Return on Investment
Two Pointers
Easy
High
Sliding Window
Easy
High
Breadth-First Search
Easy
High
Depth-First Search
Medium
High
Backtracking
High
High
Heap
Medium
Medium
Binary Search
Easy
Medium
Dynamic Programming
High
Medium
Divide and Conquer
Medium
Low
Trie
Medium
Low
Union Find
Medium
Low
Greedy
High
Low
If you are short on time, I recommend at least working through the high ROI problem solving approaches.
Some websites with an array of problems on those topics:
These same websites can also provide varying levels of online content for learning as well.
In addition to the above websites, I've also found ByteByteGo to be a great resource for books that comes with great visual guidelines.
Each of these are paid solutions which come with their own cost. Over the coming weeks I will also likely introduce my own online blog resources to help with some interactive learning.
Most of my personal experience with technical interviews have been fairly straightforward, but you need to be able to ask the right questions and quickly identify which approach to take. There have still been times when I've flunked straightforward questions.
Admittedly, I've never had to do any interviews when I "invert a binary tree" or anything of the sort. Seems impractical to test on but there are horror stories out there.
System design interview
For me, system design interviews feel like my bread and butter. I find them much more practical in my day-to-day work and I find them more intuitive to reason through.
My experience is normally to follow my own acronym CASMHDR:
Letter
Stands for
Meaning
C
Clarify
Clarify the problem/desired outcomes
A
API Design
Think through and design API interfaces
S
Storage requirements
Consider storage systems (DBs etc) and back-of-the-envelope size estimations
M
Models
Think through the data models within the system
H
High-level design
Start with the high-level design
D
Detailed design
After agreeing on the high-level design, work through something more detailed
R
Review, repeat
Work back over the system design and look for opportunities to improve or explain trade-offs
The acronym itself is not something that I've taken from a course. It's just my lightweight go-to approach for something short like system design interviews.
I've personally committed the analogy of "crossing the chasm in high definition" to memory in order to remember the acronym, and so it's something that is always in my back pocket for working through problems.
System design interviews are generally open-ended and are an open discussion with the interviews. Working through clarifying the problem with clear communication (to me) feels like half the battle.
Some resources:
ByteByteGo has a very detailed system design course and book.
I don't have a table to indicate any return on investment for resources here, but some key topics it is worth getting a high-level overview of at a minimum (based on my experience):
Caching
Consistency
Content Delivery networks (CDNs)
Reliability
Fault tolerance
Idempotency
Rate limiting
Message queues
I/O bound vs compute bound
Most of my system design interviews have focused on implementation of high-level systems. There requirements have never been as extreme as what is covered in the system design books and courses I have taken.
My general guideline would be this:
Clarify requirements and scale estimation. Questions like "how many users?", "how many requests do we expect?", "are loads consistent or spiky?", "what are the payloads and how large are we expecting?" and "are there times with lower and higher traffic?" are some of my gotos.
Jot down the key data models that the system will be working with based on the information. Clarify their properties and be prepared to re-model during review time.
Start as simple as possible for your first high-level overview. My first pass is almost always a standard three-layer system. On your second pass, introduce systems alongside reasoning as you go through the "review" phase and then repeat the process to add those elements in.
For databases, start relational until you can introduce reasoning for not doing so.
Look for opportunities to scale and/or reduce the load for key servers. Introduce things like rate limits, queues as needed.
Also spend time reviewing the solution and offering suggestions on improvements or when changes would be needed in future. Systems are fluid and different solutions optimize for different scenarios.
My experience is that there is never really a "right answer". It more of a conversation with the interviewers around what solutions would you suggest to look into based on X requirements.
Behavioral interviews
This one for me has always felt more vague than the others. When most companies ask "why do you want to work for X company?", my honest answer has been "to keep a roof over my head" but that doesn't fly so well.
Interviewers seem more interested in my business pursuits than my side projects.
Prepares your stories/approaches on conflict resolution.
Be ready to explain why are you looking for your next role and why this role specifically (again, steer away from the bottom of Maslow's Hierarchy of Needs).
Prepare some notes on some of your career work that you are most proud of. If possible, pick a few moments that can speak to from complementary domains (technical, communication, management etc.).
What about AI interviews?
This is where my experience screeches to a halt. From conversations with peers, some key points that they have mentioned:
Some live coding exams do not allow AI.
There are general conversations around how you use AI in your workflow.
Another peer shared through a LinkedIn post on 20 AI fluency interview questions. Some of the slides to me feel a little off but I think understanding some of ubiquitous language used around AI is important for expressing your own experiences with it.
Concepts around agents, memory, harnesses, skills, tools are all key concepts to know, and safely executing agents is another hot topic right now.
If you haven't spent time working with AI, dip your toes in and form your own opinion.
Assuming I am to talk about my use of AI tooling in upcoming interviews, I would probably be honest and just refer to the challenges and benefits I have personally seen.
Some key experiences off the top of my head:
It has been a force multiplier for tedious tasks. Examples like linking JIRA tickets and merge requests for security patches are now delegated and save me an hour or so each time.
Code outputs have been a mixed bag. I find that a "clean" codebase with strict standards and guidelines have been easier to work it than others and tooling I hadn't used before like open telemetry on localhost have become indispensable tools for agent verification.
Multi-tasking across multiple agents introduces significant brain strain for me. This leads to sleepiness and a tendency to slide in standards. I personally opt to spend a few hours a day working without AI when I need a flow state and I also look for tasks that it can significantly outpace me without burdening me with unexpected work.
It's very easy to "do everything" now that clicking "continue" is an option. My experience with AI is that you need to put on your product hat and understand when to say no.
AI is incredible when it comes to collating debugging information that you collect and actioning it.
I will update this section in future as I begin the interview process and give some updates on when AI comes into the process.
Advice on your applications
For this section, I would take anything I say with a grain of salt. I am constantly hounded in my reviews about how my resume looks so you are better off deferring to others on this boat.
This has been my own guidance to software engineering interviews in 2026 built upon previous experience and my own expectations of what to expect in the upcoming process.
My hope is that there are some nuggets of wisdom embedded within this that can assist in your own search for work.
I will continue to update this page as the process goes on or as I get more feedback from peers. If you have any recommendations that you aren't pushing for your own agenda, send them through and I will update the page.
]]><![CDATA[Using BuildKite with AWS CodeBuild]]>https://blog.dennisokeeffe.com/blog/2026-04-09-using-buildkite-with-aws-codebuild2026-04-03T00:00:00.000Z2026-04-03T00:00:00.000ZI've been looking for alternatives to GitHub Actions for running my CI/CD pipelines. I have previously had a good experience with Buildkite (albeit circa 2018), but pre-revenue I am looking at avenues for reducing costs as much as possible without requiring any significant refactors later on.
Although BuildKite offers some recommended templates for AWS that can scale CI alongside your team, I have been keen to first check out a more controlled approach with AWS CodeBuild which I believe can enable some cost-savings early in the project.
This blog post is a recap on my own internal investigation into configuring this setup.
Overview
The blog post covers my proof-of-concept. In it, we still host code on a private GitHub repository but creating a pull request should trigger CI to run with BuildKite + CodeBuild.
We will be using the AWS CDK to configure as much as possible for this, but there will still be some requirements where you will need to jump onto the AWS dashboard.
The desired outcome here is to run a simple build which makes use of AWS CodeBuild. Do not expect anything more advanced in this tutorial. I will cover more advanced use cases in future blog posts.
The following sequence diagram is an overview of our desired workflow for this post:
sequenceDiagram
actor Local
participant GitHub
participant Buildkite
participant CodeBuild as AWS CodeBuild
Local->>GitHub: git push
GitHub->>Buildkite: Push webhook
Buildkite->>Buildkite: Trigger pipeline build
Buildkite->>Buildkite: Schedule job
Buildkite->>CodeBuild: Webhook notification for scheduled job
CodeBuild->>CodeBuild: Provision runner environment
CodeBuild->>CodeBuild: Start Buildkite agent
CodeBuild->>Buildkite: Agent registers / requests work
Buildkite-->>CodeBuild: Dispatch scheduled job
CodeBuild->>CodeBuild: Run job steps
CodeBuild-->>Buildkite: Send logs and job result
Prerequisites
You need the following already configured if you are following along with this tutorial:
A Buildkite account.
A GitHub account.
A prepared, private GitHub repository.
An AWS account.
The following is also recommended:
Experience with the AWS CDK for declaring infrastructure-as-code.
Experience with managing GitHub repositories.
Configuring a deploy key for your private GitHub repository
Assuming that you have already prepared a private Github repository for this tutorial, you will need to configure a deploy key so that Buildkite can access this private repository.
From the command line, you can run the following:
# Generate the key at ~/.ssh/buildkite-codebuild-poc
$ ssh-keygen -t ed25519 -C "buildkite-codebuild-poc" -f ~/.ssh/buildkite-codebuild-poc
When generating a key, do not add a passphrase as this key will be used by the Buildkite agent.
If created successfully, it should output both the public key ~/.ssh/buildkite-codebuild-poc.pub and the private key ~/.ssh/buildkite-codebuild-poc.pub.
You first need to add the public key to your private GitHub repository as a deploy key. You can find this under your private repository settings.
The private key itself will need to be added as a secret for your Buildkite agent.
Setting the private deploy key as a Buildkite agent secret
While I won't be deep diving into these terms, please note that will be touching on all of these at some point.
To add your private key as a secret, head to the Buildkite dashboard and then go to your selected agent cluster. If you do not have one configured, select your default cluster.
From within your cluster, there will be a setting option for Secrets. Add your secret under our very apt key name SUPER_SECRET_SSH_KEY. This will map across to our Buildkite pipeline configuration we add later.
Getting an agent token for your Buildkite cluster
Next, you will need to configure an agent token. This token while be used by AWS components in order for communication between CodeBuild and Buildkite.
Within your same selected agent cluster, there will be a setting option for Agent Tokens. Create an agent token from within this UI.
For agent tokens, you can also lock down which inbound IP addresses are allowed. For this post, we will just allow all IP addresses for now.
Creating a Buildkite pipeline
Follow the Buildkite Pipelines UI and create a new pipeline. As part of this process, you will need to select your private GitHub repository to use.
Be sure that you select the pipeline to run from the agent that you have already configured with the secrets.
When creating, be sure to leave "auto-create webhooks" on so that Buildkite will create the webhooks for you within the Github repository.
As for the section about the "script" to run, add the following YAML:
Albeit we haven't wrote any code yet, the pipeline code about does the following:
Runs a script from ./scripts/hello-world.sh.
Makes use of a plugin git-ssh-checkout which makes use of our deploy key to authorize the pipeline to pull down the codebase.
Sets the agent to run on the default-queue where we expect the project name to be codebuild-buildkite-codebuild-poc-runner.
At this point, our Buildkite configuration is ready to go, but we need to configure AWS to run.
Writing the CodeBuild Foundation CDK stack
For our configuration with the AWS CDK, we will be deploying two stacks:
A "foundation" stack which sets up our AWS SecretsManager secret as well as an AWS CodeConnection which authorizes CodeBuild with GitHub.
A "runner" stack which will create our AWS CodeBuild build service.
First, we need to configure the foundation stack. I will be doing so in TypeScript.
If you have not yet configured it, please follow the AWS CDK guide to initializing a stack.
Within lib/buildkite-foundation-stack.ts, add the following code:
import * as cdk from "aws-cdk-lib";
import * as codeconnections from "aws-cdk-lib/aws-codeconnections";
import * as secretsmanager from "aws-cdk-lib/aws-secretsmanager";
import * as ssm from "aws-cdk-lib/aws-ssm";
import { Construct } from "constructs";

const buildkiteAgentTokenSecretName =
  "buildkite-codebuild-poc/buildkite-agent-token";
export const codeConnectionsArnParameterName =
  "/buildkite-codebuild-poc/codeconnections-arn";

export class BuildkiteFoundationStack extends cdk.Stack {
  public readonly buildkiteAgentTokenSecretName = buildkiteAgentTokenSecretName;

  constructor(scope: Construct, id: string, props?: cdk.StackProps) {
    super(scope, id, props);

    const buildkiteAgentToken = new cdk.CfnParameter(
      this,
      "BuildkiteAgentToken",
      {
        type: "String",
        noEcho: true,
        description: "Buildkite agent token from your Buildkite cluster.",
      }
    );

    const existingCodeConnectionsArn = new cdk.CfnParameter(
      this,
      "ExistingCodeConnectionsArn",
      {
        type: "String",
        default: "",
        description:
          "Optional existing authorized AWS CodeConnections ARN. Leave empty to let this stack create the connection resource.",
      }
    );

    const createCodeConnection = new cdk.CfnParameter(
      this,
      "CreateCodeConnection",
      {
        type: "String",
        default: "true",
        allowedValues: ["true", "false"],
        description:
          "Set to true to create the CodeConnections resource in this stack. You must still authorize it in the AWS console.",
      }
    );

    const codeConnectionName = new cdk.CfnParameter(
      this,
      "CodeConnectionName",
      {
        type: "String",
        default: "buildkite-github",
        description: "Name to use when CreateCodeConnection=true.",
      }
    );

    const useManagedCodeConnection = new cdk.CfnCondition(
      this,
      "UseManagedCodeConnection",
      {
        expression: cdk.Fn.conditionEquals(
          createCodeConnection.valueAsString,
          "true"
        ),
      }
    );

    const agentTokenSecret = new secretsmanager.CfnSecret(
      this,
      "BuildkiteAgentTokenSecret",
      {
        name: buildkiteAgentTokenSecretName,
        description:
          "Buildkite agent token for the CodeBuild-hosted Buildkite runner proof of concept.",
        secretString: buildkiteAgentToken.valueAsString,
      }
    );

    const managedCodeConnection = new codeconnections.CfnConnection(
      this,
      "ManagedCodeConnection",
      {
        connectionName: codeConnectionName.valueAsString,
        providerType: "GitHub",
      }
    );
    managedCodeConnection.cfnOptions.condition = useManagedCodeConnection;

    // A CodeConnections resource can be provisioned by CloudFormation, but the
    // GitHub authorization handshake still needs to be completed in the console.
    const effectiveCodeConnectionsArn = cdk.Fn.conditionIf(
      useManagedCodeConnection.logicalId,
      managedCodeConnection.attrConnectionArn,
      existingCodeConnectionsArn.valueAsString
    ).toString();
    const buildkiteAgentTokenSecretArn =
      secretsmanager.CfnSecret.arnForSecret(agentTokenSecret);

    new ssm.StringParameter(this, "CodeConnectionsArnParameter", {
      parameterName: codeConnectionsArnParameterName,
      stringValue: effectiveCodeConnectionsArn,
      description:
        "CodeConnections ARN used by the Buildkite CodeBuild runner stack.",
    });

    new cdk.CfnOutput(this, "BuildkiteAgentTokenSecretName", {
      value: this.buildkiteAgentTokenSecretName,
      description:
        "Secrets Manager secret that stores the Buildkite agent token.",
    });

    new cdk.CfnOutput(this, "BuildkiteAgentTokenSecretArn", {
      value: buildkiteAgentTokenSecretArn,
      description: "Secrets Manager ARN for the Buildkite agent token secret.",
    });

    new cdk.CfnOutput(this, "CodeConnectionsArnOutput", {
      value: effectiveCodeConnectionsArn,
      description:
        "CodeConnections ARN for the repository provider used by the runner project.",
    });

    new cdk.CfnOutput(this, "CodeConnectionsArnParameterName", {
      value: codeConnectionsArnParameterName,
      description:
        "SSM parameter name that stores the CodeConnections ARN for the runner stack.",
    });

    new cdk.CfnOutput(this, "ManagedCodeConnectionArn", {
      value: managedCodeConnection.attrConnectionArn,
      description:
        "Authorize this connection in the AWS console before deploying the runner stack.",
      condition: useManagedCodeConnection,
    });

    new cdk.CfnOutput(this, "ManagedCodeConnectionStatus", {
      value: managedCodeConnection.attrConnectionStatus,
      description:
        "The managed CodeConnections status. It remains pending until the GitHub authorization is completed.",
      condition: useManagedCodeConnection,
    });
  }
}
As mentioned previously, this code will set up our Buildkite agent secret within AWS SecretsManager and also prepare our CodeConnection to GitHub.
The latter requires a manual step, so we will need to deploy this stack and then jump into the AWS dashboard to finish off the authorization.
Before doing that, we will finish off our "runner" stack as well.
Writing the CodeBuild Runner CDK stack
Within lib/codebuild-runner-stack.ts, add the following code:
import * as cdk from "aws-cdk-lib";
import * as codebuild from "aws-cdk-lib/aws-codebuild";
import * as codeconnections from "aws-cdk-lib/aws-codeconnections";
import * as cr from "aws-cdk-lib/custom-resources";
import * as iam from "aws-cdk-lib/aws-iam";
import * as secretsmanager from "aws-cdk-lib/aws-secretsmanager";
import { Construct } from "constructs";

const projectName = "buildkite-codebuild-poc-runner";
const buildkiteAgentTag = `codebuild-${projectName}`;
const buildkiteAgentTokenSecretName =
  "buildkite-codebuild-poc/buildkite-agent-token";

export class BuildkiteCodebuildPocStack extends cdk.Stack {
  constructor(scope: Construct, id: string, props?: cdk.StackProps) {
    super(scope, id, props);

    const buildkiteAgentToken = new cdk.CfnParameter(
      this,
      "BuildkiteAgentToken",
      {
        type: "String",
        noEcho: true,
        description: "Buildkite agent token from your Buildkite cluster.",
      }
    );

    const codeConnectionsArn = new cdk.CfnParameter(
      this,
      "CodeConnectionsArn",
      {
        type: "String",
        default: "",
        description:
          "AWS CodeConnections ARN for the repository provider used by the Buildkite runner project.",
      }
    );

    const createCodeConnection = new cdk.CfnParameter(
      this,
      "CreateCodeConnection",
      {
        type: "String",
        default: "false",
        allowedValues: ["true", "false"],
        description:
          "Set to true to create the CodeConnections resource in this stack. You must still authorize it in the AWS console.",
      }
    );

    const codeConnectionName = new cdk.CfnParameter(
      this,
      "CodeConnectionName",
      {
        type: "String",
        default: "buildkite-github",
        description: "Name to use when CreateCodeConnection=true.",
      }
    );

    const useManagedCodeConnection = new cdk.CfnCondition(
      this,
      "UseManagedCodeConnection",
      {
        expression: cdk.Fn.conditionEquals(
          createCodeConnection.valueAsString,
          "true"
        ),
      }
    );

    const managedCodeConnection = new codeconnections.CfnConnection(
      this,
      "ManagedCodeConnection",
      {
        connectionName: codeConnectionName.valueAsString,
        providerType: "GitHub",
      }
    );
    managedCodeConnection.cfnOptions.condition = useManagedCodeConnection;

    // A CodeConnections resource can be provisioned by CloudFormation, but the
    // GitHub authorization handshake still needs to be completed in the console.
    const effectiveCodeConnectionsArn = cdk.Fn.conditionIf(
      useManagedCodeConnection.logicalId,
      managedCodeConnection.attrConnectionArn,
      codeConnectionsArn.valueAsString
    ).toString();

    // The console-created runner project grants permissions against both the
    // newer codeconnections ARN form and the legacy codestar-connections ARN form.
    const connectionId = cdk.Fn.select(
      1,
      cdk.Fn.split("connection/", effectiveCodeConnectionsArn)
    );
    const codestarConnectionsArn = cdk.Stack.of(this).formatArn({
      service: "codestar-connections",
      resource: "connection",
      resourceName: connectionId,
    });

    const agentTokenSecret = new secretsmanager.CfnSecret(
      this,
      "BuildkiteAgentTokenSecret",
      {
        name: buildkiteAgentTokenSecretName,
        description:
          "Buildkite agent token for the CodeBuild-hosted Buildkite runner proof of concept.",
        secretString: buildkiteAgentToken.valueAsString,
      }
    );

    const serviceRole = new iam.Role(this, "CodeBuildServiceRole", {
      assumedBy: new iam.ServicePrincipal("codebuild.amazonaws.com"),
      description:
        "Service role for the Buildkite runner proof of concept CodeBuild project.",
    });

    // The runner project needs the usual CodeBuild log permissions, read access
    // to the Buildkite agent token secret, and CodeConnections access so CodeBuild
    // can validate and use the linked repository connection.
    const runnerAccessPolicy = new iam.Policy(
      this,
      "CodeBuildRunnerAccessPolicy",
      {
        statements: [
          new iam.PolicyStatement({
            actions: [
              "logs:CreateLogGroup",
              "logs:CreateLogStream",
              "logs:PutLogEvents",
            ],
            resources: ["*"],
          }),
          new iam.PolicyStatement({
            actions: ["secretsmanager:GetSecretValue"],
            resources: [agentTokenSecret.attrId],
          }),
          new iam.PolicyStatement({
            // CodeBuild validates the connection during project updates and uses
            // the connection at job runtime, so it needs more than just UseConnection.
            actions: [
              "codeconnections:GetConnection",
              "codeconnections:GetConnectionToken",
              "codeconnections:UseConnection",
              "codestar-connections:GetConnection",
              "codestar-connections:GetConnectionToken",
              "codestar-connections:UseConnection",
            ],
            resources: [effectiveCodeConnectionsArn, codestarConnectionsArn],
          }),
        ],
      }
    );
    serviceRole.attachInlinePolicy(runnerAccessPolicy);

    const runnerProject = new codebuild.Project(
      this,
      "BuildkiteRunnerProject",
      {
        projectName,
        description:
          "Proof-of-concept CodeBuild project that runs Buildkite jobs in an ephemeral CodeBuild runner.",
        role: serviceRole,
        // Runner builds ignore the project buildspec unless explicitly overridden,
        // but NO_SOURCE projects still require an inline buildspec in the API model.
        buildSpec: codebuild.BuildSpec.fromObject({
          version: "0.2",
          phases: {
            build: {
              commands: [
                'echo "Buildkite runner project uses the managed runner build flow"',
              ],
            },
          },
        }),
        environment: {
          computeType: codebuild.ComputeType.SMALL,
          buildImage: codebuild.LinuxBuildImage.STANDARD_6_0,
        },
        environmentVariables: {
          CODEBUILD_CONFIG_BUILDKITE_AGENT_TOKEN: {
            type: codebuild.BuildEnvironmentVariableType.SECRETS_MANAGER,
            value: buildkiteAgentTokenSecretName,
          },
        },
        queuedTimeout: cdk.Duration.minutes(30),
        timeout: cdk.Duration.minutes(30),
        visibility: codebuild.ProjectVisibility.PRIVATE,
      }
    );

    const runnerProjectResource = runnerProject.node
      .defaultChild as codebuild.CfnProject;
    // Buildkite runner projects created in the console still use NO_SOURCE, but
    // they also carry CodeConnections-backed source auth and clone depth settings.
    // Without these source properties, CreateWebhook(RUNNER_BUILDKITE_BUILD) fails.
    runnerProjectResource.addPropertyOverride("Source.Auth", {
      Type: "CODECONNECTIONS",
      Resource: effectiveCodeConnectionsArn,
    });
    runnerProjectResource.addPropertyOverride("Source.GitCloneDepth", 1);
    runnerProjectResource.addPropertyOverride("Source.BuildSpec", "");

    runnerProject.node.addDependency(agentTokenSecret);
    // Updating the project to use CodeConnections can fail if CloudFormation
    // applies the project update before the runner access policy exists.
    runnerProject.node.addDependency(runnerAccessPolicy);

    const runnerWebhook = new cr.AwsCustomResource(
      this,
      "BuildkiteRunnerWebhook",
      {
        installLatestAwsSdk: false,
        onCreate: {
          service: "CodeBuild",
          action: "createWebhook",
          parameters: {
            projectName,
            buildType: "RUNNER_BUILDKITE_BUILD",
            filterGroups: [[{ type: "EVENT", pattern: "WORKFLOW_JOB_QUEUED" }]],
            // The console includes a default PR approval policy for GitHub-backed
            // Buildkite runner webhooks. Without this field, CreateWebhook returns
            // a generic InvalidInputException for an otherwise valid project.
            pullRequestBuildPolicy: {
              requiresCommentApproval: "ALL_PULL_REQUESTS",
              approverRoles: [
                "GITHUB_WRITE",
                "GITHUB_MAINTAIN",
                "GITHUB_ADMIN",
              ],
            },
          },
          physicalResourceId: cr.PhysicalResourceId.of(
            `${projectName}-buildkite-webhook`
          ),
        },
        onUpdate: {
          service: "CodeBuild",
          action: "updateWebhook",
          parameters: {
            projectName,
            buildType: "RUNNER_BUILDKITE_BUILD",
            filterGroups: [[{ type: "EVENT", pattern: "WORKFLOW_JOB_QUEUED" }]],
            pullRequestBuildPolicy: {
              requiresCommentApproval: "ALL_PULL_REQUESTS",
              approverRoles: [
                "GITHUB_WRITE",
                "GITHUB_MAINTAIN",
                "GITHUB_ADMIN",
              ],
            },
          },
          physicalResourceId: cr.PhysicalResourceId.of(
            `${projectName}-buildkite-webhook`
          ),
        },
        onDelete: {
          service: "CodeBuild",
          action: "deleteWebhook",
          parameters: {
            projectName,
          },
          ignoreErrorCodesMatching: "ResourceNotFoundException",
        },
        policy: cr.AwsCustomResourcePolicy.fromSdkCalls({
          resources: cr.AwsCustomResourcePolicy.ANY_RESOURCE,
        }),
      }
    );

    runnerWebhook.node.addDependency(runnerProject);

    new cdk.CfnOutput(this, "CodeBuildProjectName", {
      value: projectName,
      description:
        "The CodeBuild project name referenced from Buildkite agent tags.",
    });

    new cdk.CfnOutput(this, "BuildkiteAgentTagProjectValue", {
      value: buildkiteAgentTag,
      description: "Use this value in Buildkite YAML as agents.project.",
    });

    new cdk.CfnOutput(this, "BuildkiteWebhookPayloadUrl", {
      value: runnerWebhook.getResponseField("webhook.payloadUrl"),
      description:
        "Copy this into the Buildkite organization webhook URL field.",
    });

    new cdk.CfnOutput(this, "BuildkiteWebhookSecret", {
      value: runnerWebhook.getResponseField("webhook.secret"),
      description:
        "Copy this into the Buildkite organization webhook token field.",
    });

    new cdk.CfnOutput(this, "BuildkiteAgentTokenSecretName", {
      value: buildkiteAgentTokenSecretName,
      description:
        "Secrets Manager secret that stores the Buildkite agent token.",
    });

    new cdk.CfnOutput(this, "CodeConnectionsArnOutput", {
      value: effectiveCodeConnectionsArn,
      description:
        "CodeConnections ARN attached to the Buildkite runner project source auth.",
    });

    new cdk.CfnOutput(this, "ManagedCodeConnectionArn", {
      value: managedCodeConnection.attrConnectionArn,
      description:
        "Authorize this connection in the AWS console before using it for the runner project.",
      condition: useManagedCodeConnection,
    });

    new cdk.CfnOutput(this, "ManagedCodeConnectionStatus", {
      value: managedCodeConnection.attrConnectionStatus,
      description:
        "The managed CodeConnections status. It will remain pending until the GitHub authorization is completed.",
      condition: useManagedCodeConnection,
    });
  }
}
There is a quite a lot going on here, so I will keep what it does as concise as possible:
Provisions a CodeBuild project that runs ephemeral Buildkite agents to execute pipeline jobs
Stores the Buildkite agent token securely in AWS Secrets Manager and injects it at runtime
Supports GitHub integration via AWS CodeConnections (existing or optionally created)
Creates an IAM role with permissions for logs, secrets access, and CodeConnections usage
Configures CodeBuild to act as a Buildkite runner using CodeConnections-backed source auth
Sets up a custom webhook (RUNNER_BUILDKITE_BUILD) to trigger builds from Buildkite events
Ensures correct resource dependencies and deployment order for reliable setup
You will notice the ManagedCodeConnectionStatus is PENDING. In this state, you need to head to your AWS Dashboard and find the correlating code connection to authorize access.
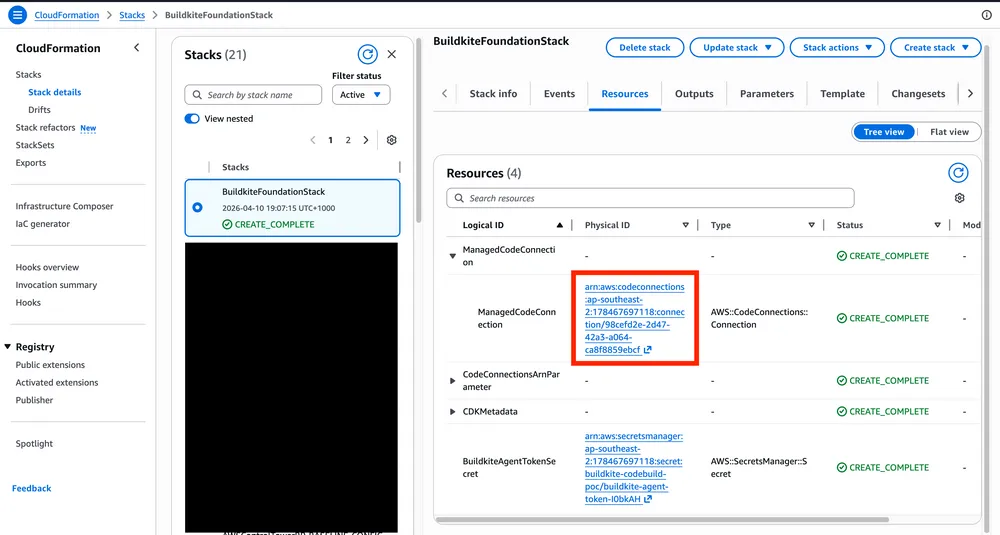
I find this easiest when heading to the CloudFormation dashboard, finding the foundation stack we deployed and clicking through the resource link directly to the code connection page.
Cloudformation dashboard
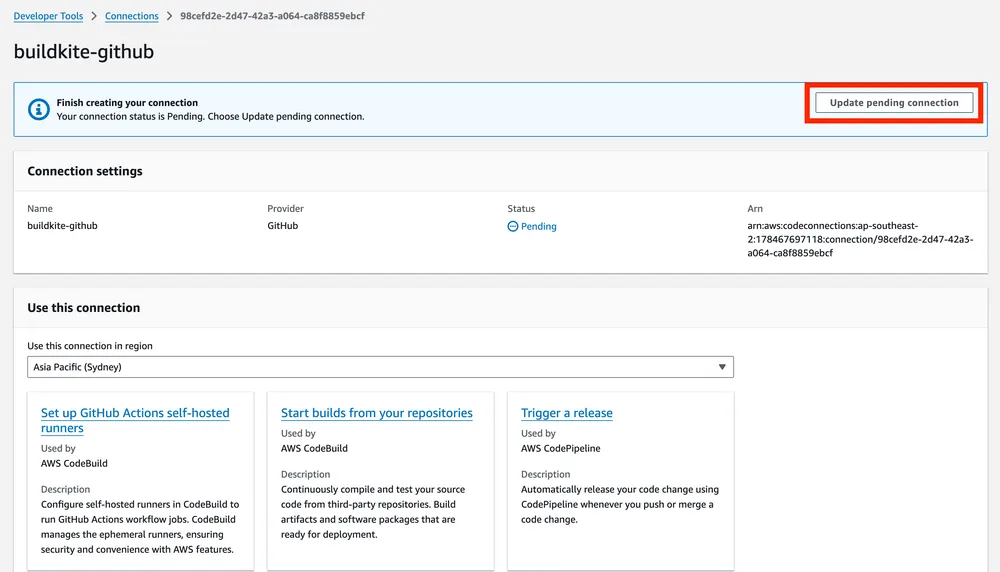
From there, you can find and click through to the pending code connection.
Pending code connection
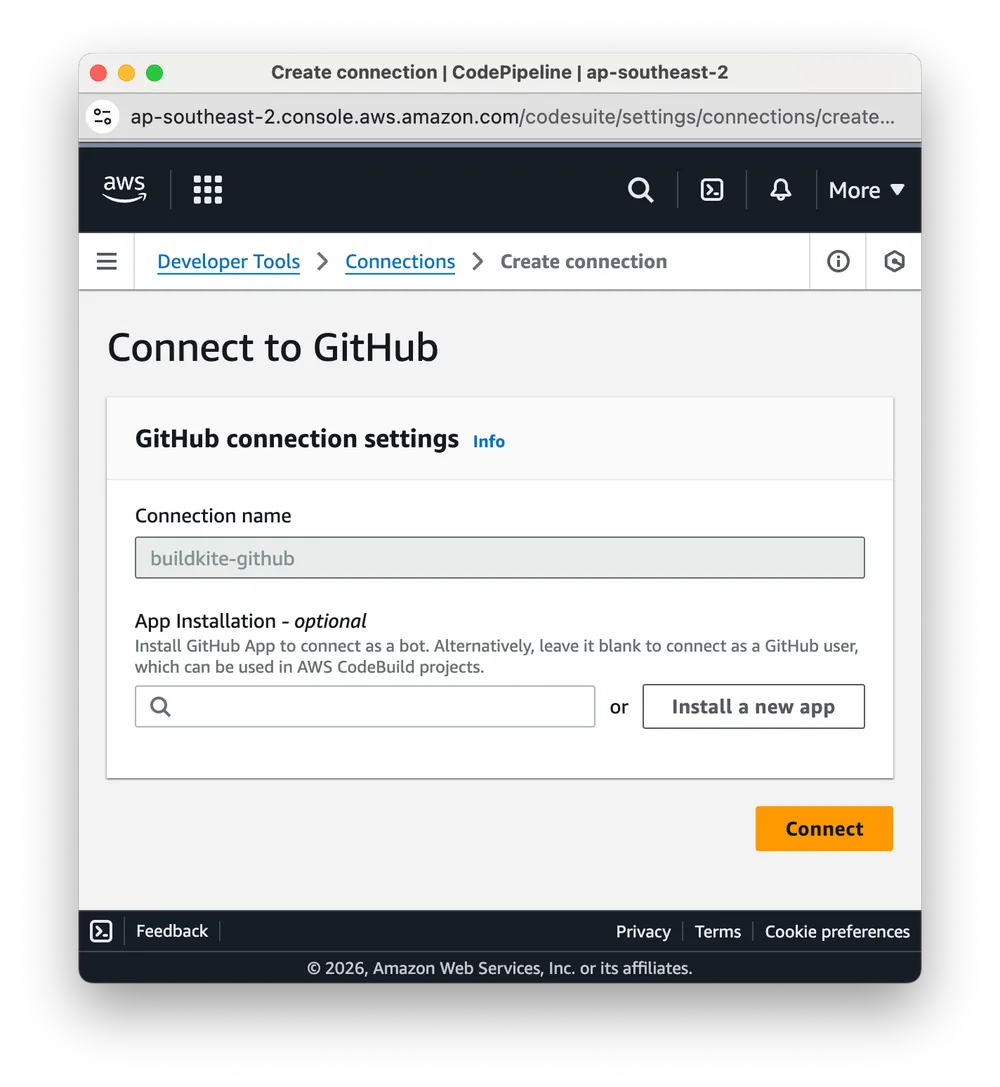
Select to complete the process and you will get a popup:
Pending code connection popup
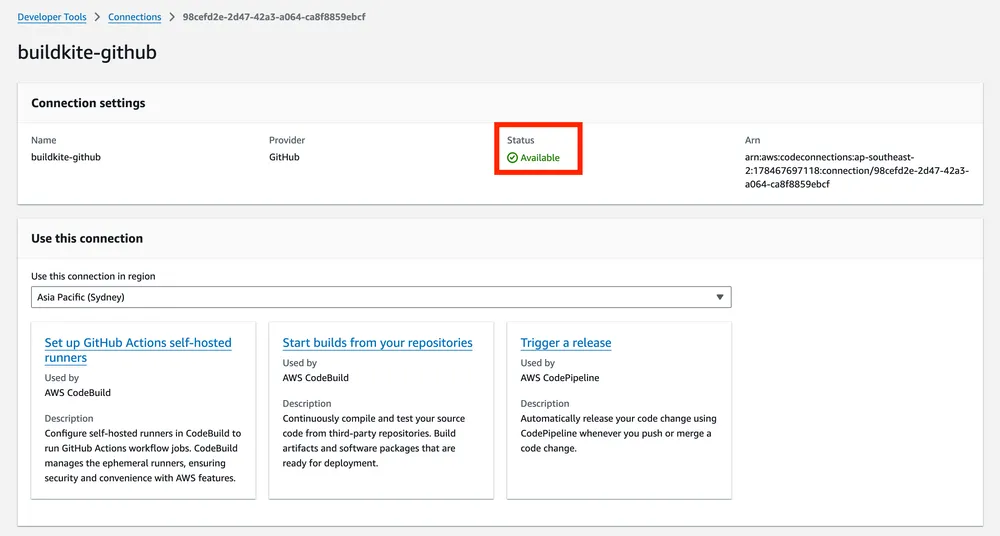
If successful, the connection should move to an available status:
Available code connection
Deploying our CodeBuild Runner CDK Stack
With this configured, we can next deploy our CodeBuild Runner stack with npx cdk deploy BuildkiteRunnerStack.
Once successful, you will get outputs like the following:
You will notice that the BuildkiteAgentTagProjectValue of codebuild-buildkite-codebuild-poc-runner matches what we configured earlier in our Buildkite pipeline YAML.
Add the CodeBuild webhook into Buildkite
Now that we have deployed the resources, you will need to copy the outputs BuildkiteWebhookSecret and BuildkiteWebhookPayloadUrl from the runner stack and add them into your Buildkite Notification Services configuration.
This is found from within your Buildkite organization settings.
Once there, select to add a webhook and set the payload URL as the webhook URL and set the token as the webhook secret. Make sure that it selected for sending the token as X-Buildkite-Token.
For the webhook, you only need to configure notifications for job.scheduled.
Finally, make sure that you set it to only send for our created pipeline.
Pushing our code
Everything should now be configured to run for our Buildkite + CodeBuild set up.
Push your code up to the repository and then check both your Buildkite dashboard as well as your CodeBuild dashboard to confirm everything is now working.
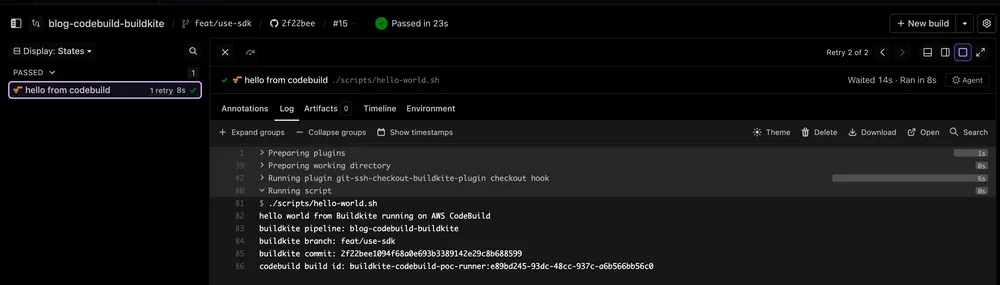
On Buildkite:
Buildkite job
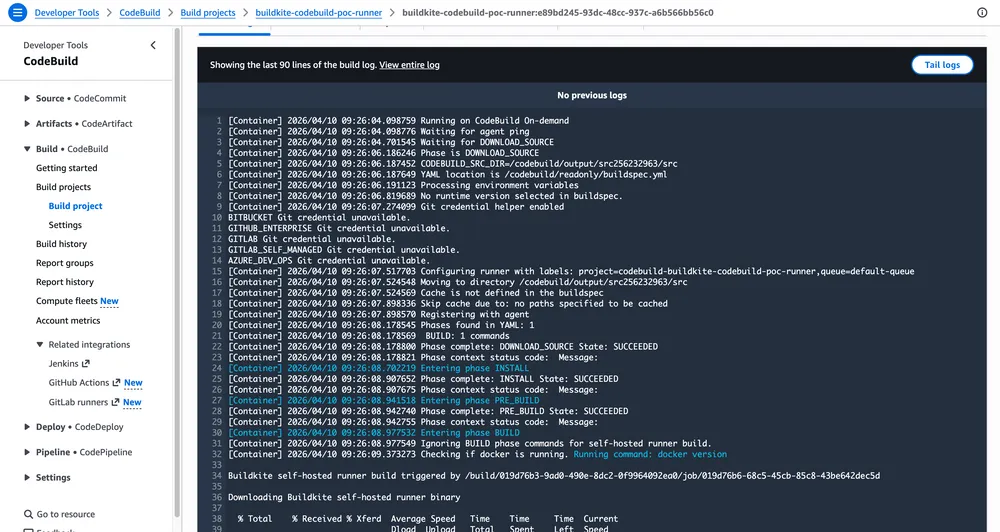
On CodeBuild:
CodeBuild logs
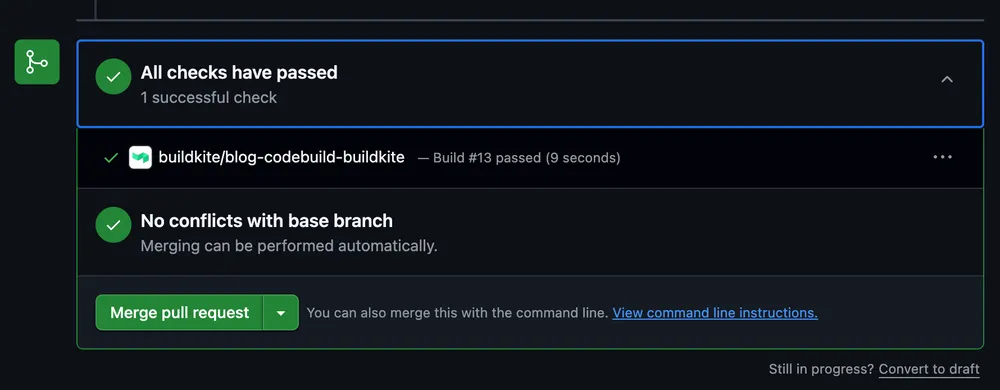
Your GitHub status checks should now also be passing:
GitHub status check
Success!
Conclusion
In this post, I recapped my proof-of-concept for getting Buildkite and AWS CodeBuild working together for a private GitHub repository.
We also used the AWS CDK to configure the AWS portion of the infrastructure.
For further ideas on this project:
Clean up the CDK code further.
Attempt a more complicated pipeline.
Make use of different Docker containers for running the code.
Use another IaC provider to configure the BuildKite portion of the code.
Make use of the Buildkite SDK/CLI for management of the pipeline.
In future posts, I may recap some of these ideas in my own implementation.
]]><![CDATA[Using AWS Bedrock with opencode]]>https://blog.dennisokeeffe.com/blog/2025-11-19-using-aws-bedrock-with-opencode2025-11-19T00:00:00.000Z2025-11-19T00:00:00.000Zopencode is a AI coding agent built for the terminal.
It's extensible nature means that we can configure our own models. This is where AWS Bedrock, an AWS offering for foundational models and agent tools, comes in.
Using AWS Bedrock with opencode
opencode (v1.0.68) will automatically enable AWS Bedrock model selection within the CLI if your terminal environment exports the expected enviornment variables (AWS_ACCESS_KEY_ID, AWS_SECRET_ACCESS_KEY and AWS_REGION). Personally, I make use of aws-vault for managing this.
opencode Bedrock models
AWS Bedrock Foundational models
For some foundational models (such as Claude models), you need to head to Bedrock on the AWS console and submit the use cases for Anthropic.
Use case form for Anthropic
This is a requirement for usage of those models in opencode.
]]><![CDATA[Interface-based functional optionals in Golang]]>https://blog.dennisokeeffe.com/blog/2025-11-16-interface-based-functional-options-in-golang2025-11-16T00:00:00.000Z2025-11-16T00:00:00.000ZThis blog post covers the Functional Options Pattern described within 100 Go Mistakes and How To Avoid Them, then compares some popular Golang repositories for how they handle flexible constructors.
The Functional Optionals Pattern
According to the book, an example of the pattern is as follows:
type options struct {
    port *int
}

type Option func(options *options) error

func WithPort(port int) Option {
    return func(options *options) error {
        if port < 0 {
            return errors.New("port should be positive")
        }
        options.port = &port
        return nil
    }
}

// Usage example:
server, err := httplib.NewServer(
    "localhost",
    httplib.WithPort(8080),
    httplib.WithTimeout(time.Second),
)
An overview for the main idea behind the Functional Options Pattern is this (taken directly from the source):
An unexported struct holds the configuration: options.
Each option is a function that returns the same type: type Option func(options *options) error. For example, WithPort accepts an int argument that represents the port and returns an Option type that represents how to update the options struct.
This enables us to construct a NewServer while maintaining some flexibility and being wary of Golang Zero values:
func NewServer(addr string, opts ...Option) (*http.Server, error) {
    var options options

    for _, opt := range opts {
        err := opt(&options)
        if err != nil {
            return nil, err
        }
    }

    // At this stage, the options struct is built and contains the config.
    // Therefore, we can implement our logic related to port configuration.
    var port int

    if options.port == nil {
        port = defaultHTTPPort
    } else {
        if *options.port == 0 {
            port = randomPort()
        } else {
            port = *options.port
        }
    }

    // ...
}
The first part of the "constructor" function applies the options, the second part handles an nil values to set defaults.
An interface-based option type
Wanting to understand more about "flexibility" with constructors in Golang, I looked to some popular open source projects and saw an approach with gRPC-Go and Uber's Zap logger that look to make use of an interface that has an apply function defined within it.
Interestingly enough, they both had an approach that made use of an interface with an apply method defined.
We'll show both case studies before refactoring the httplib example that we've defined so far.
Case Study: gRPC-Go
For example, in gRPC-Go:
type DialOption interface {
    apply(*dialOptions)
}
// and most options are implemented as functions that modify *dialOptions

conn, err := grpc.NewClient(
    "localhost:50051",
    grpc.WithTransportCredentials(creds),
    grpc.WithBlock(),
    grpc.WithUnaryInterceptor(myInterceptor),
)
With something like grpc.NewClient, it takes in a ...DialOption as the final variable argument within the NewClient definition:
func NewClient(target string, opts ...DialOption) (conn *ClientConn, err error) {
	cc := &ClientConn{
		target: target,
		conns:  make(map[*addrConn]struct{}),
		dopts:  defaultDialOptions(),
	}

	cc.retryThrottler.Store((*retryThrottler)(nil))
	cc.safeConfigSelector.UpdateConfigSelector(&defaultConfigSelector{nil})
	cc.ctx, cc.cancel = context.WithCancel(context.Background())

	// Apply dial options.
	disableGlobalOpts := false
	for _, opt := range opts {
		if _, ok := opt.(*disableGlobalDialOptions); ok {
			disableGlobalOpts = true
			break
		}
	}

	if !disableGlobalOpts {
		for _, opt := range globalDialOptions {
			opt.apply(&cc.dopts)
		}
	}

    // NOTE: We iterate through the range of opts and call their
    // `apply` method.
	for _, opt := range opts {
		opt.apply(&cc.dopts)
	}

	// ... code implementation omitted

	return cc, nil
}
In the above implementation, we see that for each opt, the apply method is called.
// funcDialOption wraps a function that modifies dialOptions into an
// implementation of the DialOption interface.
type funcDialOption struct {
	f func(*dialOptions)
}

func (fdo *funcDialOption) apply(do *dialOptions) {
	fdo.f(do)
}

func newFuncDialOption(f func(*dialOptions)) *funcDialOption {
	return &funcDialOption{
		f: f,
	}
}
An example function that can be used for defining an option function:
// An Option configures a Logger.
type Option interface {
	apply(*Logger)
}

// optionFunc wraps a func so it satisfies the Option interface.
type optionFunc func(*Logger)

func (f optionFunc) apply(log *Logger) {
	f(log)
}
func New(core zapcore.Core, options ...Option) *Logger {
	if core == nil {
		return NewNop()
	}
	log := &Logger{
		core:        core,
		errorOutput: zapcore.Lock(os.Stderr),
		addStack:    zapcore.FatalLevel + 1,
		clock:       zapcore.DefaultClock,
	}
	return log.WithOptions(options...)
}


// WithOptions clones the current Logger, applies the supplied Options, and
// returns the resulting Logger. It's safe to use concurrently.
func (log *Logger) WithOptions(opts ...Option) *Logger {
	c := log.clone()
	for _, opt := range opts {
		opt.apply(c)
	}
	return c
}

// optionFunc wraps a func so it satisfies the Option interface.
type optionFunc func(*Logger)

func (f optionFunc) apply(log *Logger) {
	f(log)
}

// ... an example option
// WithClock specifies the clock used by the logger to determine the current
// time for logged entries. Defaults to the system clock with time.Now.
func WithClock(clock zapcore.Clock) Option {
	return optionFunc(func(log *Logger) {
		log.clock = clock
	})
}
Reworking the httplib example code
Taking inspiration from the above, we can rework the example code taken from 100 Go Mistakes and How To Avoid Them to follow this interface-based approach.
First, you define options struct to match what we saw before:
type options struct {
    port *int
    // timeout *time.Duration, etc...
}
Next, we define the interface for Option:
// Option configures how we set up the server.
type Option interface {
    apply(*options) error
}
We then define our function-wrapper type:
// optionFunc wraps a func so it satisfies the Option interface.
type optionFunc func(*options) error

func (f optionFunc) apply(o *options) error {
    return f(o)
}
Then we can declare our functional option functions:
func WithPort(port int) Option {
    return optionFunc(func(o *options) error {
        if port < 0 {
            return errors.New("port should be positive")
        }
        o.port = &port
        return nil
    })
}
With these declarations, we can then create our new constructor:
func NewServer(addr string, opts ...Option) (*http.Server, error) {
    var o options

    for _, opt := range opts {
        if err := opt.apply(&o); err != nil {
            return nil, err
        }
    }

    // existing port resolution logic...
}
At this point, can still make use of the exact same signature as before:
If, instead of using http.Server we placed in our own struct Server for demonstration purposes, we can see a working example of this pattern with the following:
package main

import (
	"errors"
	"fmt"
)

type options struct {
	port *int
	// timeout *time.Duration, etc...
}

// Option configures how we set up the server.
type Option interface {
	apply(*options) error
}

// optionFunc wraps a func so it satisfies the Option interface.
type optionFunc func(*options) error

func (f optionFunc) apply(o *options) error {
	return f(o)
}

func WithPort(port int) Option {
	return optionFunc(func(o *options) error {
		if port < 0 {
			return errors.New("port should be positive")
		}
		o.port = &port
		return nil
	})
}

type Server struct {
	addr string
	port int
}

func NewServer(addr string, opts ...Option) (*Server, error) {
	var o options

	for _, opt := range opts {
		if err := opt.apply(&o); err != nil {
			return nil, err
		}
	}

	srv := &Server{
		addr: addr,
		port: *o.port,
	}

	return srv, nil
}

func main() {
	fmt.Println("=== Example 1: Valid usage ===")

	srv, err := NewServer("localhost",
		WithPort(8080),
	)
	if err != nil {
		fmt.Println("unexpected error:", err)
		return
	}
	fmt.Printf("Server struct: %+v\n\n", srv)

	fmt.Println("=== Example 2: Invalid usage (error) ===")

	srv2, err := NewServer("localhost",
		WithPort(-5), // invalid: negative port
	)
	if err != nil {
		fmt.Println("expected error:", err)
		return
	}
	fmt.Printf("Server struct: %+v\n", srv2)
}
Running go run targeting this file prints the following:
$ go run main.go
=== Example 1: Valid usage ===
Server struct: &{addr:localhost port:8080}

=== Example 2: Invalid usage (error) ===
expected error: port should be positive
We then refactored the example code to follow the interface-style approach with the apply function for composing options while maintaining the same capabilities to return errors for invalid option arguments.
]]><![CDATA[Adding Swift packages in Xcode]]>https://blog.dennisokeeffe.com/blog/2025-10-02-adding-swift-packages-in-xcode2025-10-02T00:00:00.000Z2025-10-02T00:00:00.000ZThis project walks through how to add third-party packages to your Swift projects in Xcode
Prerequisites
Swift (this post uses Swift 6.1).
Initializing a Swift executable package
You can create a new Swift executable package with the following (from the command line):
$ mkdir hello-swift
$ cd hello-swift
$ swift package init --type executable
You can run swift package init --help to get more information around arguments like --type. For example:
swift package init --help
OVERVIEW: Initialize a new package

USAGE: swift package init [--type <type>] [--enable-xctest] [--disable-xctest] [--enable-swift-testing] [--disable-swift-testing] [--name <name>]

OPTIONS:
  --type <type>           Package type: (default: library)
        library           - A package with a library.
        executable        - A package with an executable.
        tool              - A package with an executable that uses
                            Swift Argument Parser. Use this template if you
                            plan to have a rich set of command-line arguments.
        build-tool-plugin - A package that vends a build tool plugin.
        command-plugin    - A package that vends a command plugin.
        macro             - A package that vends a macro.
        empty             - An empty package with a Package.swift manifest.
  --enable-xctest/--disable-xctest
                          Enable support for XCTest
  --enable-swift-testing/--disable-swift-testing
                          Enable support for Swift Testing
  --name <name>           Provide custom package name
  --version               Show the version.
  -h, -help, --help       Show help information.
With this new package initialized as an executable, you can navigate to Sources/main.swift to see the generated entry file:
/ The Swift Programming Language
// https://docs.swift.org/swift-book

print("Hello, world!")
Running our executable
You can make use of swift run to run our executable:
$ swift run
[1/1] Planning build
Building for debugging...
[1/1] Write swift-version--58304C5D6DBC2206.txt
Build of product 'hello-swift' complete! (0.19s)
Hello, world!
We can re-use this to run after any file changes:
$ swift run
Building for debugging...
[7/7] Applying hello-swift
Build of product 'hello-swift' complete! (1.01s)
Hello again, world!
If you have a program installed such as watchexec, you can set it to watch swift extension files with watchexec --exts swift -- swift run :
$ watchexec --exts swift -- swift run
[Running: swift run]
[1/1] Planning build
Building for debugging...
[1/1] Write swift-version--58304C5D6DBC2206.txt
Build of product 'hello-swift' complete! (0.20s)
Hello again, world!
[Command was successful]
[Running: swift run]
[1/1] Planning build
Building for debugging...
[7/7] Applying hello-swift
Build of product 'hello-swift' complete! (0.73s)
Hello again and again, world!
[Command was successful]
Building files
You can run swift build from the project root to build out the executable.
$ swift build
[1/1] Planning build
Building for debugging...
[1/1] Write swift-version--58304C5D6DBC2206.txt
Build complete! (0.23s)
By default, swift build will build with debug configuration.
Once compiled, you'll have an optimized binary you can run directly (if your platform is the correct target):
$ ./.build/release/hello-swift
Hello again and again, world!
Other useful flags include --triple to cross-compile for another platform.
Makefile
You can make use of a Makefile for common operations:
.PHONY: build run clean release test

build:
	swift build

release:
	swift build -c release

run:
	swift run

test:
	swift test

clean:
	swift package clean
In use:
$ make clean
swift package clean

$ make build
swift build
Building for debugging...
[8/8] Applying hello-swift
Build complete! (1.06s)

$ make run
swift run
[1/1] Planning build
Building for debugging...
[1/1] Write swift-version--58304C5D6DBC2206.txt
Build of product 'hello-swift' complete! (0.21s)
Hello again and again, world!
Managing packages
You can manage packages in Package.swift or via the command line.
The default file that was created:
// Package.swift
// swift-tools-version: 6.1
// The swift-tools-version declares the minimum version of Swift required to build this package.

import PackageDescription

let package = Package(
    name: "hello-swift",
    targets: [
        // Targets are the basic building blocks of a package, defining a module or a test suite.
        // Targets can depend on other targets in this package and products from dependencies.
        .executableTarget(
            name: "hello-swift"),
    ]
)
From the command line, you can install a package using swift package add-dependency <URL>:
$ swift package add-dependency https://github.com/Alamofire/Alamofire --from 5.10.2
Updating package manifest at Package.swift... done.
In the above case, the package is installed via the GitHub repository for the popular networking package Alamofire.
You must also provide a version.
$ swift package add-dependency https://github.com/Alamofire/Alamofire
error: must specify one of --exact, --branch, --revision, --from, or --up-to-next-minor-from
Once installed, your Package.swift file will be updated:
// swift-tools-version: 6.1
// The swift-tools-version declares the minimum version of Swift required to build this package.

import PackageDescription

let package = Package(
    name: "hello-swift",
    dependencies: [
        .package(url: "https://github.com/Alamofire/Alamofire", from: "5.10.2"),
    ],
    targets: [
        // Targets are the basic building blocks of a package, defining a module or a test suite.
        // Targets can depend on other targets in this package and products from dependencies.
        .executableTarget(
            name: "hello-swift"),
    ]
)
In order to use it, you must update the relevant targets:
// swift-tools-version: 6.1
// The swift-tools-version declares the minimum version of Swift required to build this package.

import PackageDescription

let package = Package(
    name: "hello-swift",
    dependencies: [
        .package(url: "https://github.com/Alamofire/Alamofire", from: "5.10.2"),
    ],
    targets: [
        // Targets are the basic building blocks of a package, defining a module or a test suite.
        // Targets can depend on other targets in this package and products from dependencies.
        .executableTarget(
            name: "hello-swift",
            dependencies: [
                "Alamofire"   // 👈 add this line
            ]),
    ]
)
We can see this in action by updating our main.swift file:
// Sources/main.swift
// The Swift Programming Language
// https://docs.swift.org/swift-book

import Alamofire
import Foundation

@main
struct Hello {
    static func main() {
        AF.request("https://jsonplaceholder.typicode.com/todos/1")
            .responseString { response in
                print(response.value ?? "no data")
                CFRunLoopStop(CFRunLoopGetMain()) // stop loop when done
            }

        // keep the program alive until CFRunLoopStop is called
        CFRunLoopRun()
    }
}
Let's see it in action:
$ swift run
Fetching https://github.com/Alamofire/Alamofire
Fetched https://github.com/Alamofire/Alamofire from cache (22.64s)
Computing version for https://github.com/Alamofire/Alamofire
Computed https://github.com/Alamofire/Alamofire at 5.10.2 (23.82s)
Creating working copy for https://github.com/Alamofire/Alamofire
Working copy of https://github.com/Alamofire/Alamofire resolved at 5.10.2
[1/1] Planning build
Building for debugging...
[52/52] Applying hello-swift
Build of product 'hello-swift' complete! (6.15s)
{
  "userId": 1,
  "id": 1,
  "title": "delectus aut autem",
  "completed": false
}
Perfect, we got our response from an installed package.
Conclusion
This post was recounting some baby steps with initializing Swift packages. I will likely be writing a few tools for MacOS with this approach for learning more about the language while diving into iOS.
]]><![CDATA[Swift from the command line]]>https://blog.dennisokeeffe.com/blog/2025-09-10-swift-from-the-command-line2025-09-10T00:00:00.000Z2025-09-10T00:00:00.000ZThe following blog post is simply a recount of me tinkering with Swift without using Xcode.
It explores initializing an executable, working through some simple Swift syntax and managing packages with SwiftPM (Swift Package Manager).
Prerequisites
Swift (this post uses Swift 6.1).
Initializing a Swift executable package
You can create a new Swift executable package with the following (from the command line):
$ mkdir hello-swift
$ cd hello-swift
$ swift package init --type executable
You can run swift package init --help to get more information around arguments like --type. For example:
swift package init --help
OVERVIEW: Initialize a new package

USAGE: swift package init [--type <type>] [--enable-xctest] [--disable-xctest] [--enable-swift-testing] [--disable-swift-testing] [--name <name>]

OPTIONS:
  --type <type>           Package type: (default: library)
        library           - A package with a library.
        executable        - A package with an executable.
        tool              - A package with an executable that uses
                            Swift Argument Parser. Use this template if you
                            plan to have a rich set of command-line arguments.
        build-tool-plugin - A package that vends a build tool plugin.
        command-plugin    - A package that vends a command plugin.
        macro             - A package that vends a macro.
        empty             - An empty package with a Package.swift manifest.
  --enable-xctest/--disable-xctest
                          Enable support for XCTest
  --enable-swift-testing/--disable-swift-testing
                          Enable support for Swift Testing
  --name <name>           Provide custom package name
  --version               Show the version.
  -h, -help, --help       Show help information.
With this new package initialized as an executable, you can navigate to Sources/main.swift to see the generated entry file:
/ The Swift Programming Language
// https://docs.swift.org/swift-book

print("Hello, world!")
Running our executable
You can make use of swift run to run our executable:
$ swift run
[1/1] Planning build
Building for debugging...
[1/1] Write swift-version--58304C5D6DBC2206.txt
Build of product 'hello-swift' complete! (0.19s)
Hello, world!
We can re-use this to run after any file changes:
$ swift run
Building for debugging...
[7/7] Applying hello-swift
Build of product 'hello-swift' complete! (1.01s)
Hello again, world!
If you have a program installed such as watchexec, you can set it to watch swift extension files with watchexec --exts swift -- swift run :
$ watchexec --exts swift -- swift run
[Running: swift run]
[1/1] Planning build
Building for debugging...
[1/1] Write swift-version--58304C5D6DBC2206.txt
Build of product 'hello-swift' complete! (0.20s)
Hello again, world!
[Command was successful]
[Running: swift run]
[1/1] Planning build
Building for debugging...
[7/7] Applying hello-swift
Build of product 'hello-swift' complete! (0.73s)
Hello again and again, world!
[Command was successful]
Building files
You can run swift build from the project root to build out the executable.
$ swift build
[1/1] Planning build
Building for debugging...
[1/1] Write swift-version--58304C5D6DBC2206.txt
Build complete! (0.23s)
By default, swift build will build with debug configuration.
Once compiled, you'll have an optimized binary you can run directly (if your platform is the correct target):
$ ./.build/release/hello-swift
Hello again and again, world!
Other useful flags include --triple to cross-compile for another platform.
Makefile
You can make use of a Makefile for common operations:
.PHONY: build run clean release test

build:
	swift build

release:
	swift build -c release

run:
	swift run

test:
	swift test

clean:
	swift package clean
In use:
$ make clean
swift package clean

$ make build
swift build
Building for debugging...
[8/8] Applying hello-swift
Build complete! (1.06s)

$ make run
swift run
[1/1] Planning build
Building for debugging...
[1/1] Write swift-version--58304C5D6DBC2206.txt
Build of product 'hello-swift' complete! (0.21s)
Hello again and again, world!
Managing packages
You can manage packages in Package.swift or via the command line.
The default file that was created:
// Package.swift
// swift-tools-version: 6.1
// The swift-tools-version declares the minimum version of Swift required to build this package.

import PackageDescription

let package = Package(
    name: "hello-swift",
    targets: [
        // Targets are the basic building blocks of a package, defining a module or a test suite.
        // Targets can depend on other targets in this package and products from dependencies.
        .executableTarget(
            name: "hello-swift"),
    ]
)
From the command line, you can install a package using swift package add-dependency <URL>:
$ swift package add-dependency https://github.com/Alamofire/Alamofire --from 5.10.2
Updating package manifest at Package.swift... done.
In the above case, the package is installed via the GitHub repository for the popular networking package Alamofire.
You must also provide a version.
$ swift package add-dependency https://github.com/Alamofire/Alamofire
error: must specify one of --exact, --branch, --revision, --from, or --up-to-next-minor-from
Once installed, your Package.swift file will be updated:
// swift-tools-version: 6.1
// The swift-tools-version declares the minimum version of Swift required to build this package.

import PackageDescription

let package = Package(
    name: "hello-swift",
    dependencies: [
        .package(url: "https://github.com/Alamofire/Alamofire", from: "5.10.2"),
    ],
    targets: [
        // Targets are the basic building blocks of a package, defining a module or a test suite.
        // Targets can depend on other targets in this package and products from dependencies.
        .executableTarget(
            name: "hello-swift"),
    ]
)
In order to use it, you must update the relevant targets:
// swift-tools-version: 6.1
// The swift-tools-version declares the minimum version of Swift required to build this package.

import PackageDescription

let package = Package(
    name: "hello-swift",
    dependencies: [
        .package(url: "https://github.com/Alamofire/Alamofire", from: "5.10.2"),
    ],
    targets: [
        // Targets are the basic building blocks of a package, defining a module or a test suite.
        // Targets can depend on other targets in this package and products from dependencies.
        .executableTarget(
            name: "hello-swift",
            dependencies: [
                "Alamofire"   // 👈 add this line
            ]),
    ]
)
We can see this in action by updating our main.swift file:
// Sources/main.swift
// The Swift Programming Language
// https://docs.swift.org/swift-book

import Alamofire
import Foundation

@main
struct Hello {
    static func main() {
        AF.request("https://jsonplaceholder.typicode.com/todos/1")
            .responseString { response in
                print(response.value ?? "no data")
                CFRunLoopStop(CFRunLoopGetMain()) // stop loop when done
            }

        // keep the program alive until CFRunLoopStop is called
        CFRunLoopRun()
    }
}
Let's see it in action:
$ swift run
Fetching https://github.com/Alamofire/Alamofire
Fetched https://github.com/Alamofire/Alamofire from cache (22.64s)
Computing version for https://github.com/Alamofire/Alamofire
Computed https://github.com/Alamofire/Alamofire at 5.10.2 (23.82s)
Creating working copy for https://github.com/Alamofire/Alamofire
Working copy of https://github.com/Alamofire/Alamofire resolved at 5.10.2
[1/1] Planning build
Building for debugging...
[52/52] Applying hello-swift
Build of product 'hello-swift' complete! (6.15s)
{
  "userId": 1,
  "id": 1,
  "title": "delectus aut autem",
  "completed": false
}
Perfect, we got our response from an installed package.
Conclusion
This post was recounting some baby steps with initializing Swift packages. I will likely be writing a few tools for MacOS with this approach for learning more about the language while diving into iOS.
]]><![CDATA[Building TUIs with Golang and tview]]>https://blog.dennisokeeffe.com/blog/2025-08-19-building-tuis-with-golang-and-tview2025-08-19T00:00:00.000Z2025-08-19T00:00:00.000ZLong time avid TUI fan with zero contributions.
Given the amount of time I spend working with TUIs like k9s, lazygit, yazi and dive, I decided the time is now ripe to start learning the ins and outs of TUI development.
This post will be a walkthrough of me testing out the waters and learning more about tview, a Golang package for building TUIs.
Prerequisites
This post expects that you've worked with Golang before.
I will be using go.1.24.5.
Getting started
Start by initialising a new Go module and fetching the required packages.
# Create a project directory
mkdir blog-tview-introduction
cd blog-tview-introduction

# Initialise the module
go mod init tview.dennisokeeffe.com

# Fetch the tview package
go get github.com/rivo/tview

# Create a main.go file
touch main.go
The wiki outlines a number of basic components that can be used for drawing out our TUI and we can reinforce some of what we learn by checking out the docs.
We can update main.go to start with the example Grid component:
So reading an example like AddItem(newPrimitive("Header"), 0, 0, 1, 3, 0, 0, false) from left to right, we can understand the numerical arguments as:
Row 0.
Column 0.
Row span 1.
Column span 3.
Minimum height 0.
Minimum width 0.
We can assume that row span and column span relate to our default values, so exploring the SetRows and SetColumns method definitions can help us work backwards to understand the relationship:
Both functions follow the same principle, so it's best to read an excerpt from the documentation:
SetColumns defines how the columns of the grid are distributed. Each value defines the size of one column, starting with the leftmost column. Values greater than 0 represent absolute column widths (gaps not included). Values less than or equal to 0 represent proportional column widths or fractions of the remaining free space, where 0 is treated the same as -1. That is, a column with a value of -3 will have three times the width of a column with a value of -1 (or 0). The minimum width set with SetMinSize() is always observed.
So in our definition of SetColumns(30, 0, 30) and SetRows(3, 0, 3), we are basically setting the values for 3 rows and 3 columns, with the 0 value being the remaining cell space after the first and last of each row/column are set.
We can understand this visually from the screenshots above. Basically, we can expect our footer to double in size if we bump the row size for the footer to 6.
Doubling the footer size
Nice.
Making things interactive
From little things, big things grow. With that pearl of wisdom out of the way, let's add in a few more elements including a InputField to start to understand a bit more about interactivity.
In our code above, we've updated the grid header code we had before to add in a new header variable that we've declared.
That header in itself is adding the primitive text and also the inputField variable which we've declared above.
You can start to see a pattern occurring now with the AddItem method also appearing with the tview.NewFlex component. The method in this case has a different method signature, but I'll omit going over it as you should begin to understand that you can check the docs/intellisense and get a feel for what numeric values change.
The current state of the TUI looks like so:
Seeing our input value
With the inputField declaration, we can see the SetDoneFunc method that we invoke which takes an anonymous function.
In our case, we've added app.Stop() as part of the anonymous function, so when we hit enter it will result in closing our application.
(From the docs) The callback function is provided with the key that was pressed, which is one of the following:
KeyEnter: Done entering text.
KeyEscape: Abort text input.
KeyTab: Move to the next field.
KeyBacktab: Move to the previous field.
We can make use of this to make our interactivity a little more interesting.
Let's abstract the main content into a new text view and update our SetDoneFunc anonymous function to update the text with the value added.
Restarting our TUI, we can see what our UI looks like with text in the input:
Before hitting enter
And then after hitting the enter button:
Text change after hitting enter
Great! Our TUI is looking a little boring, but we are making some progress.
Changing view focus
At this point, our supremely basic TUI can now dynamically update text based on it's input.
The InputField is currently our initial focus, but how can we swap between different grid items and change focus?
We can introduce the List TUI component and make some changes based on things we've already worked with in order to get a simple list we can navigate up and down, while pressing : to focus on the filter bar and enter to re-enter the main list content.
We will also update the footer now to dynamically show different text help messages based on which component we are focused on.
package main

import (
 "strings"

 "github.com/gdamore/tcell/v2"
 "github.com/rivo/tview"
)

func main() {
 app := tview.NewApplication()
 newPrimitive := func(text string) tview.Primitive {
  return tview.NewTextView().
   SetTextAlign(tview.AlignCenter).
   SetText(text)
 }

 // Sample data to filter
 items := []string{"Apple", "Banana", "Cherry", "Date", "Elderberry", "Fig", "Grape", "Honeydew", "Kiwi", "Lemon", "Mango", "Orange"}

 // Create the filterable list
 list := tview.NewList().
  ShowSecondaryText(false).
  SetHighlightFullLine(true)

 // Function to populate/filter the list
 updateList := func(filter string) {
  list.Clear()
  for _, item := range items {
   if strings.Contains(strings.ToLower(item), strings.ToLower(filter)) {
    list.AddItem(item, "", 0, nil)
   }
  }
 }

 // Initially populate with all items
 updateList("")

 // Create dynamic footer for guidance text
 footer := tview.NewTextView().
  SetTextAlign(tview.AlignCenter).
  SetText("↑/↓ Navigate list • : Filter")

 // Function to update guidance text based on focus
 updateGuidance := func(focusedOnList bool) {
  if focusedOnList {
   footer.SetText("↑/↓ Navigate list • : Filter")
  } else {
   footer.SetText("Type to filter • Enter to focus list")
  }
 }

 inputField := tview.NewInputField().
  SetLabel("Filter: ").
  SetFieldWidth(0).
  SetFieldTextColor(tcell.ColorBlack).
  SetFieldBackgroundColor(tcell.ColorWhite)

 // Add real-time filtering as user types
 inputField.SetChangedFunc(func(text string) {
  updateList(text)
 })

 // On Enter, focus the list for navigation
 inputField.SetDoneFunc(func(key tcell.Key) {
  if key == tcell.KeyEnter {
   app.SetFocus(list)
   updateGuidance(true)
  }
 })

 // Add list navigation - return to input on selection
 list.SetDoneFunc(func() {
  app.SetFocus(inputField)
  updateGuidance(false)
 })

 // Handle keys for list: escape to return to input, ':' to focus filter
 list.SetInputCapture(func(event *tcell.EventKey) *tcell.EventKey {
  if event.Key() == tcell.KeyEscape {
   app.SetFocus(inputField)
   updateGuidance(false)
   return nil
  } else if event.Rune() == ':' {
   app.SetFocus(inputField)
   updateGuidance(false)
   return nil
  }
  return event
 })

 header := tview.NewFlex().
  SetDirection(tview.FlexRow).
  AddItem(newPrimitive("Header"), 2, 0, false).
  AddItem(inputField, 0, 1, true)

 menu := newPrimitive("Menu")
 sideBar := newPrimitive("Side Bar")

 grid := tview.NewGrid().
  SetRows(3, 0, 6).
  SetColumns(30, 0, 30).
  SetBorders(true).
  AddItem(header, 0, 0, 1, 3, 0, 0, false).
  AddItem(footer, 2, 0, 1, 3, 0, 0, false)

 // Layout for screens narrower than 100 cells (menu and side bar are hidden).
 grid.AddItem(menu, 0, 0, 0, 0, 0, 0, false).
  AddItem(list, 1, 0, 1, 3, 0, 0, false).
  AddItem(sideBar, 0, 0, 0, 0, 0, 0, false)

 // Layout for screens wider than 100 cells.
 grid.AddItem(menu, 1, 0, 1, 1, 0, 100, false).
  AddItem(list, 1, 1, 1, 1, 0, 100, false).
  AddItem(sideBar, 1, 2, 1, 1, 0, 100, false)

 if err := app.SetRoot(grid, true).SetFocus(list).Run(); err != nil {
  panic(err)
 }
}
Even though we've added quite a bit more code, the only real changes that we've made that look new are:
The creation of the list.
Abstracting the anonymous function and assigning it to updateList where the logic filters a hardcoded list of strings.
Doing the same with an anonymous function updateGuidance for changing the TextView footer component text.
At this point, when we run go run main.go we start focused now on the main content list.
Our filterable list
We can toggle up and down to move through the list.
In order to focus on the InputField, we can press :. This focuses on the InputField and updates the footer helper text.
Typing in letters for a basic filter will narrow down the list, and we can hit enter/return in order to focus back on the list and navigate the filtered values.
Filtered values after typing
Navigation
Finally, the last thing we will walk through is this idea of "simple navigation" where selecting a value will navigate into a "list detail" page from the "list" view and then enable a way to navigate back.
Again, we'll hardcode the detail strings for now, but the idea will be that we augment our "listeners" to jump back and forward from the "list" and "detail" view with the enter/escape button respectively.
The code now looks like the following:
package main

import (
 "strings"

 "github.com/gdamore/tcell/v2"
 "github.com/rivo/tview"
)

func main() {
 app := tview.NewApplication()
 newPrimitive := func(text string) tview.Primitive {
  return tview.NewTextView().
   SetTextAlign(tview.AlignCenter).
   SetText(text)
 }

 // Sample data to filter with details
 items := []string{"Apple", "Banana", "Cherry", "Date", "Elderberry", "Fig", "Grape", "Honeydew", "Kiwi", "Lemon", "Mango", "Orange"}

 // Sample detail data for each fruit
 details := map[string]string{
  "Apple":      "🍎 A crisp, sweet fruit that's perfect for snacking.\n\nNutritional Facts:\n• High in fiber\n• Rich in vitamin C\n• Contains antioxidants\n\nOrigin: Central Asia",
  "Banana":     "🍌 A tropical fruit with potassium and natural sugars.\n\nNutritional Facts:\n• High in potassium\n• Good source of vitamin B6\n• Natural sugars for energy\n\nOrigin: Southeast Asia",
  "Cherry":     "🍒 Small, sweet-tart stone fruits perfect for desserts.\n\nNutritional Facts:\n• Rich in antioxidants\n• Contains melatonin\n• Anti-inflammatory properties\n\nOrigin: Asia Minor",
  "Date":       "🫒 Sweet, chewy fruits from date palm trees.\n\nNutritional Facts:\n• High in fiber\n• Rich in potassium\n• Natural sweeteners\n\nOrigin: Middle East",
  "Elderberry": "🫐 Dark purple berries known for immune support.\n\nNutritional Facts:\n• High in vitamin C\n• Rich in antioxidants\n• Immune system support\n\nOrigin: Europe",
  "Fig":        "🟤 Sweet, soft fruits with edible seeds inside.\n\nNutritional Facts:\n• High in fiber\n• Good source of calcium\n• Contains potassium\n\nOrigin: Western Asia",
  "Grape":      "🍇 Juicy fruits that can be eaten fresh or made into wine.\n\nNutritional Facts:\n• Contains resveratrol\n• Rich in vitamin K\n• Natural sugars\n\nOrigin: Middle East",
  "Honeydew":   "🍈 Sweet, pale green melon with refreshing taste.\n\nNutritional Facts:\n• High water content\n• Rich in vitamin C\n• Low in calories\n\nOrigin: France",
  "Kiwi":       "🥝 Fuzzy brown fruit with bright green flesh inside.\n\nNutritional Facts:\n• Extremely high in vitamin C\n• Good source of fiber\n• Contains vitamin K\n\nOrigin: China",
  "Lemon":      "🍋 Sour citrus fruit used for cooking and drinks.\n\nNutritional Facts:\n• Very high in vitamin C\n• Contains citric acid\n• Low in calories\n\nOrigin: Asia",
  "Mango":      "🥭 Tropical stone fruit with sweet, juicy flesh.\n\nNutritional Facts:\n• High in vitamin A\n• Rich in vitamin C\n• Contains folate\n\nOrigin: India",
  "Orange":     "🍊 Citrus fruit packed with vitamin C and fiber.\n\nNutritional Facts:\n• Excellent source of vitamin C\n• High in fiber\n• Contains folate\n\nOrigin: China",
 }

 // Create the filterable list
 list := tview.NewList().
  ShowSecondaryText(false).
  SetHighlightFullLine(true)

 // Function to populate/filter the list
 updateList := func(filter string) {
  list.Clear()
  for _, item := range items {
   if strings.Contains(strings.ToLower(item), strings.ToLower(filter)) {
    list.AddItem(item, "", 0, nil)
   }
  }
 }

 // Initially populate with all items
 updateList("")

 // Create dynamic footer for guidance text
 footer := tview.NewTextView().
  SetTextAlign(tview.AlignCenter).
  SetText("↑/↓ Navigate list • : Filter")

 // Create detail view
 detailView := tview.NewTextView().
  SetDynamicColors(true).
  SetWordWrap(true).
  SetText("Select an item to view details")

 // Create input field and header components
 inputField := tview.NewInputField().
  SetLabel("Filter: ").
  SetFieldWidth(0).
  SetFieldTextColor(tcell.ColorBlack).
  SetFieldBackgroundColor(tcell.ColorWhite)

 header := tview.NewFlex().
  SetDirection(tview.FlexRow).
  AddItem(newPrimitive("Header"), 2, 0, false).
  AddItem(inputField, 0, 1, true)

 menu := newPrimitive("Menu")
 sideBar := newPrimitive("Side Bar")

 // Create the grid early so it can be referenced by functions
 grid := tview.NewGrid().
  SetRows(3, 0, 6).
  SetColumns(30, 0, 30).
  SetBorders(true).
  AddItem(header, 0, 0, 1, 3, 0, 0, false).
  AddItem(footer, 2, 0, 1, 3, 0, 0, false)

 // State management for current view
 var currentView string = "list" // "list" or "detail"

 // Function to update guidance text based on current state
 updateGuidance := func() {
  switch currentView {
  case "list":
   if app.GetFocus() == list {
    footer.SetText("↑/↓ Navigate • Enter Select • : Filter")
   } else {
    footer.SetText(": for focus on filter • Enter to focus list")
   }
  case "detail":
   footer.SetText("Escape to return to list")
  }
 }

 // Function to show detail view
 showDetail := func(itemName string) {
  if detail, exists := details[itemName]; exists {
   detailView.SetText(detail)
  } else {
   detailView.SetText("No details available for " + itemName)
  }
  currentView = "detail"
  updateGuidance()

  // Update grid to show detail view
  grid.RemoveItem(list)
  grid.AddItem(detailView, 1, 0, 1, 3, 0, 0, false)   // narrow layout
  grid.AddItem(detailView, 1, 1, 1, 1, 0, 100, false) // wide layout
  app.SetFocus(detailView)
 }

 // Function to show list view
 showList := func() {
  currentView = "list"
  updateGuidance()

  // Update grid to show list view
  grid.RemoveItem(detailView)
  grid.AddItem(list, 1, 0, 1, 3, 0, 0, false)   // narrow layout
  grid.AddItem(list, 1, 1, 1, 1, 0, 100, false) // wide layout
  app.SetFocus(list)
 }

 // Add real-time filtering as user types
 inputField.SetChangedFunc(func(text string) {
  updateList(text)
 })

 // On Enter, focus the list for navigation (ignore Escape)
 inputField.SetDoneFunc(func(key tcell.Key) {
  if key == tcell.KeyEnter {
   app.SetFocus(list)
   updateGuidance()
  }
  // Explicitly ignore Escape key - do nothing
 })

 // Add list navigation - show detail view on selection
 list.SetDoneFunc(func() {
  currentIndex := list.GetCurrentItem()
  itemText, _ := list.GetItemText(currentIndex)
  showDetail(itemText)
 })

 // Handle keys for list: ':' focuses filter, Enter shows detail when on main list screen
 list.SetInputCapture(func(event *tcell.EventKey) *tcell.EventKey {
  // Only handle keys when we're in list view (not detail view)
  switch currentView {
  case "list":
   if event.Rune() == ':' {
    app.SetFocus(inputField)
    updateGuidance()
    return nil
   } else if event.Key() == tcell.KeyEnter {
    // Explicitly handle Enter to show detail view
    currentIndex := list.GetCurrentItem()
    itemText, _ := list.GetItemText(currentIndex)
    showDetail(itemText)
    return nil
   } else if event.Key() == tcell.KeyEscape {
    // Do nothing
    return nil
   }
  case "detail":
   if event.Key() == tcell.KeyEscape {
    showList()
    return nil
   }
  }

  // Let all other keys pass through
  return event
 })

 // Layout for screens narrower than 100 cells (menu and side bar are hidden).
 grid.AddItem(menu, 0, 0, 0, 0, 0, 0, false).
  AddItem(list, 1, 0, 1, 3, 0, 0, false).
  AddItem(sideBar, 0, 0, 0, 0, 0, 0, false)

 // Layout for screens wider than 100 cells.
 grid.AddItem(menu, 1, 0, 1, 1, 0, 100, false).
  AddItem(list, 1, 1, 1, 1, 0, 100, false).
  AddItem(sideBar, 1, 2, 1, 1, 0, 100, false)

 // Initialize guidance text
 updateGuidance()

 app.SetInputCapture(func(event *tcell.EventKey) *tcell.EventKey {
  if currentView == "detail" && event.Key() == tcell.KeyEscape {
   showList()
   return nil
  }

  // Let all other keys pass through
  return event
 })

 // Set up global input capture to handle Escape only in detail view
 if err := app.SetRoot(grid, true).SetFocus(list).Run(); err != nil {
  panic(err)
 }
}
It's fairly rough code, but the list.SetInputCapture anonymous function here handles the filter focus and navigation to the "detail" view.
For navigating back, we use app.SetInputCapture to handle the escape button to invoke showList().
Running go run main.go shows a familiar landing view for our TUI.
Our list view
Selecting enter onto any of our list items now will shift us into the "detail view" to see our hardcoded detail text that maps to the selected value:
A detail view for a list item
Cool beans. At this point, we can visually see how we can set different views for our TUI.
Where to next?
At this point, I'll call it on the blog post. This should be enough to help you on your way to playing around with components and UIs and shows some of the more common workflows you might expect.
As for next steps, you could either augment this simple example to refactor and improve the handlers, or add more handlers for toggling between a number of different views.
Afterwards, instead of having hardcoded values, you could try implementing a TUI that uses dynamic data coming from a database somewhere.
Referring to the tview GitHub wiki and online documentation will go a long way from here.
Conclusion
Today's post builds up a simple TUI with Golang and tview from first steps until we have a simple application with navigation and filtering.
Although trivial in nature, my hope is that this guide is enough to get you comfortable with where to go from here and how to reference the documentation.
]]><![CDATA[Implementing more manageable transform streams in Node.js]]>https://blog.dennisokeeffe.com/blog/2025-08-03-implementing-more-manageable-transform-streams-in-nodejs2025-08-03T00:00:00.000Z2025-08-03T00:00:00.000ZOver the past few months, I've been tinkering with my approach to streams at work when needing to work with requirements that can be efficiently processed with Node.js streams.
This has led to experimentation with both Node.js stream classes and generators.
Although each have their pros and cons, in retrospect I've decided that class streams are the preference for the work that I am doing.
Some of my personal reasons:
They can be easier to reason about.
They can easily have dependency injected with inversion-of-control libraries like Awilix and Inversify.
They don't require currying or partial application for aforementioned dependency injection.
Streams that I work with
Normally you would expect this to be Strings or Buffers, but in scenarios where I am processing job records.
This has led me to make use of object mode and Transform streams more often than not in day-to-day work.
Because of this, I've also opted to build out an abstract class for me to implement in TypeScript. The purpose of it is to contain the objectMode requirement and require one method that can be used for processing each chunk of a stream.
An abstract class for object-mode transforms
The following is a general look at the abstracted stream.
abstract class ChunkStream<
  TInput = unknown,
  TResult = unknown,
> extends Transform {
  constructor() {
    super({ objectMode: true });
  }

  abstract processChunk(chunk: TInput): TResult;

  async _transform(
    chunk: TInput,
    _encoding: BufferEncoding,
    callback: (error?: Error | null, data?: TResult) => void
  ): Promise<void> {
    try {
      const result = await this.processChunk(chunk);
      if (result !== undefined && result !== null) {
        // Handle empty arrays - only push if there's actual data
        if (Array.isArray(result) && result.length === 0) {
          callback(); // Don't push empty arrays
        } else {
          callback(null, result);
        }
      } else {
        callback();
      }
    } catch (error) {
      // Transform callbacks only expect error of type `Error | null`.
      // Handling of this is entirely up to you if you wish to alter
      // this approach.
      if (error instanceof Error) {
        callback(error);
      } else {
        console.warn("Unhandled error which is not an instanceof Error", error);
        throw error;
      }
    }
  }
}
As mentioned earlier, the processChunk method is abstract and requires a concrete implementation of that behaviour.
The typing probably leaves more to be desired (it could do with some constraints), but my current implementation expects to take the incoming object chunk and then return a value that will be used as the callback for the transform stream.
Implementing a concrete transform stream
A contrived implementation may look like this:
import { err, ok } from "neverthrow";

type User = {
  name: string;
  age: number;
  color: string;
};

class UserData {
  readonly _tag = "UserData";

  name: string;
  age: number;

  constructor(name: string, age: number) {
    this.name = name;
    this.age = age;
  }
}

// Making use of the `ChunkStream`
class SetUserDataStream extends ChunkStream {
  #logger: Logger;

  constructor(logger: Logger) {
    super();
    this.#logger = logger;
  }

  // Generator method for processing chunks
  async processChunk(chunk: User) {
    const transformed = new UserData(chunk.name, chunk.age);
    return ok(transformed);
  }

  // OPTIONAL: Override a Transform method
  _flush(callback) {
    this.#logger.info("Stream completed");
    callback();
  }
}
The above stream expects an object that structurally matches User as the incoming chunk input and returns that value serialized into a UserData instance and wrapped inside of a Ok result.
There is also an optional _flush method that I have overridden. You can override anyTransform stream method. _flush has been useful for logging checkpoints at the end of a stream.
In use, it could look something like a long-running script where you fetch batches of data remotely, run a process and then finalize it somewhere:
import { pipeline } from "stream/promises";

const logger = new Logger();

// Assume this is a script that you're running to bulk run a long extract-transform-load job
async function main() {
  // Assume all streams in the middle are duplex or transform streams.
  // They could even inherit from our `ChunkStream` class.
  await pipeline(
    // Fetch data from remote
    Readable.from(fetchDataFromRemote()),
    // Serialize data
    new SetUserDataStream(logger),
    // Split into batches of 20 records to process
    new BatchStream(20),
    // Run the upload process
    new UploadToNewDataSource(),
    // Final sink to log results
    new Writable({
      write(
        chunk: User,
        _encoding: BufferEncoding,
        callback: (error?: Error | null) => void
      ) {
        // Log the output from `UploadToNewDataSource`
        logger.info("Output:", chunk);
        callback();
      },
      objectMode: true,
    })
  );
}

main();
Testing with this stream
For unit tests on a stream, I do the following:
Create a Readable stream for test data used as input.
Create an instance of my Transform stream to test.
Create a Writable "sink" where I push chunk results into an array I can assert against.
]]><![CDATA[Configuring Omarchy on Beelink]]>https://blog.dennisokeeffe.com/blog/2025-07-17-configuring-arch-linux-omarchy-via-mac2025-07-17T00:00:00.000Z2025-07-17T00:00:00.000ZThe following walks through my installation setup of Omarchy onto my new Beelink SER5.
I loaded the ISO onto a USB using my Mac, so this is a specific recount with these items in case it clarifies anything for others configuring their setup.
I will reference any point where it is best to refer back to DHH's video or the archlinux docs.
Preparing the ISO on a bootable USB drive
The following is best done alongside the archlinux installation documentation.
First, download the Arch Linux ISO from the official website. The official docs recommend using a BitTorrent download, however (due to work restrictions) it was required for me to make a HTTP direct download.
For myself in Australia, I found a mirror website to download the ISO directly, and then made use of the b2sum CLI utility in order to verify the BLAKE2b checksums.
To do this, download the b2sum.txt file from the downloads section into the same folder that you downloaded the ISO and run b2sum -c b2sums.txt in order to validate the ISO checksum.
b2sum is a command-line utility for computing and verifying BLAKE2b checksums.
BLAKE2b is a cryptographic hash function that's faster than MD5, SHA-1, and SHA-2, while providing high security. It's used to verify file integrity by comparing computed hashes against known good values.
On macOS, you can use tools like dd or graphical utilities like Balena Etcher to create a bootable USB drive.
# Example using dd (replace /dev/diskX with your USB device)
sudo dd if=archlinux.iso of=/dev/diskX bs=4M status=progress
dd (data duplicator) is a low-level copying utility that reads from an input file and writes to an output file. The options used are:
if= (input file): specifies the source file to read from
of= (output file): specifies the destination to write to
bs=1m (block size): sets the read/write block size to 1 megabyte for faster copying
rdisk prefix: on macOS, this accesses the raw disk device for faster performance
The command provided by archlinux will run silently. You can press Ctrl + t to get updates.
Once the USB is loaded, you can dismount the disk and we can plug it into our Beelink SER 5.
Entering UEFI on the Beelink SER 5
Since I pulled out my Beelink SER 5 fresh from the box, so it came preloaded with Windows 11.
We don't care about that preloaded OS, so we need to boot into UEFI.
You may be more familiar with BIOS. They are different technologies that do the same job.
UEFI (Unified Extensible Firmware Interface) is the modern successor to BIOS. It provides a more advanced interface with better security features (like Secure Boot), support for larger hard drives (over 2TB), faster boot times, and a graphical interface instead of text-only menus.
BIOS (Basic Input/Output System) is firmware that initializes and tests hardware components during the boot process. It provides the interface between the operating system and hardware, allowing you to configure boot order, hardware settings, and system parameters before the OS loads.
To enter UEFI on the Beelink SER 5:
Power on the device
Immediately press and hold the Delete key (or supposedly F2, but I didn't try) key repeatedly during startup
This will bring you into the UEFI setup menu
Navigate to the boot options and set your USB drive as the first boot priority
Save and exit to boot from the Arch Linux USB
Running archinstall
At this point, the system will boot into a very basic terminal UI. For most of this section, I followed along with DHH's setup tutorial.
We want to run archinstall to open the Arch installer and setup our configurations.
I won't go too deep into this section since you can follow along with the video, but the general overview is this:
Run the Arch bootscreen
(optional for Wifi) Configure WiFi with iwctl
Open the archinstall TUI with archinstall
Go down top-to-bottom on the left-hand sidebar
(optional) Configure your locales
Select your mirror regions to install from somewhere close to you
Disk configuration with the default layout and using the recommended btrfs file system
Turn on disk encryption (a must for Omarchy) -- select type LUKS, set the password and apply the encrytion
Setup hostname
Set root password
Add user account
For Audio, use pipewire
For network configuration, copy over what you used for install
For "Additional packages", ensure wget is installed as it will be used for Omarchy
Save and run the installation
At this point, the installer will take over and it can take a few minutes for everything to e configured.
Once you've configured archinstall and run the installer, it will prompt you to restart the system.
The following sub-headings are some details that I thought I would callout which goes a little bit deeper than the video:
archinstall
archinstall is Arch Linux's official guided installer that provides a text-based interface for installing Arch Linux. It simplifies the traditionally manual installation process by offering:
Automated partitioning and filesystem setup
Package selection and installation
Bootloader configuration
User account creation
Network configuration
bootloader
A bootloader is a small program that loads the operating system kernel
into memory during startup. Common Linux bootloaders include GRUB and
systemd-boot. The bootloader handles the transition from firmware (BIOS/UEFI)
to the operating system, and can manage multiple OS installations on the same
machine.
btrfs
Btrfs (B-tree file system) is a modern copy-on-write filesystem for Linux that supports advanced features like snapshots, checksums, and built-in RAID. It's designed for fault tolerance, repair, and easy administration.
zstd
Zstd (Zstandard) is a fast compression algorithm developed by Facebook that provides excellent compression ratios with high speed. It's commonly used for filesystem compression and package compression in Linux distributions.
wget
wget (web get) is a command-line utility for downloading files from web servers using HTTP, HTTPS, and FTP protocols. It supports recursive downloads, resuming interrupted transfers, and can follow redirects. The -qO- options make it run quietly (-q) and output to stdout (-O-) instead of saving to a file.
Installing Omarchy
Once the system reboots, you'll be prompted to unlock your encrypted disk and then log in with the configurations that you setup before.
In the previous section, we preemptively configured wget. We can now use it to install Omarchy.
wget -qO- https://omarchy.org/install | bash
At my time of installation, this will prompt you for your password a few times and request some configurations for Git.
Afterwards, it will just do it's thing and install DHH's opinionated setup.
Once completed, you will be prompted to restart the system to apply the changes.
Congratulations, you have now configured Omarchy!
I use Arch btw
Conclusion
In this recount, we walked through how I configured my new Beelink SER5 for Omarchy with boot loading. This made use of my Mac for downloading, validating and configuring my USB drive for the Arch Linux ISO.
Hopefully this comes in handy for anyone else who may be keen to make the jump but wants to understand a little bit more about the configuration.
At this point, it's worth restarting DHH's video for the basics on how to work with Omarchy.
]]><![CDATA[TypeScript Private Elements vs Private Modifiers]]>https://blog.dennisokeeffe.com/blog/2025-07-16-typescript-private-elements-vs-private-modifiers2025-07-16T00:00:00.000Z2025-07-16T00:00:00.000Z
Private access modifiers in TypeScript
If you've been working with TypeScript for a while, you may be familiar with the public, private and protectedaccess modifiers for class properties and methods:
class Modifiers {
  public a: string;
  private b: string;
  protected c: string;

  // ... omitted
}
These access modifiers enforce the member visibility you may be familiar with if you've worked in other object-oriented languages before.
The public modifier makes members accessible from anywhere, private restricts access to only within the same class, and protected allows access from the class and its subclasses. By default, all class members are public in TypeScript, so you typically only need to explicitly declare private and protected members.
The problem with this approach is that these modifiers only apply in TypeScript. Once the code is transpiled, you can still access the elements on the class as if they were always public.
For an example of this, take the following code:
class Target {
  private name: string;

  constructor(name: string) {
    this.name = name;
  }

  call() {
    this.log();
  }

  private log() {
    console.log(this.name);
  }
}

class A {
  private target: Target;

  constructor(target: Target) {
    this.target = target;
  }
}

const target = new Target("name");
export const a = new A(target);
In this code, we've set target as a private property on our contrived class A.
Once we transpile the code, we can see the following out:
"TypeScript's visibility modifiers only discourage you from accessing private data. You can even access a private property from within TypeScript using a type assertion or iteration...
ES2022 officially added support for private fields. Unlike TypeScript's private, ECMAScript's private is enforced both for type checking and at runtime. To use it, prefix your class property with a #...
What about public and protected? In JavaScript (and TypeScript), public is the default visibility so there's no need to annotate this explicitly. And while private implies encapsulation, protected implies inheritance. The general rule in object-oriented programming is to prefer composition over inheritance, so practical uses of protected are quite rare. readonly as a field modifier is a type-level construct and is fine to use... A field may be both #private and readonly.
In summary, the book recommends that we stick to the #private convention and highlights an important point about the protected modifier: object-oriented programming should prefer composition over inheritance.
Private elements in JavaScript
As we saw in the previous section, ECMAScript introduced the private elements with ES2022.
Let's rewrite our previous example to make use of this:
class Target {
  #name: string;

  constructor(name: string) {
    this.#name = name;
  }

  call() {
    this.log();
  }

  private log() {
    console.log(this.#name);
  }
}

class A {
  #target: Target;

  constructor(target: Target) {
    this.#target = target;
  }

  call() {
    this.#target.call();
  }
}

const target = new Target("name");
export const a = new A(target);
Our contrived classes now replace the private access modifier with the pound # prefix for our private elements.
$ node
Welcome to Node.js v24.3.0.
Type ".help" for more information.
> const {a} = require('./index.js')
undefined
> a.#target.#name
a.#target.#name
 ^

Uncaught SyntaxError: Private field '#target' must be declared in an enclosing class
> a.call()
name
undefined
As we can see, we get true access control with the pound # prefix and must access our private elements through public methods.
Conclusion
In general, it would be wise to opt for ECMAScript standards and make use of the pound # prefix introduced in ES2022 (regardless of how it feels compared to using the keyword).
The private elements approach provides true encapsulation at runtime, making your code more secure and predictable. As highlighted with protected, chances are that if you are using it, you are likely not abiding by the principle of preferring composition over inheritance.
Consider using private elements (#) when you need true privacy that persists after transpilation, and reserve TypeScript's private modifier for cases where you only need compile-time type checking.
]]><![CDATA[Tail Recursion]]>https://blog.dennisokeeffe.com/blog/2025-07-08-tail-recursion2025-07-08T00:00:00.000Z2025-07-08T00:00:00.000ZWhat is Tail Recursion?
Tail recursion is a memory-optimization technique (using tail call optimization) for the call stack.
Instead of piling on more data onto the stack data structure for recursive calls, tail recursion enables the optimization to deallocate the previous function call's memory prior to making the recursive call.
Not all languages support tail call optimization. Almost all functional languages support it, some systems languages support it, but a number of popular languages such as Python and Ruby do not support it. It's still worth knowing about.
How Can I Visualize Tail Recursion?
Think of a stack of plates.
Stack of plates
Each plate in the stack represents in a recursive call that is not tail call optimized.
Given enough recursive calls, the stack will build up enough, run out of space and cause a stack overflow that will crash the system.
In the case of tail recursion, you can think of this as one plate being added to the stack, but once it finishes it's run and makes a recursive call, the current "plate" is removed from the stack before the next "plate" is added.
You can think of this as a plate stack with one plate being added and removed for each recursive iteration.
One plate
This analogy helps to visualize the lifecycle of a call stack and how that data structure works. Regardless of tail recursion, each time you are adding and removing from the stack it is like a stack of plates where you add and remove from the top.
An Example of Tail Recursion
I will make use of Zig to compare an approach with and without tail call optimization being used.
const std = @import("std");
const print = std.debug.print;
// Get approximate stack pointer to measure stack usage
fn getStackPointer() usize {
var dummy: u8 = 0;
return @intFromPtr(&dummy);
}
fn measureMaxStackUsage() void {
var max_stack_used: i64 = 0;
const initial_sp = getStackPointer();
const result = tailRecursiveWithMeasurement(1000, 1, initial_sp, &max_stack_used);
print("=== Maximum Stack Usage Test ===\n", .{});
print("Result: {}\n", .{result});
print("Maximum stack used during recursion: {} bytes\n", .{max_stack_used});
}
// Separate function that tracks max usage
fn tailRecursiveWithMeasurement(n: u64, acc: u64, initial: usize, max_used: *i64) u64 {
const current_sp = getStackPointer();
const used = @as(i64, @intCast(initial)) - @as(i64, @intCast(current_sp));
if (used > max_used.*) {
max_used.* = used;
}
// Print occasionally to show progress
if (n % 100 == 0) {
print(" n={}, current stack: {} bytes, max so far: {} bytes\n", .{ n, used, max_used.* });
}
if (n <= 1) return acc;
return @call(.always_tail, tailRecursiveWithMeasurement, .{ n - 1, acc + n, initial, max_used });
}
fn compareStackUsage() void {
var tail_max: i64 = 0;
var regular_max: i64 = 0;
const initial_sp = getStackPointer();
print("Testing tail recursion (1000 calls)...\n", .{});
_ = tailRecursiveWithMeasurement(1000, 0, initial_sp, &tail_max);
print("\nTesting regular recursion (20 calls)...\n", .{});
_ = regularRecursiveWithMeasurement(20, initial_sp, ®ular_max);
print("\n📊 RESULTS:\n", .{});
print("Tail recursion (1000 calls): {} bytes max\n", .{tail_max});
print("Regular recursion (20 calls): {} bytes max\n", .{regular_max});
print("Bytes per call - Tail: {:.1} bytes\n", .{@as(f64, @floatFromInt(tail_max)) / 1000.0});
print("Bytes per call - Regular: {:.1} bytes\n", .{@as(f64, @floatFromInt(regular_max)) / 20.0});
}
fn regularRecursiveWithMeasurement(n: u64, initial: usize, max_used: *i64) u64 {
const current_sp = getStackPointer();
const used = @as(i64, @intCast(initial)) - @as(i64, @intCast(current_sp));
if (used > max_used.*) {
max_used.* = used;
}
// Print occasionally to show usage
if (n % 10 == 0) {
print(" n={}, current stack: {} bytes, max so far: {} bytes\n", .{ n, used, max_used.* });
}
if (n <= 1) return 1;
return 1 + regularRecursiveWithMeasurement(n - 1, initial, max_used);
}
pub fn main() !void {
print("\n=== Stack Usage Comparison ===\n", .{});
compareStackUsage();
}
Running this code results in the following:
$ zig run -O ReleaseFast tail_recursion.zig

=== Stack Usage Comparison ===
Testing tail recursion (1000 calls)...
  n=1000, current stack: -72 bytes, max so far: 0 bytes
  n=900, current stack: -72 bytes, max so far: 0 bytes
  n=800, current stack: -72 bytes, max so far: 0 bytes
  n=700, current stack: -72 bytes, max so far: 0 bytes
  n=600, current stack: -72 bytes, max so far: 0 bytes
  n=500, current stack: -72 bytes, max so far: 0 bytes
  n=400, current stack: -72 bytes, max so far: 0 bytes
  n=300, current stack: -72 bytes, max so far: 0 bytes
  n=200, current stack: -72 bytes, max so far: 0 bytes
  n=100, current stack: -72 bytes, max so far: 0 bytes

Testing regular recursion (20 calls)...
  n=20, current stack: 57 bytes, max so far: 57 bytes
  n=10, current stack: 857 bytes, max so far: 857 bytes

📊 RESULTS:
Tail recursion (1000 calls):    0 bytes max
Regular recursion (20 calls):   1577 bytes max
Bytes per call - Tail:          0.0e0 bytes
Bytes per call - Regular:       7.9e1 bytes
The -72 bytes for the tail recursion is a bit of noise, but you can see in the difference here that 20 calls with regular recursion used up around 8 bytes for invocation, while the tail recursion resulted in no memory buildup.
]]><![CDATA[Data Classes in TypeScript]]>https://blog.dennisokeeffe.com/blog/2025-06-23-typescript-data-classes2025-06-23T00:00:00.000Z2025-07-02T00:00:00.000ZThis post considers the concept of "data classes" as defined with Kotlin and focuses on some of the type benefits we might get within TypeScript with tagged/discriminant unions.
Please note that this is a very loose use of the term and it certainly does not plan on focuses on the methods that come with data classes in Kotlin.
What are data classes?
As defined in the Kotlin documentation, "Data classes ... are primarily used to hold data. For each data class, the compiler automatically generates additional member functions ... Data classes are marked with data".
So for an example definition in Kotlin, you could define a data class with data class User(val name: String, val age: Int).
As mentioned, I'm not too focused on the additional methods that come with data classes. There already is another library alexeyraspopov/dataclass that enables something like this.
What I am interested in is the type properties as it relates to TypeScript that come with the idea of storing data in classes that are, by designed, not meant to add any additional functionality.
I want to explore the idea of using these data containers as classes.
How can these help in TypeScript?
TypeScript is a structural type system as opposed to a nominal type system.
For an example of what I mean by structural type, take the following:
In the above code, there are no type errors even though our obj is not of type User. TypeScript doesn't complain because it satifies the expected structure of a User interface.
In fact, even if we add more properties to obj, it still won't complain:
This is in contrast to a nominal type system where it would expect the input to be of type User.
Let's say in fact that we do want to ensure that the type matches, we could do a little tinkering to refactor the above to the following:
class DataUser {
  public name: string;

  constructor(name: string) {
    this.name = name;
  }
}

function uppercaseUserName(user: DataUser) {
  return user.name.toUpperCase();
}

const obj = {
  name: "something",
  age: 22,
  address: "123 fake street",
};

const user = new DataUser(obj.name);
console.log(uppercaseUserName(user));
In the above code, we now explicitly create a DataUser instance. Note that the properties are public which is by design. The mental model you can use is that we are effectively encasing the object we want within a class.
This also looks to be similar to how Kotlin goes about this:
val jane = User("Jane", 35)
val (name, age) = jane
println("$name, $age years of age")
// Jane, 35 years of age
In TypeScript, some of the benefits that we get so far is that because classes themselves are a type, we don't need to declare a separate interface for these. The classes type themselves. On large-scale databases where you have many different shapes of objects being passed around, this can also be blessing for code volume reduction.
Getting benefits from discriminants
We can extend these benefits by introducing a discriminant into the classes:
class DataUser {
  readonly _tag = "DataUser";

  public name: string;

  constructor(name: string) {
    this.name = name;
  }
}
In the above code, we've now added readonly _tag = "DataUser". But what's the value of this?
Adding a type "discriminant", also know as a "tag", is what enables the type narrowing capabilities for disciminant/tagged unions in TypeScript.
In the above code, we get no type errors due to structural typing by the return type of result is User | Address.
If we start a new line with result., you'll notice that we don't get any type completion. The reason for this is that we need to first narrow down the type in order for TypeScript to be smart enough to know what to do.
In order to do this at the moment is a little shaky and specific to the output type:
if ("name" in result) {
  result.name;
} else if ("address" in result) {
  result.address;
}
Using this helper will assist TypeScript in knowing what types we are dealing with. Inside the 'name' in result block, TypeScript now knows that the type must be a User, while in the other if block it knows that it must be Address so we get our type completion assistance back.
As mentioned before, this is clunky and very specific to the situation. If we add another one for age, we need the same 'age' in result helper and this will change for other functions that can return different types.
In our interfaces now, _tag is our disciminant. Because our union type all includes _tag, our result response knows that it has that one common property between all possible return types.
We can use this to our advantage. In the switch block, we switch on the _tag property and, because TypeScript is smart enough to know all possible disciminant values, is can help us autocomplete and narrow does the types that way.
The beauty of this approach is that if you set a common disciminant across your data, you can always rely on this approach to help you narrow types down.
Applying discriminants to our data classes
Let's convert our current code example back to using "data" classes:
class DataUser {
  readonly _tag = "DataUser";
  public name: string;

  constructor(name: string) {
    this.name = name;
  }
}

class DataAddress {
  readonly _tag = "DataAddress";
  public name: string;

  constructor(name: string) {
    this.name = name;
  }
}

function getUserOrAddress({
  name,
  address,
}: {
  name: string;
  address: string;
}): DataUser | DataAddress {
  if (Math.random() > 0.5) {
    return new DataUser(name);
  }

  return new DataAddress(address);
}

const obj = {
  name: "something",
  age: 22,
  address: "123 fake",
};

const result = getUserOrAddress(obj);

switch (result._tag) {
  case "DataUser":
    console.log("is user");
    break;
  case "DataAddress":
    console.log("is address");
}
We rewrite the classes to have a readonly _tag property which, assuming we keep this unique across our codebase, can now always be used as a discriminant for type narrowing.
This also simplies the return values to be the creation of the data class instances.
Of course, readonly _tag is something that needs to be enforced at a behavioural level. You can of course assign this to an interface/class and implement/inherit the requirement for this property, but it feels like too much overhead to me.
You should know pretty quickly if someone hasn't added a readonly _tag property if your TypeScript types widen. Correcting this also should be simple enough.
An opinion on classes and design patterns
Something I am very bullish on is avoiding premature abstraction. It's one of those things I keep close to my heart because I've always been the perpetrator for it and burned myself.
I personally believe that object-orientated design patterns can be the enemy for this if you do not stay vigilant.
The reason that I give this "data container" a pass (at least as I currently mull over them) is purely because of the lack of functionality they provide.
Other than defining the shape of the object I want to work with, there is no ping ponging back and forth between a business layer and data class. It feels like it can give the same level of declarativeness that you get from assigning objects inline (hopefully I am conveying what I mean on this well enough).
Usage with branded types
What happens when you share a common data shape but want to be able to differentiate more on the tagged union _tag property?
In a scenario like this, we can introduce the idea of branded types to our data class using generics.
type SchemeType = "Visa" | "MasterCard";
type SchemeTypeDataUser = `${SchemeType}DataUser`;

class DataUser<T extends SchemeTypeDataUser = SchemeTypeDataUser> {
  readonly _tag;
  name: string;
  age: number;

  constructor(tag: T, name: string, age: number) {
    this._tag = tag;
    this.name = name;
    this.age = age;
  }
}

const mc = new DataUser("MasterCardDataUser", "Dennis", 33);
const visa = new DataUser("VisaDataUser", "Dan", 21);

mc._tag; // typed as "MasterCardDataUser"
visa._tag; // typed as "VisaDataUser"
In the above code, I make use of the SchemeTypeDataUser to set a "branded" type. This enables some re-use on a model that we may use differently based on context.
We use generics here in order to still enforce the _tag property to be a readonly literal. Without it, our _tag is cast to a string.
Branded types with a private constructor
Taking things one step further, you can also enforce the use of static methods if you want to have instances built with the tagged union property baked in.
type SchemeType = "Visa" | "MasterCard";
type SchemeTypeDataUser = `${SchemeType}DataUser`;

class DataUser<T extends SchemeTypeDataUser = SchemeTypeDataUser> {
  readonly _tag;
  name: string;
  age: number;

  private constructor(tag: T, name: string, age: number) {
    this._tag = tag;
    this.name = name;
    this.age = age;
  }

  static mastercard(name: string, age: number) {
    return new DataUser("MasterCardDataUser", name, age);
  }

  static visa(name: string, age: number) {
    return new DataUser("VisaDataUser", name, age);
  }
}

const mc = DataUser.mastercard("Dennis", 33);
const visa = DataUser.visa("Dan", 21);

mc._tag; // typed as "MasterCardDataUser"
visa._tag; // typed as "VisaDataUser"

// !!! TypeScript error due to the private constructor
// const cantDo = new DataUser('MasterCardDataUser', 'test', 25);
In the above code, we add two static properties which themselves call the private constructor in order to return the instances with a specific value already set for the branded type.
Conclusion
This post speaks to the idea of containing and passing your key objects around using a "data class".
In a recent update, we also explored the idea of using branded types and private constructors in order to get re-use out of the classes themselves.
It can work well with the structural nature of the TypeScript type system and using a common discriminant across the codebase can you simplify your control flow.
As a friendly-reminder though: These representations are not actually data classes in TypeScript. They are just inspired by the concept. The type system won't help you if you or a team member opt to start adding in instance methods. You need to find and apply another lint rule to support something like that.
]]><![CDATA[Isolating PostgreSQL Tests with PGLite]]>https://blog.dennisokeeffe.com/blog/2025-06-09-isolating-postgresql-tests-with-pglite2025-06-09T00:00:00.000Z2025-06-09T00:00:00.000ZThis post introduces PGLite as an in-memory way to run tests without compromising too much on speed or isolation problems.
We will be using Prisma and Vitest to demonstrate this, but please note that this approach is just as applicable to using alternative test runners and PostgresQL-compatible libraries such as Jest and Drizzle.
Example code used for this blog post can be found on my GitHub.
Testing purgatory
There are four things that lead to testing purgatory:
Boundaries
Isolation
Mocking
Asserting side-effects
If your test boundaries are too narrow, you lose test confidence.
If you fail to properly isolate your tests, it tends towards flakiness.
If you over-mock or mock the wrong things, you introduce unnecessary code volume to your application and present an inaccurate reflection of your application.
Finally, if you over-assert side-effects within a module that are separate to the desired functionality of the program, you run the risk of false negatives once refactoring occurs.
How can PGLite help with isolation?
PGLite is full PostgreSQL database run using Web Assembly.
While some benefits are beyond the scope of this blog post, the main focus is on the fact that it's lightweight, supports the PostgreSQL feature set and extensions.
This also introduces us a perfect use-case for it: a drop-in replacement that can be used for testing.
The way that test runners like Vitest work is that they run tests sequentially within each file. Beyond that, the test runners attempt to parallelize the test runs whenever they can.
We can control this behavior by reducing the amount of parallel testing that can occur through test configuration files or the CLI in order to run tests serially.
In Vitest, there are a few options provided around this:
threads pool runs every test file in a separate Worker.
forks pool runs every test file in a separate forked child process.
vmThreads pool runs every test file in a separate VM context, but it uses workers for parallelism.
If you are more familiar with Jest, then you may have used --runInBand. The --runInBand flag in Jest forces all tests to run serially in the same process rather than creating a worker pool of child processes.
By default, Vitest runs a forks worker pool.
Selecting values for parallelism and worker pools is important for a number of reasons (including test speed in resource-constrained environments).
One of those reasons is to prevent cross-test access to shared resources such as databases. Failing to isolate this will lead to dirty reads or false assumptions about the current state of the database and, in turn, flaky tests.
Given the lightweight nature of PGLite and knowing that tests are parallelized per test file but serially run within, we can workaround this problem by spinning up an in-memory database for every test file.
Understanding alternative approaches
Before going too far, it's worth knowing some other approaches and what their trade-offs are.
In the scenario of spinning up database for tests to interact with, we already know that would be required to run tests in isolation to prevent flakiness.
Test shards will split up tests in N shards (where N is the number of shards nominated by you). Doing so while also spinning up N test containers can re-enable parallelism to an extent, but each test shard still needs to run their own tests serially within the shard.
When working with databases that do not offer in-memory solutions, TestContainers can still be your best bet for enable some form of parallelism with test shards.
Configuring Vitest and Prisma for in-memory PGLite
In my demo code, I've followed the Getting Started guide for Prisma and made use of that demonstration schema.
Following that, Vitest needs to be installed and configured to have following options:
Most of it this is default configuration, but importantly we have configured a global setup file, a setup file for tests and updated our worker pool options.
In our case specifically, I've opted to run isolated threads and am making use of node:os (since I am using Node.js in this post) to provide a limit for maxThreads. I've set -1 on the count from the max CPU cores in order not to detract compute power away from other processes. You will likely want this or -2.
Please note: it's worth reviewing the configuration options and refining your configuration for what suits. Do not forget that your CI test runner environment may be different to local.
Files added to globalSetup run once prior to running the tests, while the files within setupFiles run before each test file.
You want to configure it so that globalSetup will prepare what we need for our PGLite database while setupFiles will configure the in-memory database itself and allow it to be accessed for the files tests.
Configuring our global setup file
Starting with the global setup file, we can add the following:
import { generateDbInitSql } from "./db-setup";

export async function setup() {
  console.log("🔧 Setting up test environment...");

  try {
    // Generate the schema SQL
    await generateDbInitSql();
    console.log("✅ Database schema generated and cached");
  } catch (error) {
    console.error("❌ Failed to generate database schema:", error);
    throw error;
  }
}

export async function teardown() {
  console.log("🧹 Global teardown complete");
}
In Vitest, the setup and teardown functions are key functions that the test runner looks for. In my case (and to keep it simple), I'm running a generateDbInitSql function as part of global setup.
My db-setup.ts file looks like the following:
import { readFileSync } from "node:fs";

import type { PrismaClient } from "../../generated/prisma";
import type { PGlite } from "@electric-sql/pglite";
import { exec } from "node:child_process";
import { promisify } from "node:util";
import { resolve } from "node:path";
import { cwd } from "node:process";
const execAsync = promisify(exec);

declare global {
  var testPrisma: PrismaClient;
  var testDb: PGlite;
}

const migrationOutputPath = resolve(cwd(), "tmp/migration.sql");

/**
 * The Prisma CLI does not (yet) support initializing a PGLite database. Instead, we get Prisma to
 * dump a single migration file which can then be loaded by a PGLite instance to setup the
 * database.
 *
 * @see https://github.com/lucasthevenet/pglite-utils/issues/8#issuecomment-2147944548
 */
export async function generateDbInitSql() {
  const prismaSchemaPath = resolve(cwd(), "prisma/schema.prisma");
  await execAsync(
    `prisma migrate diff --from-empty --to-schema-datamodel ${prismaSchemaPath} --script > ${migrationOutputPath}`
  );
}

export function getSchemaSql() {
  return readFileSync(migrationOutputPath, "utf-8");
}
In the file, I am running a Prisma shell command in order to generate a single migration file that can be used for setting up the database for each test.
At the time of writing, Prisma does not expose an API to do this programmatically.
In my case, the output file will be placed locally within a tmp/ folder. This will run everytime we re-run tests.
Configuring our test setup file
The setup file adds some hooks to our before/after blocks to configure the PGLite database for Prisma and to set that to our globals:
import { beforeAll, afterAll, beforeEach } from "vitest";
import { PGlite } from "@electric-sql/pglite";
import { PrismaPGlite } from "pglite-prisma-adapter";
import { PrismaClient } from "../../generated/prisma";
import { getSchemaSql } from "./db-setup";

let db: PGlite;
let prisma: PrismaClient;

beforeAll(async () => {
  console.log("🚀 Setting up database for test file...");

  db = new PGlite({
    dataDir: "memory://",
  });

  await db.exec(getSchemaSql());

  prisma = new PrismaClient({
    adapter: new PrismaPGlite(db),
  });

  // Make available globally
  global.testDb = db;
  global.testPrisma = prisma;

  console.log("✅ Database ready!");
});

afterAll(async () => {
  console.log("🧹 Cleaning up database...");

  try {
    await prisma.$disconnect();
    await db.close();
  } catch (error) {
    console.warn("Cleanup warning:", error);
  }

  console.log("✅ Database cleaned up!");
});

beforeEach(async () => {
  // Get all table names excluding Prisma migration tables
  const result = await db.query<{ tablename: string }>(`
      SELECT tablename
      FROM pg_tables
      WHERE schemaname = 'public'
      AND tablename NOT LIKE '_prisma%'
      ORDER BY tablename;
    `);

  const tableNames = result.rows.map((row) => row.tablename);

  if (tableNames.length > 0) {
    // Disable foreign key checks, truncate all tables, re-enable
    await db.exec(`
        SET session_replication_role = replica;
        TRUNCATE TABLE ${tableNames
          .map((name) => `"${name}"`)
          .join(", ")} RESTART IDENTITY CASCADE;
        SET session_replication_role = DEFAULT;
      `);
  }
});
The beforeAll block reads in the migration SQL file, configures the PGLite client, applies the migration and then sets up a Prisma client and assigns them to globals we can access during our tests.
The afterAll block run after all the tests runs the Prisma disconnect and closes the in-memory database.
Finally, our beforeEach below will ensure the data in the database has been truncated (removed) in order to start each test with a clean start. This is incredibly important for the testing model arrange-act-assert.
You may in fact want to have seed database data for the tests. In that scenario, you should do some experimentation with seeding during beforeAll and working on how you will cleanup tables after tests to prevent polluting the data.
At this point, we are ready to run some tests.
Creating a file to write tests against
I opted to write a simple repository file that had some actions we can write tests for:
import type { PrismaClient, Role } from "../generated/prisma";

export interface CreateUserData {
  email: string;
  name?: string;
  role?: Role;
}

export interface UpdateUserData {
  email?: string;
  name?: string;
  role?: Role;
}

export class UserRepository {
  private prisma: PrismaClient;

  constructor(prisma: PrismaClient) {
    this.prisma = prisma;
  }

  /**
   * Naively return all users with no limit
   */
  async getAllUsers() {
    return this.prisma.user.findMany();
  }

  /**
   * Get user by ID
   */
  async getUser(id: number) {
    return this.prisma.user.findUnique({
      where: { id },
    });
  }

  /**
   * Create a new user
   */
  async createUser(data: CreateUserData) {
    return this.prisma.user.create({
      data: {
        email: data.email,
        name: data.name,
        role: data.role || "USER",
      },
    });
  }

  /**
   * Update user
   */
  async updateUser(id: number, data: UpdateUserData) {
    return this.prisma.user.update({
      where: { id },
      data,
    });
  }

  /**
   * Delete user
   */
  async deleteUser(id: number) {
    try {
      await this.prisma.user.delete({
        where: { id },
      });
      return true;
    } catch (error) {
      // Handle user not found
      return false;
    }
  }
}
Writing tests for our file
As for tests, I had written the following:
import { beforeEach, describe, expect, it } from "vitest";
import { UserRepository } from "./user-repository";
import { faker } from "@faker-js/faker";
import { fail } from "node:assert";

describe("UserRepository", () => {
  let userRepo: UserRepository;

  beforeEach(() => {
    userRepo = new UserRepository(global.testPrisma);
  });

  describe("getUser", () => {
    it("should return user by ID", async () => {
      const user = await global.testPrisma.user.create({
        data: {
          email: faker.internet.email(),
          name: faker.person.fullName(),
        },
      });

      const result = await userRepo.getUser(user.id);
      if (!result) {
        fail("Result was null");
      }

      expect(result).not.toBeNull();
      expect(result.id).toBe(user.id);
      expect(result.email).toBe(user.email);
    });

    it("should return null for non-existent user", async () => {
      const result = await userRepo.getUser(99999);
      expect(result).toBeNull();
    });
  });

  describe("createUser", () => {
    it("should create user with all fields", async () => {
      const userData = {
        email: faker.internet.email(),
        name: faker.person.fullName(),
        role: "ADMIN" as const,
      };

      const result = await userRepo.createUser(userData);

      expect(result.email).toBe(userData.email);
      expect(result.name).toBe(userData.name);
      expect(result.role).toBe(userData.role);
      expect(result.id).toBeDefined();
    });

    it("should create user with default role when not specified", async () => {
      const userData = {
        email: faker.internet.email(),
        name: faker.person.fullName(),
      };

      const result = await userRepo.createUser(userData);

      expect(result.email).toBe(userData.email);
      expect(result.name).toBe(userData.name);
      expect(result.role).toBe("USER");
    });

    it("should create user without name (optional field)", async () => {
      const userData = {
        email: faker.internet.email(),
      };

      const result = await userRepo.createUser(userData);

      expect(result.email).toBe(userData.email);
      expect(result.name).toBeNull();
      expect(result.role).toBe("USER");
    });

    it("should throw error for duplicate email", async () => {
      const email = faker.internet.email();

      await userRepo.createUser({
        email,
        name: faker.person.fullName(),
      });

      await expect(
        userRepo.createUser({
          email, // Same email
          name: faker.person.fullName(),
        })
      ).rejects.toThrow();
    });
  });

  describe("updateUser", () => {
    it("should update user successfully", async () => {
      const user = await global.testPrisma.user.create({
        data: {
          email: faker.internet.email(),
          name: faker.person.fullName(),
          role: "USER",
        },
      });

      const updateData = {
        name: faker.person.fullName(),
        role: "ADMIN" as const,
      };

      const result = await userRepo.updateUser(user.id, updateData);
      if (!result) {
        fail("Update result was null");
      }

      expect(result.id).toBe(user.id);
      expect(result.name).toBe(updateData.name);
      expect(result.role).toBe(updateData.role);
      expect(result.email).toBe(user.email); // Should remain unchanged
    });

    it("should update only specified fields", async () => {
      const user = await global.testPrisma.user.create({
        data: {
          email: faker.internet.email(),
          name: faker.person.fullName(),
          role: "USER",
        },
      });

      const newName = faker.person.fullName();
      const result = await userRepo.updateUser(user.id, { name: newName });
      if (!result) {
        fail("Update result was null");
      }

      expect(result.name).toBe(newName);
      expect(result.email).toBe(user.email); // Unchanged
      expect(result.role).toBe(user.role); // Unchanged
    });

    it("should return null for non-existent user", async () => {
      await expect(
        userRepo.updateUser(99999, {
          name: faker.person.fullName(),
        })
      ).rejects.toThrow();
    });

    it("should throw error when updating to duplicate email", async () => {
      const existingUser = await global.testPrisma.user.create({
        data: {
          email: faker.internet.email(),
          name: faker.person.fullName(),
        },
      });

      const userToUpdate = await global.testPrisma.user.create({
        data: {
          email: faker.internet.email(),
          name: faker.person.fullName(),
        },
      });

      await expect(
        userRepo.updateUser(userToUpdate.id, {
          email: existingUser.email, // Duplicate email
        })
      ).rejects.toThrow();
    });
  });

  describe("deleteUser", () => {
    it("should delete user successfully", async () => {
      const user = await global.testPrisma.user.create({
        data: {
          email: faker.internet.email(),
          name: faker.person.fullName(),
        },
      });

      const result = await userRepo.deleteUser(user.id);
      expect(result).toBe(true);

      // Verify user was actually deleted
      const deletedUser = await global.testPrisma.user.findUnique({
        where: { id: user.id },
      });
      expect(deletedUser).toBeNull();
    });

    it("should return false for non-existent user", async () => {
      const result = await userRepo.deleteUser(99999);
      expect(result).toBe(false);
    });
  });

  describe("getUsers", () => {
    it("should return all users", async () => {
      const data = [
        {
          email: faker.internet.email(),
          name: faker.person.fullName(),
        },
        {
          email: faker.internet.email(),
          name: faker.person.fullName(),
        },
        {
          email: faker.internet.email(),
          name: faker.person.fullName(),
        },
        {
          email: faker.internet.email(),
          name: faker.person.fullName(),
        },
        {
          email: faker.internet.email(),
          name: faker.person.fullName(),
        },
      ];
      await global.testPrisma.user.createMany({
        data,
      });

      const users = await userRepo.getAllUsers();

      // Naive test just checking database length
      expect(users.length).toBe(5);
    });
  });
});
Each of these runs some operations against the database. I've also opted to put a naive users.length check at the end of the tests to check for pollution of data and cleanup.
Running the tests
Running one test itself would be fine, but we want to check the parallelism and isolation of our tests.
I wrote a script to create 100 copies of the tests in order to have them run in parallel and see the results.
The expectation here is that we will, throughout the duration of the tests, create 100 PGLite databases. This aligns with our understanding of how the setup file that we created is expected to operate.
Running vitest run enables our test runner to start. You should see it indicate that it found 100 files and the UI will indicate that it is parallelising tests in groups.
Running 1300 tests in 25 seconds where each file only has 13 tests is seriously impressive when each tests needs to run access to a running PostgreSQL database!
For what it is worth, the timing certainly depends on compute power. 25s might be arbitrary but my computer is a 2023 MacBook pro a few years old with mid-range specs!
If you follow the logs, you will also see when tests reset the database.
Mocking out the module instead
In our current approach that we explored, it opts to create values that are added to the global namespace. Given that my approach relies on using the global namespace to arrange the data mock data first and my tested module relies on dependency injection, this works fine for me.
For alternatives where you directly import the module, you may want to consider changing the setup test file to make use of module mocks instead.
For example:
vi.mock("./path/to/your/module", async (importOriginal) => {
  const { PGlite } = await vi.importActual("@electric-sql/pglite");
  const { PrismaPGlite } = await vi.importActual("@prisma/adapter-pglite");
  const { PrismaClient } = await vi.importActual("@prisma/client");

  const db = new PGlite();
  const adapter = new PrismaPGlite(db);
  const prisma = new PrismaClient({ adapter });

  // Apply your generated schema
  const schemaSQL = getGeneratedSchema();
  await db.exec(schemaSQL);

  return { prisma, db };
});
In the above, we assume that ./path/to/your/module exports an object with prisma and db properties in this case. Adjust as required.
Be warned though: as covered earlier, over-mocking of modules can lead to testing purgatory. Use this sparingly and when it makes the most sense to do so.
Conclusion
This blog post explores how we can replace our PostgreSQL database for a full, in-memory version to significantly sped up our tests without compromising on test boundaries.
It enables use to bypass network latency and flaky limitations that can occur when running end-to-end without losing much in test confidence as we maintain a strong representation of interacting with the database.
]]><![CDATA[PostgreSQL Performance]]>https://blog.dennisokeeffe.com/blog/2025-05-27-postgresql-performance2025-05-27T00:00:00.000Z2025-05-27T00:00:00.000ZThis blog post works through some common PostgreSQL performance opportunities while teaching you about the common ailments and decision-making that you need to make around indexing with PostgreSQL.
The target audience is for TypeScript/JavaScript developers who understand the basics of interfacing with PostgreSQL, but do not yet feel confident in working directly with SQL or the impacts of certain table design decisions. For those more confident with their PostgreSQL capabilities, this post will not be anymore than a reference for you.
We will be using Prisma to abstract some of the table schema design work. This is purely to lower the barrier to entry for developers so we can spend more take talking about and showing improvements.
I've chosen Prisma primarily as it helps for me to share this piece with work colleagues at my workplace (at the time of writing), but note that what is shown focuses more on PostgreSQL and is not ORM-bound.
]]><![CDATA[Multi-tenant testing]]>https://blog.dennisokeeffe.com/blog/2025-05-24-multitenant-testing2025-05-24T00:00:00.000Z2025-05-24T00:00:00.000ZDuring a recent podcast on The Pragmatic Engineer, I heard an interesting approach to testing that Uber takes with their services by leveraging multitenancy.
The approach sounded like an interesting alternative to managing environments with microservices, something that I've been pondering resolutions to myself at work to cutdown lead time to feature deployment.
This blog post looks to built out a minimal approach to using multitenancy within TypeScript microservices, but also goes a step further to see how a unified approach to multitenancy can also be grateful support by network mocking solutions for solving those difficult-to-emulate response scenarios.
Getting started
For this project, I've built out a minimal Turborepo starting place to illustrate some of the different approaches and trade-offs with minimal Hono servers.
For the testing and servers, they are not a true reflection of my approaches to these things, but are there to focus on some key points.
For a better reflection on some of my thoughts behind testing in TypeScript for projects, please read my blog post The Boundaries of TypeScript Testing.
For this particular scenario, we are going to work with a chain of requests across three Hono servers:
service-a will be our core server.
downstream-b will be our stand-in for a service we need to call. This could be a placeholder for another micro-service within our system.
downstream-c will be our stand-in for a server that downstream-b needs to call. This could be a placeholder for another micro-service or a third-party API we need to interact with.
The scenario is straight forward: A calls B, B calls C.
Let's see this in action.
Some of the code from Service A which runs on localhost:3000:
app.post("/users", async (c) => {
  try {
    // ResultAsync.fromPromise comes from neverthrow
    const body = await ResultAsync.fromPromise(c.req.json(), (err) => err);
    if (body.isErr()) {
      c.status(400);
      return c.json(new NoJsonBodyError());
    }

    const userBodyResult = UsersPostBody.safeParse(body);
    if (!userBodyResult.success) {
      c.status(400);
      return c.json(new ValidationError(userBodyResult.error));
    }

    // We aren't storing this. Just illustrating some adjustments to the value
    const newUser = {
      id: v4(),
      name: userBodyResult.data.name,
    };

    const res = await axios.post(
      "http://localhost:3001/notifications",
      new NewUserNotification(newUser)
    );

    switch (res.data._tag) {
      case "ItemQueued":
        return c.json(new UserCreatedResponse(newUser));
      default:
        return c.json(new UnhandledResponseTagError());
    }
  } catch (err) {
    console.error("Something went wrong", err);
    return c.json(new InternalServerError());
  }
});
The "creates" a new user, then forwards the request onto another service Downstream B on localhost:3001:
app.post("/notifications", async (c) => {
  try {
    const body = await c.req.json();
    const notificationBodyResult = NotificationPostBody.safeParse(body);
    if (!notificationBodyResult.success) {
      c.status(400);
      return c.json(new ValidationError(notificationBodyResult.error));
    }

    const res = await addToQueue(
      new NewUserNotification(notificationBodyResult.data.value)
    );

    switch (res.data._tag) {
      case "SuccessfullyQueued":
        return c.json(new ItemQueuedResponse());
      // Propagate the following errors back under one
      // unified error type for the sake of it.
      case "ValidationError":
      case "TimeoutError":
        return c.json(new QueueError(res.data));
      default:
        return c.json(new InternalServerError());
    }
  } catch (error) {
    console.error("Error processing notification", error);
    return c.json(new InternalServerError());
  }
});
That code attempts to add it to a "queue" (we are not really doing this) on another endpoint localhost:3002 for our service Downstream C.
If it is successfully queued, then it will return the instance of ItemQueuedResponse, but our logic is handling scenarios for ValidationError and TimeoutError error as well where is returns an instance of QueueError.
For example's sake, Downstream C does not implement handling for a timeout error, however we can make the assumption that this has been implemented and that Downstream B can possibly return errors based off that.
From the companion code, we can run pnpm dev from the root directory to start all three servers and test our code is working:
# Start the servers
$ pnpm dev

# In another terminal window, testing the endpoint with HTTPie
$ http POST http://localhost:3000/users name="Dennis"                                          HTTP/1.1 200 OK
Connection: keep-alive
Content-Length: 92
Date: Sat, 24 May 2025 05:06:39 GMT
Keep-Alive: timeout=5
content-type: application/json

{
    "_tag": "UserCreated",
    "value": {
        "id": "37ba97de-df86-488f-9258-4867a655fec0",
        "name": "Dennis"
    }
}
At this point, we can tell that our configuration returns a response along our successful path.
We can also confirm that our NoJsonBodyError and ValidationError works by dropping the name from the request or setting it to be an invalid type:
# NoJsonBody Error
$ http POST http://localhost:3000/users
HTTP/1.1 400 Bad Request
Connection: keep-alive
Content-Length: 68
Date: Sat, 24 May 2025 05:31:17 GMT
Keep-Alive: timeout=5
content-type: application/json

{
    "_tag": "NoJsonBody",
    "value": {
        "message": "Request body is required"
    }
}

# ValidationError
$ http POST http://localhost:3000/users name:=1
HTTP/1.1 400 Bad Request
Connection: keep-alive
Content-Length: 139
Date: Sat, 24 May 2025 05:33:30 GMT
Keep-Alive: timeout=5
content-type: application/json

{
    "_tag": "ValidationError",
    "value": {
        "details": "✖ Invalid input: expected string, received number\n  → at name",
        "message": "Bad Request"
    }
}
But what happens for error scenarios that are not so easy to represent from our remote services?
In our code, there are potential errors to bubble up like the downstream services like TimeoutError which are not so easy to replicate reliably. Let's take a look at a few of our options.
Options for testing
Our setup is non-trivial. Although my test setup demonstrates multiple micro-services within the same repository, we may not always have that luxury.
At your own workplace, you may have services distributed across multiple teams and repositories, and co-ordination for this level of testing is of utmost importance across the board.
Let's walkthrough some possible solutions for us now.
An approach using testing library mocks
The most basic possibility for emulating certain scenarios is to make use of library mocks.
Popular TypeScript testing frameworks such as Jest and Vitest have mocking capabilities out of the box.
Depending on you configure this, you can stub a return value for a request library (like our Axios library from the examples) or even a module that interacts with the service in order to test certain scenarios.
The benefits of this approach is that it is a quick-and-easy approach that comes built into our testing tools.
The major downside is that your test boundary ends where the mock starts. Your test can no longer give certain guarantees and confidence from the tools that are now mocked out. If we mock out our request library, then we have no confidence in the request library returning the response from the network request itself.
This can be a major loss from the point-of-view of testing that aims to, at a minimum, test all modules within a service until (at least) the network boundary.
An approach using mock server infrastructure
On the other end of the scale is to stand up infrastructure to emulate network traffic. This could be a scenario of running different environments for your service, but it can also move to more extreme cases of standing up infrastructure in an attempt to emulate third-party services and APIs that you interface with in production.
This approach certainly has a spectrum of complexity.
On the side of standing up internal service infrastructure environments, it can give you a chance to run test boundaries that give you test confidence as far as deeper data layers like your databases.
The trade-off with the internal services is that there is always a cost to infrastructure which is not just monetary. There is time-to-production costs, infrastructure management, complexity increases and more. In scenarios where you have multiple environments and service with multiple internal down stream services, you can also face challenges around all environments being at parity for running tests.
It is still standardized to run different environments for your services, but it's worth noting that the approach to this varies from company-to-company and there is still such a thing as over-kill or misprovisioning of resources.
In the case of third-party mock service infrastructure, you face the cost of re-implementing and maintaining an emulation of their third party service's logic and run the risk of implementation logic mismatches.
An approach using Mock Service Worker
With JavaScript/TypeScript, there is the delightful Mock Service Worker (MSW) library which enables you to stub out responses at the network level.
This differs from the module-mocking approach we spoke about earlier in that you service still operates end-to-end from within it's service boundary. As long as your mocked response matches that of the expected success/error responses, then MSW is an unbelievably useful option for emulating response types that are hard to emulate.
A basic example of MSW from their documentation:
// src/mocks/handlers.js
import { http, HttpResponse } from "msw";

export const handlers = [
  // Intercept "GET https://example.com/user" requests...
  http.get("https://example.com/user", () => {
    // ...and respond to them using this JSON response.
    return HttpResponse.json({
      id: "c7b3d8e0-5e0b-4b0f-8b3a-3b9f4b3d3b3d",
      firstName: "John",
      lastName: "Maverick",
    });
  }),
];
When MSW is intercepting network calls, a call to https://example.com/user from your request library will respond with a valid HTTP response with a JSON body.
By enabling multiple tenants (such as test environments, canary releases, and product lines) to coexist within the same infrastructure, Uber achieves code isolation, flexible traffic routing, and improved integration testing, ultimately supporting rapid feature deployment and reliable service performance.
More relevant around the integration testing, Uber uses routing to test services without the constraints of static environment configuration.
Consider a scenario where Uber needs to test a new version of Service B, which interacts with Services A, C, and D. Instead of deploying this new version in a separate staging environment, Uber deploys it as a distinct tenant within the production environment, referred to as Service B' (Service B Prime). Test traffic is routed specifically to Service B', while production traffic continues to flow through the original Service B. This setup ensures that the new version can be tested in a live environment without impacting the production services.
Uber uses HTTP headers to implement multi-tenancy for integration testing in their microservice architecture.
Here's how it works:
Tenancy Context Propagation: When a request is made (for example, from a test client), Uber adds a special tenancy header to the HTTP request (e.g., X-Tenant-ID: integration-test-123).
Traffic Routing: Uber's internal routing and service discovery systems use this header to direct the request to the correct tenant-specific instance of the service (e.g., a test version of Service B).
End-to-End Isolation: This header is propagated across all service calls, ensuring that the entire chain of microservices (B → C → D) remains within the same test tenant. This allows for full end-to-end testing without touching production instances.
While this approach puts a lot of emphasis on a consistent system, it also enables us to reduce some of the complexities previously spoken about around managing environments for microservices and we can leverage an approach similar using HTTP headers (or a consistent equivalent) in order to make a combination of previously explained processes in an attempt to simplify testing new versions or routing to specific HTTP mock responses.
Rethinking our approach to integration testing
Keeping in mind the different tooling and options that we currently have, we can start to pick-and-choose a combination of options to best reflect the trade-offs we want to make.
In our current setup, I'm thinking this will be what works best:
Making use of headers to conditionally intercept requests when MSW is enabled.
Configuring middleware to conditionally return certain HTTP responses from the service itself.
Providing route management using the headers to conditionally alter where requests are sent.
With that in mind, let's work through what some of this can look like.
Taking another look at our Mock Service Worker approach
With the idea in mind around using HTTP headers, we can make use of MSW's passthrough helper in order to conditionally fire off the original request without mocking.
When running in test modes, we can enable MSW and then using those testing headers in order to run our tests. Let's look at how that could look.
The above code will conditionally switch on a X-Tenancy-ID value if provided and only when MSW is enabled and running. In scenarios where MSW is not enabled, it will not have an impact.
In the case of the development server and testing, we can conditionally enable MSW for the duration of the tests.
On the assumption of a Vitest test setup that has MSW configured to run using the following hooks:
// vitest.setup.ts
import { beforeAll, afterEach, afterAll } from "vitest";
import { server } from "../src/mocks/node";

// Start server before all tests
beforeAll(() => {
  server.listen({
    // If you wanted to, you could set warn here in dev mode
    onUnhandledRequest: "bypass",
  });
});

// Reset handlers after each test (important for test isolation)
afterEach(() => {
  server.resetHandlers();
});

// Close server after all tests
afterAll(() => {
  server.close();
});
Then we can write a test to confirm that our configuration works with the X-Tenancy-ID configuration we've made with the following test:
import axios, { isAxiosError } from "axios";
import { ResultAsync } from "neverthrow";
import { describe, expect, it } from "vitest";

/**
 * These tests expect all the servers to be up and running.
 */
describe("app", () => {
  describe("creating a user", () => {
    describe("success states", () => {
      it("successfully creates a user", async () => {
        const response = await axios.post(
          "http://localhost:3000/users",
          {
            name: "Dennis",
          },
          {
            headers: {
              "Content-Type": "application/json",
            },
          }
        );

        expect(response.status).toBe(200);
        expect(response.data._tag).toBe("UserCreated");
      });
    });

    describe("error states", () => {
      it("requires a name property within the json body", async () => {
        const response = await ResultAsync.fromPromise(
          axios.post(
            "http://localhost:3000/users",
            {},
            {
              headers: {
                "Content-Type": "application/json",
              },
            }
          ),
          (err) => err
        );

        // There is likely a better way to handle this, but will
        // leave it in as it's the assertions that I care most
        // about using for illustration purposes.
        if (
          !response.isErr() ||
          !isAxiosError(response.error) ||
          !response.error.response
        ) {
          throw new Error("Unexpected request success");
        }

        expect(response.error.response.status).toBe(400);
        expect(response.error.response.data._tag).toBe("ValidationError");
      });

      it("returns information on the queue service TimeoutError", async () => {
        const response = await ResultAsync.fromPromise(
          axios.post(
            "http://localhost:3000/users",
            {
              name: "Dennis",
            },
            {
              headers: {
                "Content-Type": "application/json",
                "X-Tenancy-ID": "DownstreamB/TimeoutError",
              },
            }
          ),
          (err) => err
        );

        // There is likely a better way to handle this, but will
        // leave it in as it's the assertions that I care most
        // about using for illustration purposes.
        if (
          !response.isErr() ||
          !isAxiosError(response.error) ||
          !response.error.response
        ) {
          throw new Error("Unexpected request success");
        }

        expect(response.error.response.status).toBe(500);
        expect(response.error.response.data._tag).toBe("QueueError");
        expect(response.error.response.data.value._tag).toBe("TimeoutError");
      });

      it("returns information on the queue service ValidationError", async () => {
        const response = await ResultAsync.fromPromise(
          axios.post(
            "http://localhost:3000/users",
            {
              name: "Dennis",
            },
            {
              headers: {
                "Content-Type": "application/json",
                "X-Tenancy-ID": "DownstreamB/ValidationError",
              },
            }
          ),
          (err) => err
        );

        // There is likely a better way to handle this, but will
        // leave it in as it's the assertions that I care most
        // about using for illustration purposes.
        if (
          !response.isErr() ||
          !isAxiosError(response.error) ||
          !response.error.response
        ) {
          throw new Error("Unexpected request success");
        }

        expect(response.error.response.status).toBe(500);
        expect(response.error.response.data._tag).toBe("QueueError");
        expect(response.error.response.data.value._tag).toBe("ValidationError");
      });
    });
  });
});
Our tests are checking the bare minimum, and I've written them in a way that favors illustrating the MSW mock conditionally in action (it could certainly do with some TLC).
In our test scenarios, MSW mocks are configured to run for each test.
Our successful scenario bypasses the MSW mock and calls into our microservices Downstream B and Downstream C.
Our failure scenarios that pass the X-Tenancy-ID values that match our MSW mock conditions will be intercepted at the network level and never make it to Downstream B. That being said, the mocked JSON responses are a one-to-one representation of responses from Downstream B.
Of course, we can also make use of this if MSW is enabled on our development servers to check that we are getting the expected responses.
# An example of an MSW intercepted endpoint
$ http POST http://localhost:3000/users "X-Tenancy-ID:DownstreamB/TimeoutError" name="Dennis"
HTTP/1.1 500 Internal Server Error
Connection: keep-alive
Content-Length: 53
Date: Sun, 25 May 2025 11:42:24 GMT
Keep-Alive: timeout=5
content-type: application/json

{
    "_tag": "QueueError",
    "value": {
        "_tag": "TimeoutError"
    }
}
Great! So we've managed to use the X-Tenancy-ID header to incept requests for difficult-to-emulate downstream error responses in our tests to ensure that Service A can handle those as expected on its infrastructure.
The next step for us is make use of that header for redirecting requests.
Implementing multi-tenancy for services
On real network infrastructure, there are a number of ways to manage routing. Examples of this could be re-routing at API Gateway, load balancers, reverse proxies or within services themselves (along with more alternatives!). Each come with their own value propositions and trade-offs.
In our example, we're going to simplify things by conditionally routing requests based on the X-Tenancy-ID from within a service application. Again, it's best to do a technical spike and review your own systems in order to understand what may be most beneficial for your needs.
For the example, I'm going to create a duplicate of the code in Downstream C. For the demonstration today, we'll name it Downstream C Prime, but you can think it of as emulating a separate, updated deployment of Downstream C that we want to test out.
For some contrived code in Service B that conditionally re-routes traffic based on the X-Tenancy-ID header, I have the following:
app.post("/notifications", async (c) => {
  try {
    const body = await c.req.json();
    const notificationBodyResult = NotificationPostBody.safeParse(body);
    if (!notificationBodyResult.success) {
      c.status(400);
      return c.json(new ValidationError(notificationBodyResult.error));
    }

    // This is shoe-horned in for demonstration. In reality, you should come up
    // with a better approach to resolving this value.
    let baseUrl;
    switch (c.req.header("X-Tenancy-ID")) {
      case "Feature/QueueUpdate":
        baseUrl = "http://localhost:3003";
        break;
      default:
        baseUrl = "http://localhost:3002";
    }

    const res = await addToQueue(
      new NewUserNotification(notificationBodyResult.data.value),
      baseUrl
    );

    switch (res.data._tag) {
      case "SuccessfullyQueued":
        return c.json(new ItemQueuedResponse());
      case "SuccessfullyQueuedAlt":
        return c.json(new ItemQueuedNewVersionResponse());
      // Propagate the following errors back under one
      // unified error type for the sake of it.
      case "ValidationError":
      case "TimeoutError":
        return c.json(new QueueError(res.data));
      default:
        return c.json(new InternalServerError());
    }
  } catch (error) {
    console.error("Error processing notification", error);
    return c.json(new InternalServerError());
  }
});
In the above code, we have code-dependent conditional logic to resolve the base URL to use for the request with a fallback to the default service.
The updated Downstream C Prime service also has an different response to emulate an "updated" version of the service.
We can test this works against our running servers by making a few calls:
# Without the tenancy ID
$ http POST http://localhost:3000/users name="Dennis"
HTTP/1.1 200 OK
Connection: keep-alive
Content-Length: 92
Date: Sun, 25 May 2025 09:59:40 GMT
Keep-Alive: timeout=5
content-type: application/json

{
    "_tag": "UserCreated",
    "value": {
        "id": "e0371a7e-56d4-4c4e-a3f3-8942caca0003",
        "name": "Dennis"
    }
}

# With the tenancy ID
$ http POST http://localhost:3000/users X-Tenancy-ID:Feature/QueueUpdate name="Dennis"
HTTP/1.1 200 OK
Connection: keep-alive
Content-Length: 68
Date: Sun, 25 May 2025 09:58:48 GMT
Keep-Alive: timeout=5
content-type: application/json

{
    "_message": "This uses the alternative tenant",
    "_tag": "UserCreated"
}
As we can see, our servers are now responding with different values for our service.
We can also configure our tests for us to test both these alternatives by adding the alternative route as another success route:
describe("success states", () => {
  it("successfully creates a user", async () => {
    const response = await axios.post(
      "http://localhost:3000/users",
      {
        name: "Dennis",
      },
      {
        headers: {
          "Content-Type": "application/json",
        },
      }
    );

    expect(response.status).toBe(200);
    expect(response.data._tag).toBe("UserCreated");
  });

  it("successfully creates a user taking the alternative path", async () => {
    // This test will run against Downstream C Prime thanks
    // to the X-Tenancy-ID
    const response = await axios.post(
      "http://localhost:3000/users",
      {
        name: "Dennis",
      },
      {
        headers: {
          "Content-Type": "application/json",
          "X-Tenancy-ID": "Feature/QueueUpdate",
        },
      }
    );

    expect(response.status).toBe(200);
    expect(response.data._tag).toBe("UserCreated");
    expect(response.data._message).toBe("This uses the alternative tenant");
  });
});
When we run our tests with pnpm test, we can see that all tests pass.
At this point, we now have a solution to optionally intercept or re-route traffic for our services based on the X-Tenancy-ID provided.
Conclusion
This post explored a proof-of-concept for multi-tenant testing, as well as using networking mocking solutions to also reduce the amount of infrastructure management required.
These approaches adequately showed the potential that this approach has with enough buy-in and unification. I believe that refining these ideas with a technical design relevant to your situation has the potential to greatly simplify testing complicated microservice architecture systems.
]]><![CDATA[Retries, timeouts and spans for TS Rest clients]]>https://blog.dennisokeeffe.com/blog/2025-04-10-retries-spans-timeouts-for-ts-rest2025-04-10T00:00:00.000Z2025-04-10T00:00:00.000ZWorking with TS Rest is great for any workflows where your consumers are TypeScript frontend and backend applications.
If you work extensively with Zod and tools like Tanstack Query (if you are using Vue/React at this point in time), it can be a natural fit and time saver to generate and distribute your clients this way.
In recent work, I've been using TS Rest to pair up my smaller Hono projects with clients, but it becomes immediately apparent to me just how good Tanstack Query can be out of the box with it's out-of-the-box capabilities around retries and caching.
This short blog post aims to look at ways to make use of TS Rest customization in order to have some control over how we can introduce this to our other clients.
Custom TS Rest clients
TS Rest gives you the capability to create your own custom client which can be used for controlling how your HTTP calls are made.
In their example code here, they expose their default tsRestFetchApi and allow you to control anything you want based off the args prior to making any calls.
There are also guides on how to create your own custom client with Axios:
import axios, { Method, AxiosError, AxiosResponse, isAxiosError } from "axios";
import { initClient } from "@ts-rest/core";
import { contract } from "./contract";

const client = initClient(contract, {
  baseUrl: "http://localhost:3333/api",
  baseHeaders: {
    "Content-Type": "application/json",
  },
  api: async ({ path, method, headers, body }) => {
    const baseUrl = "http://localhost:3333/api"; //baseUrl is not available as a param, yet
    try {
      const result = await axios.request({
        method: method as Method,
        url: `${this.baseUrl}/${path}`,
        headers,
        data: body,
      });
      return {
        status: result.status,
        body: result.data,
        headers: result.headers,
      };
    } catch (e: Error | AxiosError | any) {
      if (isAxiosError(e)) {
        const error = e as AxiosError;
        const response = error.response as AxiosResponse;
        return {
          status: response.status,
          body: response.data,
          headers: response.headers,
        };
      }
      throw e;
    }
  },
});
In our example code today, we will be creating a custom handler for our api property with Axios.
What can we extend?
We will be doing more "showing" than "telling" in this short blog post.
In short, the standard ApiFetcherArgs which are passed to the api handler extending the exported InitClientArgs. Both ApiFetcherArgs and InitClientArgs are available type exports from ts-rest.
Let's show some type definitions from my current version of TS Rest to show what we have to work with.
As long as we follow that contractual obligation, we can customize things however we want.
Enabling retries, timeouts and more
At this point, we can show some code.
It's worth highlighting: this code is a rough proof-of-concept and nothing special. It will illustrate enough to get the point across, but be sure to make adjustments as your needs suit.
The code I will show you is a class that has a handler method which meets the contractual obligation to be used.
In the above code, we have some helpers to determine whether a code is "retry-able", we also pass a timeout argument property to the Axios client where Axios can control the abort signals for our calls and we leave some placeholder space for starting and stopping "spans".
An example of implementing our client could now look like this:
import { initClient } from "@ts-rest/core";
import { contract } from "./contract";
import { TsRestClient } from "./rpc-class";

async function main() {
  // Initialize the client with the custom API
  const client = initClient(contract, {
    baseUrl: "http://localhost:3000",
    baseHeaders: {},
    api: new TsRestClient().handler,
  });

  // Example usage with helper options
  const result = await client.authors.getAuthors({
    retries: 3,
    span: { name: "fetch-authors", options: { operation: "read" } },
    timeout: 10000,
  });
  console.log(result.status);

  switch (result.status) {
    case 200:
      console.log(result.body);
      break;
    case 404:
      console.log(result.body);
      break;
    case 500:
      console.log(result.body);
      break;
  }
}

main();
In the above code, I pass the api code the handler method property of a new TsRestClient instance.
More notably, it is type safe for my to pass custom arguments for retries, span and timeout.
In the case of my contract, I expect I can return 200, 404 or 500s. If I run the code, I get the following for each scenario:
Other than the fact that my logging is zero-indexed (oops), you can now see that each code has different behaviour based on the responses.
In the case of my 200, I have a span start, span end and log the contract result from my test server.
The 404 behaves in a similar manner, but returns with not found after just one attempt. This follows my default configuration behind what are the retryable statuses.
Finally, the 500 demonstrates the retries. I makes four attempts in total, each with some exponential back-off based on my settings.
Our current API allows for custom overrides per invocation. So if we wanted to, we could enable 404s to be retryable.
As mentioned, we have placeholders for spans there and I haven't touched on caching.
It would be trivial to augment this to use an in-memory cache that you can opt into and extend our API options to include cache options.
As for the spans, you're more likely to be using something like Otel. In that case, you might have a configuration like the following:
import { NodeTracerProvider } from "@opentelemetry/sdk-trace-node";
import { Resource } from "@opentelemetry/resources";
import { SemanticResourceAttributes } from "@opentelemetry/semantic-conventions";
import { AWSXRayIdGenerator } from "@opentelemetry/id-generator-aws-xray";
import { AWSXRayPropagator } from "@opentelemetry/propagator-aws-xray";
import { AWSXRayExporter } from "@opentelemetry/exporter-aws-xray";
import { registerInstrumentations } from "@opentelemetry/instrumentation";
import { getNodeAutoInstrumentations } from "@opentelemetry/auto-instrumentations-node";

import { trace, context, propagation } from "@opentelemetry/api";

// Create the tracer provider with AWS X-Ray ID generator
const provider = new NodeTracerProvider({
  idGenerator: new AWSXRayIdGenerator(),
  resource: new Resource({
    [SemanticResourceAttributes.SERVICE_NAME]: "my-node-service",
  }),
});

// Set the X-Ray exporter
provider.addSpanProcessor(new SimpleSpanProcessor(new AWSXRayExporter()));

// Register the provider
provider.register();

// Set the global propagator to X-Ray format
propagation.setGlobalPropagator(new AWSXRayPropagator());

// Optional: register all known instrumentations
registerInstrumentations({
  instrumentations: [getNodeAutoInstrumentations()],
});

// Now you can use OpenTelemetry as usual
const tracer = trace.getTracer("my-node-service");
Once you have a tracer available, you can start and stop spans like so:
const tracer = trace.getTracer("my-node-service");

// Somewhere in your business logic
const span = tracer.startSpan("fraudCheck");

context.with(trace.setSpan(context.active(), span), () => {
  try {
    // do fraud check
    if (someRiskyCondition) {
      span.setAttribute("fraud.score", 95);
    }
    span.addEvent("fraud check complete");
  } catch (err) {
    span.recordException(err);
    span.setStatus({ code: SpanStatusCode.ERROR });
  } finally {
    span.end();
  }
});
Instead of passing in the span arguments we made, you might pass in the span or context itself and have your client manage its lifecycle or attribute properties.
Conclusion
Short post today. I wanted to just show off a proof-of-concept that I had in order to illustrate that you can encapsulate some of that timeout and retry logic into your custom client logic so that others can make use it in their projects when calling your servers.
]]><![CDATA[Well Known JSON Web Key Sets (JWKS)]]>https://blog.dennisokeeffe.com/blog/2025-04-09-well-known-jwks2025-04-09T00:00:00.000Z2025-04-09T00:00:00.000ZWhen working across multiple services, being able to verify the source of a JSON Web Token (JWT) plays a vital role in proving token integrity.
In this blog post, we'll be working through the process of distributing JWTs and verifying them in another service by making use of a "well-known" public endpoint.
Well-known URIs are public endpoints prefixed with /.well-known/.
Defined in RFC 8615, the purpose of well known endpoints is to add a consistent resolution to web applications that require the discovery of information about an origin (also known as "site-wide metadata").
| Well-Known Endpoint | Purpose | Example URL |
| ---------------------------- | -------------------------------------------------------------------------------------------------------------------------------------- | ------------------------------------------------------------ | --- |
| openid-configuration | Provides OpenID Connect provider configuration details, including endpoints and supported capabilities. | https://example.com/.well-known/openid-configuration |
| jwks.json | Supplies the JSON Web Key Set (JWKS), containing public keys used to verify JSON Web Tokens (JWTs) issued by the authorization server. | https://example.com/.well-known/jwks.json |
| webfinger | Enables discovery of information about entities (e.g., users) identified by a URI, often used in federated systems. | https://example.com/.well-known/webfinger |
| oauth-authorization-server | Provides metadata about the OAuth 2.0 authorization server, detailing its capabilities and endpoints. | https://example.com/.well-known/oauth-authorization-server |
| security.txt | Specifies security policies and contact information for reporting vulnerabilities. | https://example.com/.well-known/security.txt | |
Well-known endpoints standardize the process of discovering essential service information and ease integration across various services.
As noted in the above table, we can use this supply the JSON Web Key Set that contains the public keys that help us with the JWT verification process.
Verifying JWTS without well-known endpoints
Before demonstrating an example of a well-known endpoint assisting with JWT verification, we can take a look at how verification works.
In order to do this, we need to generate a key-pair to use. For the sake of mixing things up compared to my previous posts, I'll generate this key pair using node-forge:
import forge from "node-forge";
import fs from "node:fs";

const { pki } = forge;

// 1. Generate RSA keypair
const keypair = pki.rsa.generateKeyPair(2048);

// 2. Convert keys to PEM format
const privateKeyPem = pki.privateKeyToPem(keypair.privateKey);
const publicKeyPem = pki.publicKeyToPem(keypair.publicKey);

// 3. Print or save them
console.log("🔐 Private Key:\n", privateKeyPem);
console.log("🔓 Public Key:\n", publicKeyPem);

// Optional: save to files
fs.writeFileSync("keys/private.pem", privateKeyPem);
fs.writeFileSync("keys/public.pem", publicKeyPem);
Running this script will generate my key-pair for me in a keys folder.
Once completed, we can use another script to generate a JSON Web Token (JWT) and then run verification across it.
As you might expect, if you update any of the verification values to expect something different i.e. a different issuer or audience, then re-running the script will fail the validation.
Verification with a well-known JWKS endpoint
Now that we understand how verification can work for JWTs, let's use a local server with a well-known endpoint to perform the verification this time.
For our server file, we can add the following:
import { Hono } from "hono";
import { exportJWK, importSPKI } from "jose";
import fs from "node:fs";
import { serve } from "@hono/node-server";

const publicKey = fs.readFileSync("./keys/public.pem", "utf8");

// Convert PEM to KeyLike (SPKI = public key in PEM format)
const key = await importSPKI(publicKey, "RS256");

// Convert the public key to JWK format
const jwk = await exportJWK(key);
jwk.kid = "test-key"; // must match JWT `kid`

const app = new Hono();

// Serve JWKS
app.get("/.well-known/jwks.json", (c) => {
  return c.json({ keys: [jwk] });
});

serve(app, (info) => {
  console.log(`Listening on http://localhost:${info.port}`);
});
We import helper functions from the widely used jose package for converting our public key string into a format that can be exported as a JSON Web Key.
The SPKI format is used for representing public keys, and it's this format that we need to pass as an argument for exportJWK.
We start up a simple Hono web server and serve our JSON Web Key as part of an array of keys from the endpoint /.well-known/jwks.json.
As for the verification script, we can follow a similar script to before with some helper functions to derive our public key used for the verification:
import jwt from "jsonwebtoken";
import axios from "axios";
import jwkToPem from "jwk-to-pem";
import fs from "node:fs";

const issuer = "http://localhost:3000"; // your issuer that serves the .well-known/jwks.json
const audience = "your-audience";
const algorithm = "RS256";
const kid = "test-key";
const jwksUrl = `${issuer}/.well-known/jwks.json`;

const privateKey = fs.readFileSync("./keys/private.pem");

const token = jwt.sign({ sub: "user_123", role: "admin" }, privateKey, {
  algorithm,
  keyid: kid,
  expiresIn: "1h",
  issuer,
  audience,
});

async function getPublicKeyFromJwks(kid: string): Promise<string> {
  const { data } = await axios.get(jwksUrl);
  const jwk = data.keys.find((key: any) => key.kid === kid);

  if (!jwk) {
    throw new Error(`Key with kid "${kid}" not found in JWKS`);
  }

  return jwkToPem(jwk);
}

async function verifyToken(token: string) {
  const decodedHeader = jwt.decode(token, { complete: true })?.header;

  if (!decodedHeader || !decodedHeader.kid) {
    throw new Error("Missing or invalid token header");
  }

  const publicKey = await getPublicKeyFromJwks(decodedHeader.kid);

  const payload = jwt.verify(token, publicKey, {
    algorithms: [algorithm],
    issuer,
    audience,
  });

  return payload;
}

verifyToken(token)
  .then((decoded) => {
    console.log("✅ Token is valid!");
    console.log("Decoded payload:", decoded);
  })
  .catch((err) => {
    console.error("❌ Token verification failed:", (err as Error).message);
  });
In this script, we make use of the jwk-to-pem library to convert the JWK that we fetch into the PEM format. We also make use of an HTTP client Axios in order to make our GET request.
It's worth also calling out here that we could have used the jose library as well. It has some helper functions for verifying JWTs and importing JWKs. I opted not to use it in order to keep our script that previously verified with the jsonwebtoken library aligned to make it easier to see the differences.
Another potentially confusing point to clarify: I am creating the JWT within the script with the private key that we generated previously, but using the well-known endpoint to verify it with the public key information that we also generated earlier in this blog post.
If we run our updated script, it will give us our desired verification:
Great! We successfully verified our JSON Web Token using the well-known endpoint that shared our JSON Web Keys.
Conclusion
We explored the use of Well-Known JSON Web Key Sets (JWKS) for dynamically verifying JSON Web Tokens (JWTs) across distributed services.
This becomes useful in your own services if you have a centralized service delegating JWTs that you need extra verification of that are durable against key-rotations.
This was done using well-known endpoints, which are worth knowing as these endpoints have many use cases for distributing service metadata. You are likely to require doing this yourself with other 3rd parties at some stage.
]]><![CDATA[Mutual Transport Layer Security (mTLS)]]>https://blog.dennisokeeffe.com/blog/2025-04-08-mutual-transport-layer-security-mtls2025-04-08T00:00:00.000Z2025-04-08T00:00:00.000ZMutual Transport Layer Security (mTLS) is an extension to Transport Layer Security (TLS) that, in addition to verifying the server's, also verifies the connecting client's identity.
It's an extra layer of security that can be applied at the networking layer of the OSI model (layer 4) and is used extensively within architectures such as financial systems and service meshes.
This post will work through defining what mTLS is, work through some key components such as Certificate Authorities (CAs), Certificate Signing Requests (CSRs) and x.509 certificates, work through building an example application with your own chain of trust that includes a root CA, intermediary CA, client and server and round off with some real-world case studies.
Mutual Transport Layer Security
To understand how mTLS extends TLS, let's recap how TLS 1.3 works at a high level.
The verification process of TLS 1.3 introduces a more streamlined handshake compared to earlier versions.
It reduces the number of round trips and encrypts more of the handshake itself while maintaining strong security guarantees.
In standard (one-way) TLS, only the server is authenticated.
A high-level summary of the one-way TLS 1.3 handshake:
Client sends a ClientHello, which includes supported cipher suites, extensions (like ALPN: Application-Layer Protocol Negotiation), and its key share (used for Diffie-Hellman key exchange).
Server responds with a ServerHello, its own key share, and its certificate (usually signed by a trusted Certificate Authority).
The client verifies the server's certificate using its trust store.
Both sides use their key shares to derive a shared secret (ECDHE: Elliptic Curve Diffie-Hellman Ephemeral is common).
A secure, encrypted channel is established using symmetric encryption based on the shared secret.
The ClientHello and ServerHello messages are described in detail in the TLS 1.3 specification.
In this process, the server proves its identity via the certificate, but the client remains anonymous.
In mutual TLS (mTLS), the handshake includes an optional client authentication step, allowing both parties to verify each other's identities.
A high-level summary of the mutual TLS 1.3 handshake:
Client initiates a connection with a ClientHello and its key share.
Server replies with ServerHello, its own key share, and its certificate.
Client verifies the server's certificate.
Server sends a CertificateRequest message, asking the client to authenticate.
Client responds with its own certificate and a CertificateVerify message (proving it holds the private key).
Server verifies the client's certificate and signature.
Both parties complete the handshake using the agreed key derived from their shared key shares.
A secure, mutually authenticated channel is established.
In mTLS, the connection is only considered secure after both certificates have been verified and the shared key is established.
TLS 1.3's enhancements make the handshake more efficient while preserving the flexibility to support mTLS when mutual identity verification is required.
In order to understand more on verification with a trusted root Certificate Authority, we need to better understand how certificates work in general and their relation to this process.
Certificates, Authorities, Signing Requests
Let's start by defining some of the key terms:
Term
Description
X.509 Certificate
A standard digital certificate format that binds a public key to an identity (e.g. a server or user). Used in TLS to prove identity. Includes fields like Subject, Issuer, Validity Period, and the Public Key.
Public/Private Key Pair
A cryptographic pair: the private key is kept secret, and the public key is shared. If data is encrypted with one, it can only be decrypted with the other. Certificates include the public key.
Certificate Authority (CA)
A trusted entity that issues and signs certificates. Acts like a passport office verifying identities and vouching for them via digital signatures.
Certificate Signing Request (CSR)
A file generated by an entity (e.g. a server) containing its public key and identity info, which it submits to a CA to request a signed certificate.
Certificate Signing and Trust Chain
A signed certificate can be verified by following the "chain of trust" up to a trusted root CA. Intermediate CAs are often used between end-entity certs and root CAs.
Root CA
The top of a certificate chain. Usually self-signed and highly trusted. Kept offline for security and only used to sign intermediate CAs.
Intermediate CA
A certificate authority signed by the root CA (or another intermediate) that signs end-entity certs. Keeps the root CA isolated and adds flexibility for revocation/rotation.
Self-Signed Certificate
A certificate signed with its own private key (e.g. a root CA or test cert). Not trusted unless explicitly added to a system's trust store.
CA-Signed Certificate
A certificate signed by a trusted CA. Automatically trusted by systems and browsers if the CA is in the trusted root store.
Trust Store
A collection of root certificates that a client or system inherently trusts. Used to verify whether a certificate's signature is valid and the issuer is trusted.
Key Share
The key share is a public key generated for a temporary (ephemeral) key exchange.
Most of these terms require some form of memorization. To help ease that process, here is an analogy with airport security that can help you better visualize how each of these concepts play a role in mTLS.
Concept
Analogy
X.509 Certificate
Your passport – it proves your identity, shows who issued it, and includes a photo (public key) that others can verify.
Public/Private Key Pair
Like a passport photo + biometric signature – only you (private key) can match your photo in the passport (public key). The airport can scan your face/fingerprint (private key behavior) to verify the passport really belongs to you.
Certificate Authority (CA)
The passport office – a trusted organization that checks your identity and issues your passport. People trust passports because they trust the passport office.
Certificate Signing Request (CSR)
A passport application – you fill it out, include your details, and submit it to the passport office. It has your info and public key, but it's not valid yet.
Certificate Signing and Trust Chain
Imagine your passport was issued by a local passport office that was certified by the national government. Even if you don't know the local office, you trust the chain of endorsements up to the federal level. That's how a trust chain works.
Root CA
The federal government's passport authority – top of the trust chain. Everyone agrees to trust it. They don't deal with individuals but certify regional offices (intermediates).
Intermediate CA
A regional passport office – they verify people and issue passports, but they were certified by the root government authority.
Self-Signed Certificate
A DIY passport – you just printed one yourself and said, "Trust me." The airport won't accept it unless you're flying private and have told them in advance to accept it.
CA-Signed Certificate
An official passport issued by a trusted passport office. Because the issuing office is on the trusted list, your passport is valid.
Trust Store
The airport's trusted list of passport authorities – if your passport was issued by someone on the list (a known CA), you're in. If not, you're denied.
Key Share
Like the first half of a secret handshake – when you arrive at the airport, you and the officer each offer your half. When combined (privately), you both create a unique shared handshake for this trip.
For the sake of clarification in the analogy, the airport represents the server while you are the client. Where you need to get your create juices out a bit is understanding how the certificates (passports) are shown.
In regular TLS, only the server shows its passport (this is where the creative thinking needs to come in, since airports obviously don't have passports). In this scenario, the client (you) checks if it is valid, but you don't need to show your ID.
In mutual TLS, both the server and client show their passports. The airport checks your passport and you verify theirs. No one gets in without being trusted on both sides.
To best solidify these elements and the roles that they play in mTLS, we can build out our own local representation of these.
Demo: Generating certificates
Based on our key terms, we know there are a few things that we would like to emulate locally:
The Root Certificate Authority.
An Intermediate Certificate Authority that acts on behalf of the Root Certificate Authority.
A valid Server certificate.
A valid Client certificate.
We can make use of the openssl tool in order to create these certificates.
First, we need to create the private key that represents our Root CA's private key, then use that key to generate a x.509 certificate. Our Root CA in our case will be self-signed.
We first setup a configuration file that is used during the signing process, then create the intermediary private key and certificate signing request before doing the signing to generate the certificate.
You might also be wondering at this point: Why use an intermediary certificate authority?
Here's the key idea:
The root certificate (public key, usually self-signed) is shared and trusted.
The root private key is the secret signing key and can be kept offline for safety.
The root only needs to be used to sign intermediates, which can then go on to sign leaf certs (like for clients or servers).
So in practice:
The root CA (offline) signs the intermediate CA's cert once.
The intermediate CA's cert (now signed by the root) is publicly distributed.
Clients will trust the root certificate (already in their trust store).
In our case, we obviously have the representation of our root CA's certificate stored on our local system, but in practice this would be stored away securely.
Understanding why we don't need the root certificate private key should become clearer as we sign the client and server certificates and show them in use.
As a next step, we can follow a similar process for signing and creating the server certificate:
Doing this will create two new certificate files that are inclusive of our intermediary certificate. This way, when the certificate requestor receives the cert, it can verify:
The "leaf" certificate (client/server) was signed by intermediate.
The intermediate was signed by root.
The root is in the trust store.
The concatenated files will be used as our certificates, while the public rootCA.crt file will be used as our CA cert in our mTLS configuration that you will soon see, however it's worth pointing out that you could also concatenate the intermediate and root CA certificats to be used as the CA certificate and then just use the server certificate. The verification process will have the same result.
# Create a full CA chain file for verification as an alternative
cat certs/rootCA.crt certs/intermediateCA.crt > certs/ca-chain.crt
To see how all of this ties in together, let's see it at work with a simple Node.js application that can show when and how our certificates are used.
Demo: mTLS application with our generated certificates
In our demonstration, we will have both a server receiving requests and a client making the requests over a mTLS.
For our tiny server, we'll run the following:
// server.ts
import https from "node:https";
import fs from "node:fs";
import type { TLSSocket } from "node:tls";

try {
  // Read the files
  const serverKey = fs.readFileSync("certs/server.key");
  const serverCert = fs.readFileSync("certs/server-chain.crt"); // Using individual cert
  const caCert = fs.readFileSync("certs/rootCA.crt"); // Using full CA chain

  function isTlsSocket(socket: unknown): socket is TLSSocket {
    return !!socket && typeof socket === "object" && "authorized" in socket;
  }

  const server = https.createServer(
    {
      key: serverKey,
      cert: serverCert,
      ca: caCert,
      requestCert: true,
      rejectUnauthorized: true,
    },
    (req, res) => {
      const tlsSocket = req.socket;

      if (!isTlsSocket(tlsSocket)) {
        console.error("Invalid socket properties");
        res.writeHead(500);
        res.end("Server error");
        return;
      }

      console.log("TLS Connection Details:");
      console.log(`- Authorized: ${tlsSocket.authorized}`);
      console.log(`- Protocol: ${tlsSocket.getProtocol()}`);
      console.log(`- Cipher: ${tlsSocket.getCipher().name}`);

      if (tlsSocket.getPeerCertificate) {
        const cert = tlsSocket.getPeerCertificate(true);
        console.log(`- Client Subject: ${cert.subject?.CN || "Unknown"}`);
        console.log(`- Client Issuer: ${cert.issuer?.CN || "Unknown"}`);
      }

      if (!tlsSocket.authorized) {
        console.error(`Auth Error: ${tlsSocket.authorizationError}`);
        res.writeHead(401);
        res.end(
          `Client certificate not authorized: ${tlsSocket.authorizationError}`
        );
        return;
      }

      res.writeHead(200);
      res.end("Hello, secure world with intermediate CA!");
    }
  );

  server.on("tlsClientError", (err) => {
    console.error("TLS Client Error:", err);
  });

  server.listen(3000, () => {
    console.log("✅ HTTPS server running at https://localhost:3000");
  });
} catch (err) {
  console.error("Failed to start server:", err);
}
Within the http.createServer options, can configure our mTLS options. As you can probably infer from the naming, we make use of the public root certificate rootCA.crt alongside the server private key and our server-chain.crt.
We can demonstrate our client connecting over mTLS with the following script:
// client.ts
import https from "node:https";
import fs from "node:fs";
import axios from "axios";

// Read the files with better error handling
try {
  const clientKey = fs.readFileSync("certs/client.key");
  const clientCert = fs.readFileSync("certs/client-chain.crt"); // Using individual cert, not chain
  const caCert = fs.readFileSync("certs/rootCA.crt"); // Using full CA chain

  const agent = new https.Agent({
    key: clientKey,
    cert: clientCert,
    ca: caCert,
    rejectUnauthorized: true,
  });

  console.log("Starting mTLS client request...");

  axios
    .get("https://localhost:3000", {
      httpsAgent: agent,
      timeout: 10000, // Longer timeout for debugging
    })
    .then((res) => {
      console.log("✅ Server response status:", res.status);
      console.log("✅ Server response data:", res.data);
    })
    .catch((err) => {
      console.error("❌ Request failed:");
      if (err.response) {
        console.error(`Status: ${err.response.status}`);
        console.error(`Response: ${JSON.stringify(err.response.data)}`);
      } else if (err.request) {
        console.error("No response received from server");
      } else {
        console.error(`Error: ${err.message}`);
      }

      if (err.code) {
        console.error(`Error code: ${err.code}`);
      }

      // More detailed error info for TLS issues
      if (err.cause) {
        console.error("Error cause:", err.cause);
      }
    });
} catch (err) {
  console.error("Failed to read certificate files:", err);
}
In our case, we're making use of the Axios package which accepts a httpsAgent argument, and we configure this agent using Node's https agent.
We used the openssl binaries directly to work through our process of creating private keys, certificate signing requests and final signed certificates, but it's worth highlighting that you can do this programmatically.
Golang has a standard library package crypto/x509 that can generate certificates for you without external packages and is very nice.
I've also included an example of doing the exact same certificate chain we did but with Golang on the GitHub repository.
What makes this nice is that you can stand up your own private certificate authorities to manage the distribution of certicates.
For Node.js, packages like node-forge are available which provides support for x509 certificate generation.
AWS Private CA enables creation of private certificate authority (CA) hierarchies, including root and subordinate CAs, without the investment and maintenance costs of operating an on-premises CA.
It's a managed-service for your CA requirements if you wish not to manage that yourself. It offers APIs in order for you to interface with the service and can be desired if you don't wish to create a service yourself.
As an alternative to our approach, you could make use of AWS Private CA to create all of the certificates that we did ourselves, download them via AWS APIs and reenact the same demo that we did with our Node.js configurations.
Case Study: Istio
Istio is a popular service mesh that extends capabilities for Kubernetes clusters.
One of its core features is to automative mTLS enforcement for inter-service and inter-node communication within microservices.
Within Istio service meshes running in sidecar mode, each Pod is deployed with a sidecar which injects an Envoy proxy.
The Istio daemon (istiod) distributes certificates between the sidecars as required and those proxies enforce mTLS between each other for secure, verified communication between Pods.
In this approach, you do not need to configure mTLS at the client-level. You make a request as you expect and the data plane will manage the mTLS verfication for you thanks to the proxies.
This transparency is what makes service meshes so powerful for implementing zero-trust security models without requiring changes to application code.
In our own walkthrough, we store all of the certificates locally.
It's worth taking a moment to highlight that well-planned and secure management of the entire certificate lifecycle is absolutely necessary.
Systems like Istio automate certificate issuance and rotation, and clients/servers are configured to trust the organization's CA.
In your own work, you'll need to ensure that you implement proper handling of keys and certificates.
Certificates have expirations and may require revocation, so ensure that if you are running your own certificate authority to cover these bases.
It's also worth clarifying that while mTLS adds extra security and authentication, it does not by itself guarantee non-repudiation of transmitted data. You would still need to remedy this with key signatures on request data. I have an entire section on this in my blog post Roll Your Own API Keys.
Conclusion
Mutual TLS (mTLS) builds on the strong foundation of TLS by introducing client verification, enabling two-way trust in secure communication. Whether you're managing communications between services in a microservices architecture or securing client-server interactions in highly regulated industries, mTLS provides an effective layer of defense.
By understanding the roles of certificate authorities, certificate signing processes, and the chain of trust, you can confidently implement mTLS in your applications.
mTLS can introduce operational complexity, but in turn it offers strong identity assurance and encryption that can be foundational for zero-trust architectures and highly secure systems.
]]><![CDATA[Roll Your Own API Keys]]>https://blog.dennisokeeffe.com/blog/2025-04-07-roll-your-own-api-keys2025-04-07T00:00:00.000Z2025-04-07T00:00:00.000ZAPI keys at their most basic level offer authentication solutions for both your public-facing and internal-facing APIs. At a deeper level, your API keys can open up strategies such as authorization, rate-limiting and tamper-proofing of payloads.
This post will cover some of the fundamentals of rolling your own API keys in TypeScript and Node.js 22, but the knowledge is language-agnostic (and runtime agnostic for that matter). I will also close with some remarks on why TypeScript might not be the language of choice for your API keys if you expect any sort of scale.
Two strategies around API Keys
This post will focus on two strategies around rolling your own API keys:
Static API keys
HMAC-signed API keys
Both strategies have their trade-offs, but if you are time-poor, then I would focus on the keys with request signatures.
We will work through some simple implementations for both that focuses on authentication and, in the case of signed keys, tamper-proofing.
Static keys
Static API keys are simply tokens that a client can include with each request.
Server-side, we verify and ensure the token is valid in order to authenticate the request against our token data store.
You can consider this analogous in ways to providing a password with a request. The key must be sent with every request, kept secret and only transmitted over TLS to prevent eavesdropping.
An example implementation of static keys with a Hono router:
For the sake of understanding our example, I am using the in-memory store from keyv as a stand-in for our data store, @hono/zod-openapi as our augmented Hono server and some helpers from the Node.js crypto module for generating random bytes for our API key and hashing that key to be stored in the database.
Our server has two endpoints:
One for creating API keys at /keys/create.
A second for verifying those API keys at /keys/verify.
In our /keys/create endpoint, we generate an API key, hash it and then store the hash as a key-value in the database under hash:${plainkey}.
We can call our endpoint like so:
curl http://localhost:3000/v1/api-keys/keys/create \
  --request POST
If we call our endpoint, we end up with a result like the following:
Although static keys can be adequate for many cases, they fall down when extra security is needed. Although that can be rolled or revoked easily, simple API keys cannot verify the identity of the caller or prevent tampering of request parameters in transit, so there are weaker integrity guarantees.
We can work around these problems by introducing request signatures.
Keys with request signatures
Request signatures introduce two values to be shared with the client at the time of API key generation:
The access key ID.
The secret access key.
Typically, the secret access key is only shared once for the user, so if they lose the secret access key then they will need to re-generate keys.
The client never shares the secret key back to the server. Instead, the access key ID is sent alongside a signature of the request data which is signed using the secret key.
Once the data is sent, the server looks up the token secret and recomputes the signature. If they match, the request is authenticated and proven integral (which is spiel for not being tampered with).
Let's take a look at how an implementation of this works:
On the server, we store the secret for us to fetch later (please see the callout below on this) in order to be used for validating the signature. We then return both values once. Warn the user to securely store the secret, as we won't be returning that value again.
In order to see how signing works, here is a helper script that I used to test against our verification endpoint /keys/secure-verify:
import crypto from "node:crypto";
import axios from "axios";

const { accessKeyId, secretAccessKey } = {
  accessKeyId: "pk_live_f5c4672457c78c8e019df66eeabbe33e",
  secretAccessKey:
    "2a39d2316ef07ebb7c763f3eb06b0ef3aafbd7f0b3d0f2b3bd5acfa6e0b57fd5",
};
const timestamp = Math.floor(Date.now() / 1000).toString();

const body = {
  message: "Hello, HMAC-secured world!",
};

// Compute HMAC using timestamp and JSON body
const digest = crypto
  .createHmac("sha256", secretAccessKey)
  .update(`${timestamp}:${JSON.stringify(body, null, 0)}`)
  .digest("hex");

const start = performance.now();
const res = await axios.post(
  "http://localhost:3000/v1/api-keys/keys/secure-verify",
  body,
  {
    headers: {
      Authorization: `Bearer ${accessKeyId}`,
      "X-Timestamp": timestamp,
      "X-Signature": digest,
      "Content-Type": "application/json",
    },
  }
);
const end = performance.now();
console.log("Time:", end - start);

console.log("Response:", res.data);
In the above code we use the crypto.createHmac function in order to sign the request, and then we pass it along as our X-Signature header. The header itself uses update to incorporate our concatenated timestamp and body payload string into the signature.
The data used to verify the signature can include whatever we want, so if there are any extra headers or pieces of data that are important to validating integrity, then be sure to reflect that in the signature.
Once signed, we send a request that includes the required headers. Values such a X-Timestamp are required in order to verify the signature server-side and can also be used to reject signatures older than a certain time period.
In order to compare the signatures on the server-side implementation, we have the following:
crypto.timingSafeEqual is a function that compares the underlying bytes using a constant-time algorithm. It does not leak timing information which is an attack surface for malicious actors and is suitable for comparing HMAC digests.
If you are interested in reading up more about authentication practices like timing attacks, then see the OWASP authentication cheat sheet.
If we run the Node.js script, we will get back the expect Response: { valid: true } payload.
Play around and attempt to tamper some of the values and see what happens. Unsurprisingly, valid is false.
Case study: AWS APIs
Amazon Web Services APIs use a two-part credential: an Access Key ID (public identifier) and a Secret Access Key. Every API request must be signed using a process called Signature Version 4 (SigV4), which is an HMAC-SHA256 scheme.
The client includes the Access Key ID and the computed signature in an Authorization header. AWS uses the Access Key ID to look up the secret key and then recomputes the signature from the request data on their end. If it matches, the request is authenticated and processed. If not, it's rejected.
In a similar setup to our implementation, AWS requires a timestamp (X-Amz-Date header or an HTTP Date header) on each request. This is used to reject requests that are considered stale (5 minutes by default) to protect against replay attacks.
If you are familiar with the AWS APIs, then this process of signing the request is abstracted away from you, but there is documentation that shows you how create a signed AWS API request that is an important reference if you want to cross-reference your implementations against theirs.
Unlike user passwords, which are usually hashed with slow algorithms like bcrypt, API secrets are often hashed with a standard cryptographic hash (e.g. SHA-256) or stored encrypted.
The reason comes down to entropy and usage patterns. API keys are high-entropy, machine-generated secrets (often 128 bits or more of randomness), whereas user passwords are typically low-entropy (words or common patterns).
Because API keys are essentially unguessable by brute force (I wrote this pre-quantum), it's acceptable to use a fast hash for storage.
By contrast, passwords require slow hashing (bcrypt, Argon2, PBKDF2) are used specifically to thwart offline guessing if hashes are stolen.
Cryptography at scale
Finally, I wanted to touch on your choice for tooling. Node.js can be incredible for I/O bound tasks like HTTP requests, but some of the trade-offs with Node.js is that compute bound tasks such a cryptography operations can be significantly slower for computation time when compared to other runtimes and languages.
If you are building a real-world application, consider taking this into account as it can have real implications on compute costs and auto-scaling nodes. The same concepts apply agnostically across languages, so find that happy point between your estimated scale and what works best for your developers and budgets.
Conclusion
Whether you're shipping a side project or laying the groundwork for production-scale auth, rolling your own API keys is a great exercise in balancing simplicity, security, and developer control.
Start small, sign what matters, and revisit your setup as your needs evolve. Be sure to cross-reference this post with other public APIs when designing your own implementations and ensure that your storage of the API keys is secure and resistant to issues around stolen database data.
]]><![CDATA[The Boundaries of TypeScript Testing]]>https://blog.dennisokeeffe.com/blog/2025-03-29-the-boundaries-of-typescript-testing2025-03-29T00:00:00.000Z2025-03-29T00:00:00.000ZOver my years of software engineering, there is hill that I stumbled upon that I am willing to die on: Test coverage does not equate to your test confidence.
Increasing your test confidence vector is a hot topic. Some of my greatest mistakes and, as far as I am concerned, most useless code has written done around testing.
In this post, we'll focus on principles for static analysis, unit testing and integration testing that can increase your confidence vector as much as possible while limiting some of the pain points. Some of these points are certain to be contentious and are unashamedly biased from the parts of testing that have consumed way-too-many-hours-to-admit from my short tenure on this planet.
Companion code
Unlike my other blog posts, this one won't be building anything from scratch. There is a companion project to this blog post that I will often link to and share code from throughout this post.
The principles I will talk through today are mostly agnostic to language, tool and runtime, although whether it's idiomatic or frowned up depends on your community and how well-equipped your chosen ecosystem is.
We'll be walking through these principles in TypeScript to satiate some of my recent thoughts.
Issues to acknowledge with test coverage
Software teams use a minimum coverage percentage as a quality gate, but what that number is varies from source-to-source. Google's testing blog has testing coverage values where 60% is acceptable, 75% is commendable and 90% is exemplary. Atlassian's page on code coverage mentions that 80% coverage is good to aim for, but higher coverage might yield dimishing returns.
I personally have two main gripes around test coverage:
The reported coverage can be misleading.
Strict quality gates can lead to writing tests for the sake of writing tests, which leads to bad tests.
To illustrate some of the problems with code coverage, let's start with the basics. Take the following pure function add:
export function add(a: number, b: number) {
  return a + b;
}
We can write a simple test to validate this:
import { expect, test } from "vitest";
import { add } from "./math";

test("should add 1 + 2", () => {
  expect(add(1, 2)).toEqual(3);
});
With vitest, if I test with coverage e.g. vitest --coverage, I get the following output:
Great! We have 100% coverage! No need for tests to try to trip up the boundaries, right? Well, writing a test to check 1 + 2 isn't exactly adventurous. We hardly pushed our function and it looks as if we're at the finish line.
Other than pushing the limits of our function, what happens if someone has come in and adds some sweet nothings to our function?
interface Loggable {
  log: (msg: string) => void;
}

function sideEffect(logger: Loggable) {
  logger.log("yo");
}

export function add(a: number, b: number, logger: Loggable) {
  sideEffect(logger);
  return a + b;
}
We have a new side effect introduced, but what happens if we update our test to pass through a console argument?
import { expect, test, vi } from "vitest";
import { add } from "./math";

test("should add 1 + 2", () => {
  const result = add(1, 2, console);
  expect(result).toEqual(3);
});
Still 100%, what gives!? In a world where console.log is injected a logger object that throws an error e.g. add(1, 2, { log: () => { throw new Error('KABOOM') }}), we're still at 100% coverage.
Worst of all, what happens if they changed our test to validate only the logging?
Code coverage, at least in the forms that I've seen it, is a guideline. In reality, it's unlikely for me to come across tests that don't verify something as important as the return value. What has been problematic for me though have been high test coverage thresholds that force your hand.
This has happened to me plenty of times where I have ended up writing tests that do nothing other than get me passed the numbers required to pass CI:
In testing environments that require you to mock out responses with hazy boundaries, you can end up writing tests like this simply to make coverage requirements.
To summarize: committing to code coverage can be hazardous. If you're going to do it, pick a safe threshold and embed it into the engineering culture at your company to prioritize high-quality tests that are not easily fallible.
As we continue into the age of AI assistance, configure your review agents to help scrutinize your choice of edge cases and make sure that any iffy boundaries are covered by tests.
Issues to acknowledge with mocking, spies and test boundaries
Mocks are commonly used within testing to help with isolation. This can be helpful, but can become a scapegoat with setups that feel non-trivial to configure correctly to better represent your system.
In the most recent code example, we hinted towards test boundaries that can negatively impact our test confidence.
But what is a "test boundary"? My definition of the test boundary is the scope of what we can accurately test against. Accuracy being the crucial point here.
Let's look out test again, make some adjustments and add some more context on what the someRepo function does:
In our code now, the someRepo function checks a remote cache for a result, returns it if there is a hit or returns the result from the database. The test hasn't changed from what it was previously.
Ask yourself the question: what boundaries of this functionality are tested with the current implementation? The entire raison d'être for our someService test is to evaluate it's functionality, but here we do not step in into our code beyond the current someService context due to our mock.
In practice, increasing our test confidence requires us to increase how far we can "step in" our code in order to reliably test as close to our system as possible.
As a first pass at our test refactoring, what happens if we update our mocks to move to the boundary where they mock our checkCache and fetchFromDatabase instead?
In our tests now, we have shifted the test boundaries a little deeper to where checkCache and fetchFromDb begin. We can improve on this more, but first let's take a moment to consider our spies and .toHaveBeenCalledOnce calls.
In our someRepo code, we've refactored the logs but the core functionality has not changed. If we run our tests though... they fail.
You can probably know why: one of our tests expect console to have been called twice. This is where we fall into "false negative" territory. As far as desired output behavior goes for our someRepo function, it still operates the same as before, but our tests were written as a false representation of that expected behavior.
Unless it is absolutely necessary to ensure a function is called as part of another, my ethos is that you should omit it entirely. We'll justify the reasons in an upcoming section, but for now my starting guideline would be to test the inputs and outputs.
For now, let's refactor the tests back to the following:
Now we can freely refactor non-critical side-effects like console.log without returning false negatives about the desired function's behavior.
An example where validating calls made would be for functions where their entire purposeis to emit expected, measurable side-effects that the system should prevent from unintended changes.
import { beforeEach, describe, expect, test, vi } from "vitest";
import { addTrace, addTraceCurried } from "./add-trace";
import { container } from "../config/ioc-test";
import { ILoggerService } from "@/services/logger-service";
import { IocKeys } from "@/config/ioc-keys";

class Target {
  needle() {
    return null;
  }

  async needleAsync() {
    return Promise.resolve(null);
  }
}

describe("trace proxies", () => {
  let logger: ILoggerService;

  beforeEach(() => {
    logger = container.get<ILoggerService>(IocKeys.LoggerService);
  });

  describe("addTrace", () => {
    test("invokes two trace logs at the beginning and end of a function", () => {
      const spy = vi.spyOn(logger, "trace");
      const target = addTrace(new Target(), logger);

      expect(target.needle()).toBeNull();
      expect(spy).toHaveBeenCalledTimes(2);
      expect(spy.mock.calls).toEqual([
        [{ args: [], className: "Target" }, `Target.needle() called`],
        [
          { className: "Target", duration: expect.any(String) },
          `Target.needle() returned`,
        ],
      ]);
    });

    test("invokes two trace logs at the beginning and end of an async function", async () => {
      const spy = vi.spyOn(logger, "trace");
      const target = addTrace(new Target(), logger);

      expect(await target.needleAsync()).toBeNull();
      expect(spy).toHaveBeenCalledTimes(2);
      expect(spy.mock.calls).toEqual([
        [{ args: [], className: "Target" }, `Target.needleAsync() called`],
        [
          { className: "Target", duration: expect.any(String) },
          `Target.needleAsync() returned`,
        ],
      ]);
    });
  });

  describe("addTraceCurried", () => {
    test("full application invokes two trace logs at the beginning and end of a function", () => {
      const spy = vi.spyOn(logger, "trace");
      const partiallyAppliedFn = addTraceCurried(logger);
      const target = partiallyAppliedFn(new Target());

      expect(target.needle()).toBeNull();
      expect(spy).toHaveBeenCalledTimes(2);
      expect(spy.mock.calls).toEqual([
        [{ args: [], className: "Target" }, `Target.needle() called`],
        [
          { className: "Target", duration: expect.any(String) },
          `Target.needle() returned`,
        ],
      ]);
    });

    test("invokes two trace logs at the beginning and end of an async function", async () => {
      const spy = vi.spyOn(logger, "trace");
      const partiallyAppliedFn = addTraceCurried(logger);
      const target = partiallyAppliedFn(new Target());

      expect(await target.needleAsync()).toBeNull();
      expect(spy).toHaveBeenCalledTimes(2);
      expect(spy.mock.calls).toEqual([
        [{ args: [], className: "Target" }, `Target.needleAsync() called`],
        [
          { className: "Target", duration: expect.any(String) },
          `Target.needleAsync() returned`,
        ],
      ]);
    });
  });
});
In these tests, I explicitly spy on the instance of the ILoggerService to ensure that logger.trace is called with the expected arguments as that is the purpose of the proxy.
For this particular test, asserting that the dependency calls is as much confidence as I want from these tests.
For the astute, you will have notice that spies don't inherently mock out functionality unless explicitly stated. This means that I can assert the desired functionality while testing against a real implementation.
Just to reiterate: I do not use spies like this for every function call.
Remember what we covered about false negatives. I will only ever do this in scenarios where a side effect is the sole desired outcome for the function existing.
In these scenarios, there is normally no response or the side effect has higher priority. In my example, the proxy return type plays second fiddle to the trace logging.
For impure functions that return values that you care about (from databases etc), assert against output and do not get caught up on the implementation details.
describe("getBlog", () => {
  let post: Post;

  beforeEach(async () => {
    post = postFactory.build();

    await prisma.post.create({
      data: post,
    });
  });

  test("can get a blog", async () => {
    const result = await blogRepository.getBlog({ param: { blogId: post.id } });
    expect(result.isOk()).toBe(true);
    result.map((value) => {
      expect(value.data?.title).toBe(post.title);
      expect(value.data?.content).toBe(post.content);
    });
  });

  test("can retrieve a blog from cache", async () => {
    const noCacheResult = await blogRepository.getBlog({
      param: { blogId: post.id },
    });
    expect(noCacheResult.isOk()).toBe(true);
    noCacheResult.map((value) => {
      expect(value._cacheHit).toBe(false);
    });

    const result = await blogRepository.getBlog({ param: { blogId: post.id } });
    expect(result.isOk()).toBe(true);
    result.map((value) => {
      expect(value._cacheHit).toBe(true);
    });
  });

  test("returns BlogNotFoundError when there is no matching blog found", async () => {
    const result = await blogRepository.getBlog({
      param: { blogId: faker.string.uuid() },
    });
    expect(result.isErr()).toBe(true);
    result.mapErr((e) => {
      expect(e._tag).toBe("BlogNotFoundError");
    });
  });
});
Notice that it does not check that certain wrapper library functionality is called. Is purely cares on whether or not the functionality returns the expected data and information about hitting the cache. If I swapped out cache implementation or ORM but kept the contract, then this test will not need to change and it will be the best indicator that I've maintained the expected functionality.
Finally, I wanted to finish by acknowledging an area where I find mocking appropriate at the cost of shortening the test boundary: error cases that are not easily replicated and are explicitly handled for unhappy paths.
Applications are fallible to the most bizarre things, so if you're working with a system that handles edge cases that are not easily replicated but are actively handled within your application, then mocking will come to the rescue.
For example (albeit contrived), what happens if you're writing code that specifically handles cases where a disk is full?
// file-service.ts
import { promises as fs } from "fs";
import path from "path";
import { err, ok } from "neverthrow";

/**
 * Saves data to a file, with retry logic for edge cases
 * @param filePath Path to save the file
 * @param data Content to write
 */
async function saveFile(filePath: string, data: string): Promise<void> {
  try {
    // Create directory if it doesn't exist
    const directory = path.dirname(filePath);
    await fs.mkdir(directory, { recursive: true });

    // Write the file
    await fs.writeFile(filePath, data, { encoding: "utf8" });
    return ok(true);
  } catch (error) {
    if (err.code === "ENOSPC") {
      // No space left on device
      // Very difficult to emulate without actually filling disk
      return err({
        _tag: "DiskFull",
        somethingImportant: true,
      });
    }

    return err({
      _tag: "ContrivedCatchAll",
    });
  }
}
In this example, replicating the disk full scenario is not easily done. Mocking comes to our rescue here:
// file-service.test.ts
import { describe, beforeEach, it, expect, vi } from "vitest";
import { promises as fs } from "fs";
import path from "path";
import { saveFile } from "./file-service";

// Mock the fs module
vi.mock("fs", () => ({
  promises: {
    writeFile: vi.fn(),
    mkdir: vi.fn().mockResolvedValue(undefined),
  },
}));

describe("saveFile", () => {
  beforeEach(() => {
    vi.resetAllMocks();
    vi.mocked(fs.mkdir).mockResolvedValue(undefined);
  });

  it("should handle disk full error correctly", async () => {
    // Mock writeFile to throw an ENOSPC error
    const mockError = new Error("No space left on device");
    // Add the code property to the error
    (mockError as any).code = "ENOSPC";

    // Setup the mock to reject with our custom error
    vi.mocked(fs.writeFile).mockRejectedValue(mockError);

    const result = await saveFile("/path/to/file.txt", "test data");

    // Verify the error was handled correctly
    expect(result.isErr()).toBeTruthy();
    result.mapErr((e) => {
      expect(e._tag).toBe("DiskFull");
      expect(e.somethingImportant).toBe(true);
    });
  });
});
Guidelines for test boundaries
With our test boundaries, how far can and should we push? I believe this strongly depends on preferences and configuration, but my guidelines:
For tests that compose of functionality that makes network requests, test out until the network boundary with request interceptors like MSW where possible.
For tests that compose of functionality that interface directly with databases, attempt to run tests against a local copy of the expected database using tools like
testcontainers.
For tests that interface with third party library utilities, test without mocking out the utilities.
For other side effects types like interfacing with file systems, if it's undesirable to write to the file-system and clean up, then attempt to mock in-memory. For something like Node.js, there exists utilities like mock-fs.
These guidelines begin to blur the definitions between unit testing and integration testing. If you're familiar with the testing pyramid, then you may favor unit tests as your baseline. Over time, I've personally grown to become more in favor of model closer to the testing trophy which places emphasis on static analysis as your baseline and integration testing as the testing layer to focus on most.
Most of the time, blurring these lines is inconsequential for projects. For projects that require more setup and most importantly are actively becoming an acknowledged problem and time consuming to run, then consider updating your testing configuration to separate these.
Finally, one common bottleneck that I haven't called out here is that to prevent state management race conditions for dependencies like databases, you generally need to forego any parallelization for tests running on the same machine. I should reiterate that until this becomes a problem, I wouldn't be too concerned about this. Locally, tests runners allow running a subset of tests. On CI, there are also strategies to split tests across test runners with isolated database that might be worth considering first. Seek out alternatives first and proactively evaluate any changes to your approach.
In my example code, I'm spinning up both a Valkey and Postgres test container, along with using MSW to intercept my HTTP requests to a make-believe service, so I use the global setup and setup files to prepare this.
My global setup will stand up the databases and tear them down at the end of the tests:
My setup files apply Vitest hooks in order to ensure that my databases and MSW mocks are cleared between runs to prevent race conditions:
import { server } from "../mocks/server";
import { PrismaClient } from "@prisma/client";
import { container } from "../config/ioc-test";
import { beforeAll, afterEach, afterAll, beforeEach } from "vitest";
import { IocKeys } from "../config/ioc-keys";

const keyv = container.get<any>(IocKeys.KeyvClient);
const prisma = container.get<PrismaClient>(IocKeys.PrismaClient);

/**
 * Clean all tables in the database
 */
async function cleanDatabase() {
  // Get all tables
  const tables = await prisma.$queryRaw<Array<{ tablename: string }>>`
    SELECT tablename FROM pg_tables
    WHERE schemaname='public'
    AND tablename NOT IN ('_prisma_migrations')
  `;

  // Truncate each table
  for (const { tablename } of tables) {
    try {
      await prisma.$executeRawUnsafe(`TRUNCATE "${tablename}" CASCADE;`);
    } catch (error) {
      console.log(`Error truncating ${tablename}`);
    }
  }
}

beforeAll(async () => {
  server.listen({ onUnhandledRequest: "bypass" });
}, 30000);

beforeEach(async () => {
  // Clean the database before each test to start fresh
  await cleanDatabase();
});

afterEach(async () => {
  await keyv.clear();
  server.resetHandlers();
});

afterAll(async () => {
  server.close();

  await prisma.$disconnect();
  await keyv.disconnect();
});
In the example code, I've chosen to use table truncation for clearing the relational database between runs as it feels the simplest for my use case.
The time is takes for me to run the tests from a fresh start with cached containers is about 7 seconds for the full suite, which includes starting up the Docker containers (albeit there are only ~30 tests).
The previous section covered database integration into our testing, so let's recap some guidelines that around this:
Serialize tests if tests share the same database.
Write global setup and teardown functionality to ensure safe setup and teardown of your database(s).
Enforce a clean slate before each test.
Colocate the test data within the test file. It should be easy to track down where data was initialized from.
There may be instances where some of these guidelines don't apply. For example. some possible options for database isolation that have different trade-offs for cost:
Database isolation per test.
Transactions per test that are rolled back.
Truncating tables after each tests.
In addition to that, testing in CI may open up avenues to splits tests up across shards that may allow you to configure different databases per shard.
The problems with emulation
I'll keep this section short, but as a general rule of thumb: if you are going to test your application beyond the application boundary, then beware emulation. If you can't use the actual technology locally, then question it's use at all.
This is more a warning than a "never do it" scenario, because there are times where things like drop-in replacements for providing in-memory APIs can be incredibly useful.
In general though, if you're using something 3rd party to emulate something in your environment that belongs to closed-source work, know that any breaking changes or upgrades to the original product will cause you grief (on top of any bugs or lack-of-support from the 3rd party software). Weigh up the trade-offs before implementing something like this.
Using cloud technologies is an example of something I will never bother to emulate for testing or development in my personal work. If something is not officially provided to run locally, I don't bother. I learned this the hard way and spent way too many hours debugging 3rd party emulators when running on the actual platform worked as expected.
You're better off testing on cloud hardware if you ever end up in a scenario like this. Once again, evaluate whether or not the cost and complexity of doing so is worth it.
No side-effects: Things like logging, interfacing with networks or file systems constitutes a side-effect.
Same input == same output: When passing the exact same arguments in, we expect the same result every time.
Let's go back to a previous example of implementing add:
interface Loggable {
  log: (msg: string) => void;
}

function sideEffect(logger: Loggable) {
  logger.log("yo");
}

export function add(a: number, b: number, logger: Loggable) {
  sideEffect(logger);
  return a + b;
}
We know this violates rule (1) of pure functions due to it's side-effect, so let's refactor a little more and add some constraints around our add function:
function constrainedAdd(a: number, b: number) {
  if (isNaN(a) || isNaN(b)) {
    return 0;
  }

  a = a < 0 ? 0 : a > 2 ? 2 : a;
  b = b < 0 ? 0 : b > 2 ? 2 : b;

  return Math.floor(a) + Math.floor(b);
}
This completely useless function will add two integers together, with any argument smaller than 0 being set as 0 and any argument larger than 2 being set to 2. It also enforces the numbers added to be integers.
This function may appear useless, but it is a pure function.
There are no side effects.
Each valid input will return the same output.
Here is another useful tidbit about pure functions: functions that are only composed of other pure functions are themselves pure. Assuming Math.floor and isNaN themselves are pure functions, our constrainedAdd does not violate any rules on pure functions. This has some useful properties that make our lives with testing much easier.
The next important lesson we can take away from constrainedAdd is how we define the domain and range of the function.
The domain describes the bounds of valid input, and any given domain input itself for a pure function can map directly to the range which is a set of all possible outputs.
For our function, our domain for the arguments can be described as any valid number, but with this implementation it's our range that is is most interesting. Our output is locked to be any valid integer within the set {0,1,2,3,4}.
The beauty of pure functions it makes life easier to test against edge cases if you can understand the range.
it.each([
  // [a, b, expected]
  [1, 2, 3], // Normal case within constraints
  [-1, -1, 0], // Both negative values constrained to 0
  [-1, 3, 2], // Negative and above constraint combination
  [3, 3, 4], // Both values above constraints
  [1.9, 2.1, 3], // Decimal values with flooring and constraints
  [NaN, 2, 0], // NaN constrains the output to 0
])("adds constrained %f and %f to equal %i", (a, b, expected) => {
  expect(constrainedAdd(a, b)).toBe(expected);
});
In a test like the one above, we increase our test confidence vector by increasing our assertion coverage for as many edge cases as we can infer from the domain and range.
Although math and numbers are the most relatable when it comes to domain and range (for anyone stuck doing Calculus anyway), this also applies to any argument where the output is consistent for the same input.
The following is also a pure function:
function getSecret(code: "alpha" | "bravo" | "delta") {
  switch (code) {
    case "alpha":
      return "hello";
    case "bravo":
      return "from";
    case "delta":
      return "planet earth";
  }
}
In the above, our domain is one of three values alpha, bravo or delta while the range is hello, from and planet earth.
In hindsight after writing this, explaining domain and range with getSecret seems easier to understand than my constrainedAdd function...
Functional core, imperative shell
This pattern is something I first came across at Ruby conferences five or so years ago and it is a pattern that I've written about before.
The heart of this concepts lies around what we've learned so far related to pure functions and composition. Pure functions are easier to reason about, and so if you start with your "deepest" code as being composed of pure functions (a.k.a. a functional core), then testing those functions can yield more consistency.
In practical terms, if we consider our controller-service-repository layer application, we already know that we can't avoid side-effects with our repository layers. That's okay, the idea is to invert as much of our impure logic upward until we hit our "imperative shell". The boundary of the shell and core can be thought of as fluid.
For example, take the following:
function functionB() {
  console.log("core started");
  somePureFunction();
  console.log("core ended");
}

function functionA() {
  functionB();
}

functionA();
At our current state, assuming that somePureFunction is in fact pure, then our functional core boundary starts at the somePureFunction invocation (and our imperative shell boundary ends), because functionB is impure thanks to the logs.
Let's refactor again:
function functionB() {
  somePureFunction();
}

function functionA() {
  console.log("core started");
  functionB();
  console.log("core ended");
}

functionA();
If we "push up" the logs to functionA, then functionB through composition has become a pure function itself, so now the functional core starts at the invocation of functionB.
In my mind, the ideology of "functional core, imperative shell" isn't explicit that certain layers are entirely pure or impure. I think of it as "dipping into" functional cores at those boundaries. You can had methods within your service layer that are entire pure, or they're impure because they call into functionality that interfaces with something like our databases.
In practice, I find that service layers methods are the point where you normally "dip in and out" of the line between the functional core and imperative shell, but that's not a hard rule. Business layer logic that operates on concrete instances can normally be implemented as functional while calls out to the database can only ever be impure.
Dependency injection
Dependency injection has many benefits, but it also enables a level of control that can be second-to-none around testing. Inverting control of what is constructed for a class instance can be a powerful tool.
In our contrived code, we've inverted control over the userRepo to be anything that adheres to the IUserRepository.
When it comes to testing, we can inject anything to adheres to the IUserRepository contract, be that an instance of UserRepository or any mock that adheres to the contract.
In cases where you use tools like Effect, tsyringe or Inversify, this can make it trivial to provide test-specific dependencies where required.
Within the accompanying repository, I've configured Inversify with a test-specific container. This testing container can be used to supply the mock implementations or remove unnecessary behaviour (like I have with removing higher-order proxies).
Conclusion
Today's post covered a lot of testing methodology and guidelines that enable you to reason more about what effective testing can look like for you.
A recap of the most important talking points:
The problem with code coverage
The impacts mocking can have on your test confidence vector
]]><![CDATA[Effective TypeScript Principles in 2025]]>https://blog.dennisokeeffe.com/blog/2025-03-16-effective-typescript-principles-in-20252025-03-16T00:00:00.000Z2025-03-16T00:00:00.000ZSome guidelines for how I want to write TypeScript in 2025. Feel free to take it or leave it. Always remember that opinions have trade-offs and come from experiences that may have blinded me to better alternatives.
"First, your refactoring was not part of our negotiations nor our agreement so I must do nothing. And secondly, you must be a lead developer for changes to the developer's code to apply and you're not. And thirdly, the code is more what you'd call 'rules' than actual guidelines. Welcome aboard Corporate Development, Miss Turner" -- Barbossa, Project Lead, 2003.
We will be covering a few topics where each is ramping up into the next:
The prerequisites
Code volume
Control flow
State management
The principles
Composition over inheritance
Parse, don't validate
Never throw errors
Metadata
Define your source of truth
Let controllers tell you everything
Don't emulate network infrastructure
Don't let AI take the driver's seat
Generate as much code as possible
Write to refactor programmatically
Don't go overkill on abstraction layers
I won't be covering teamwork and only briefly touching upon inter-service communication at points.
The prerequisites
This section will briefly cover three elements of the development process that come from an older Enterprise Architecture Patterns course that I took back in 2021, but have found to been of constant importance.
These cornerstones have a direct correlation to complexity and brain overload. They are:
Code volume.
Control flow.
State management.
Any mishandling of the following topics will lead development towards "developer purgatory" and, as a bonus side-effect, make future devs die inside.
Code volume
Code volume relates to the amount of code that you have to manage. In layperson spiel: less lines of code to manage is better.
I always find this concept to be at odds with Clean Code and Gang of Four design patterns. My reason for this is that Clean Code and GO4 patterns become the scapegoat to justify over-bloat and unnecessary abstractions, or premature abstractions that doesn't keep the necessary separation of concerns for the domain.
Over-bloat and unnecessary abstractions may be easier to imagine. If you're working in the codebase where you need to make jumps to ten different definitions in order to understand the inheritance chain or follow the path of the business logic, then you have probably over-engineered the shit out of it. Principles like "composition over inheritance" and "parse, don't validate" can help mitigate volume creep (which I touch on in their own section), but there are some general guiding principles that I recommend to get around this:
Service layers that handle the business logic should be as "shallow" as possible. What I mean by this is that service layers should not compose other service layers, and layers that are required here should themselves aim to stay as shallow as possible.
Functional core, imperative shell. The idea here is that the "deepest" layers invoked should be as pure as possible. Side-effects like logging should be the responsibility the the imperative shell (in our case, we aim for that to be the service layer or injected at the service layer). This also becomes a God-send for a controlled domain and range of tests for pure functions.
As for the premature abstractions, this one might be harder to understand at first. Dan Abramov's "Goodbye Clean Code" does a good job of outlining the core idea that combining similar interfaces to reduce the code volume is not always the best idea.
But what gives? Isn't the idea that less code is better? You need to understand when contradictions to this guideline are necessary. I'll touch later on approaches to mitigate this problem with code generation.
The important thing to remember here is that the code volume cornerstone applies to code that you have to manage as a developer, not the size of the codebase itself.
Control flow
Control flow speaks to the branches in logic. Choices in how you apply control flow, how much of it there is and where logic "branches" can make or break your day.
We'll be touching on this topic with the following sections:
Let your controllers tell your everything.
Don't go overkill on abstraction layers.
Never throw errors.
Metadata.
State management
State management refers to how applications track and maintain data that changes over time. This "state" includes things like user inputs, API responses, UI configurations, and application settings.
Mismanagement here can create some deeply-knotted problems:
Unpredictable Behavior: When state can be modified from multiple places without clear patterns, applications become unpredictable. Developers can't easily reason about what will happen when code executes.
Debugging Nightmares: Without clear state flows, finding the root cause of bugs becomes extremely difficult. A bug might manifest in one component but originate from state modifications elsewhere.
Technical Debt Accumulation: Poor state management compounds over time through things like duplicated state, stale state and side-effects.
Readability and Maintainability Issues: New developers struggle to understand applications.
Although this post won't spend too much time on state management, it is also partly related to these topics:
Parse, don't validate.
Never throw errors.
Metadata.
Define your source of truth.
The principles
With the foundation prerequisites out of the way, the rest of the section will speak to some examples scenarios. You should keep those three cornerstones in mind while reading through each guideline.
Composition over inheritance
Composition over inheritance is a design principle that suggests you should prefer building complex functionality by combining simpler objects (composition) rather than through class inheritance hierarchies.
Key Benefits of Composition
Some of the benefits:
Easier to change behavior at runtime
Looser coupling between components
Simpler to test isolated components
Don't:
abstract class Pizza {
  prepare() {
    console.log("Preparing something hidden away from concrete classes");
  }

  // This method needs to be implemented by subclasses
  abstract addToppings(): void;
}

// Concrete subclasses
class PineapplePizza extends Pizza {
  addToppings(): void {
    console.log("Adding pineapple chunks");
  }
}

const p = new PineapplePizza();
p.prepare();
p.addToppings();
One thing about this approach: use composition over inheritance for enforcing behaviors.
When it comes to properties on the class, don't rely on implementation an interface to enforce that property. Implementing interfaces comes with the caveat that you cannot implement non-public properties. In those scenarios, use dependency injection.
Don't:
interface Pizza {
  id: string;
  name: string;
  prepare(): void;
  addToppings(): void;
}

class PineapplePizza implements Pizza {
  // Can't be private
  public id: string;
  public name: string;

  constructor(id: string, name: string) {
    this.id = id;
    this.name = name;
  }

  prepare() {
    console.log("Preparing pineable pizza");
  }

  addToppings(): void {
    console.log("Adding pineapple chunks");
  }
}

const p = new PineapplePizza("1", "pineapple");
The core idea behind "parse, don't validate" is to transform untyped or less-typed data into well-typed data early in your program flow, rather than checking validity throughout your code. With this approach:
You parse input data once, at the boundary of your system.
This parsing step both validates and transforms the data.
After parsing, you work with fully-typed, validated data throughout the rest of your code.
You rely on the parser to take unknown data into known data, and in regards to TypeScript, that known type then improves our confidence vector for the rest of the code as we can give the remaining heavy lifting to static analysis with the type checker.
Keeping the validation at the boundary also improves develop experience ensuring that validation logic isn't littered throughout our control flow, which helps to keep our control flow cornerstone healthy.
Don't:
interface Request {
  body: unknown;
}

class Service {
  action(body: unknown) {
    // First check if body is a non-null object
    if (body !== null && typeof body === "object") {
      // Now TypeScript knows body is an object, so we can use 'in' operator
      if ("name" in body) {
        // Do something with body.name
        // Note: At this point, TypeScript knows body has a 'name' property,
        // but doesn't know its type. If needed, we could add further type narrowing:
        const typedBody = body as { name: string };
        // Now we can use typedBody.name as a string
      }
    }
  }
}

class Controller {
  private service: Service;

  constructor(service: Service) {
    this.service = service;
  }

  get(req: Request) {
    this.service.action(req.body);

    // ... omitted
  }
}
Here, validation happens away from the boundary and we are passing unknown data types around.
Do:
import { z } from "zod";

interface Request {
  body: unknown;
}

// Define the schema for our request body
const UserSchema = z.object({
  name: z.string(),
  email: z.string().email(),
  age: z.number().int().positive().optional(),
});

// Derive TypeScript type from the schema
type User = z.infer<typeof UserSchema>;

class Service {
  action(user: User) {
    // No need to validate
  }
}

class Controller {
  private service: Service;

  constructor(service: Service) {
    this.service = service;
  }

  get(req: Request) {
    // Parse and validate at the boundary
    const userResult = UserSchema.safeParse(req.body);

    if (!userResult.success) {
      // Handle error case
      return;
    }

    // Pass the parsed and typed data to the service
    this.service.action(userResult.data);

    // ... omitted
  }
}
In the example above, we are using Zod to demonstrate an example of parsing into a well-known type.
Never throw errors
Errors fall into two categories: expected and unexpected.
In the scenario of an expected error, we want to take control of how we respond to that error and keep our system fault tolerant. In a scenario where a downstream server may be unavailable, a particular response like a 504 Gateway Timeout may knowingly want to be handled with retries, while for 400 errors we knowingly want to respond to our own request straight away with actionable details instead of retries. All of these scenarios fall under the domain that I considered expected errors.
In contrast, errors that are unexpected as far as the application is concerned fall into the unexpected errors, also known as defects. In these cases, an exception is generally raised and managed outside of the scope of the controller (for example, this could be catch-all middleware).
To elaborate a bit more, "unexpected as far as the application is concerned" does imply that it's a possible error scenario that you may expect to happen, but haven't implemented anything to handle it and don't mind that it's caught and tracked by a catch-all implementation. As for the "catch-all" middleware example, I will elaborate more on that in the** "Let controllers tell you everything"** section.
class Data {
  readonly _tag = "Data";
  private myData: string;

  constructor(myData: string) {
    this.myData = myData;
  }
}

class Service {
  create() {
    // stand-in
    const isErr = false;

    if (isErr) {
      throw new Error("ErrorOne");
    }

    if (isErr) {
      throw new Error("ErrorTwo");
    }

    // Stand-in for applying actual work
    return new Data("Yay");
  }
}

class Controller {
  private service: Service;

  constructor(service: Service) {
    this.service = service;
  }

  create() {
    try {
      const createResult = this.service.create();

      return {
        status: 200,
        message: "Success",
      };
    } catch (err) {
      // Some catch error handling
      // ... omitted

      // If we can't match the expected cases here, throw to the catch-all handler.
      throw err;
    }
  }
}
In the above case, we are throwing errors as stand-ins for what could be handled as expected errors. A non-exhaustive list of problems with this:
If we want to catch and run business logic on this, we need to do so at the controller. In cases that don't match, if we don't apply our observability tools here, then we need to re-throw. This creates some havoc on our control flow cornerstone and may also bloat our error logs and tools with known errors that we didn't handle because static analysis couldn't help us.
Throwing errors aren't visible in the types. If we use our Intellisense on the Service.create method, all we see if that the return type is Data. A developer cannot grok from our types what can go wrong in an expected way.
In my experience as well, this approach also doesn't really happen in practice. Not all thrown errors are caught and managed correctly, so you end up with hard-to-follow try-catch behavior littered throughout implementation.
Do:
import { ok, err } from "neverthrow";

class ExpectedErrorOne {
  readonly _tag = "ExpectedErrorOne";
}

class ExpectedErrorTwo {
  readonly _tag = "ExpectedErrorTwo";
}

class Data {
  readonly _tag = "Data";
  private myData: string;

  constructor(myData: string) {
    this.myData = myData;
  }
}

class Service {
  create() {
    // Stand-in
    const isErr = false;

    if (isErr) {
      return err(new ExpectedErrorOne());
    }

    if (isErr) {
      return err(new ExpectedErrorTwo());
    }

    // Stand-in for applying actual work
    return ok(new Data("Yay"));
  }
}

class Controller {
  private service: Service;

  constructor(service: Service) {
    this.service = service;
  }

  create() {
    const createResult = this.service.create();

    return createResult.match(
      // Success case
      (data) => ({
        status: 200,
        message: "Success",
      }),

      // Error case - pattern match on _tag
      (error) => {
        switch (error._tag) {
          case "ExpectedErrorOne":
            return {
              status: 400,
              message: "Bad request",
            };
          case "ExpectedErrorTwo":
            return {
              status: 422,
              message: "Unprocessable entity",
            };
          default:
            // Optional Exhaustiveness check - will error if we add a new response type
            // and forget to handle it.
            const _exhaustiveCheck: never = error;
        }
      }
    );
  }
}
In the above, I've made use of the neverthrow library to demonstrate an approach of returning known errors.
Some of the benefits of this:
The return type is known typed to know what can go wrong const createResult: Err<never, ExpectedErrorOne> | Err<never, ExpectedErrorTwo> | Ok<Data, never>.
There are no try-catch clauses. In the case where an error is thrown from something unexpected, we consider this a defect and should have systems in place to capture that error and inform the developers (not shown here).
Our controller can have an easier time managing responses at the boundary, while our developers working on this can learn a lot about this endpoint and possible responses without diving into the business logic.
I should finish here by saying that "never" here is a bit strong. I've recently heard an engineering manager use the quote "use exceptions for exceptional circumstances", and I find that to be a useful quote around throwing errors in TypeScript. Do so sparingly and with good reason.
Metadata
There should be an easy way to delineate data which is important for internal affairs.
As mentioned in the previous section, I use the underscore prefix _ as an easy for way for me to delineate between properties important for internal logic, or represent data that has only has importance to internal debugging and observability tools.
I opted for this style of delineation after spending some time working with EffectTS, but you certainly do not have to follow my conventions. The important part is that there are conventions and those are not easily confused with other data.
Don't:
class InvalidDatabaseObject {
  readonly tag = "InvalidDatabaseObject";
  readonly errorId = 123;
  readonly interalMessage = "To resolve, check a...b...c..."
  readonly statusCode = 422;
  readonly message = "We are unable to process your request at this time";
}

class Controller() {
  create() {
    // Assume this created object was the response
    const result = new InvalidDatabaseObject();

    if (result.tag === "InvalidDatabaseObject") {
      // Implement any observability if we need based on error properties
      logger.error("Failed to do something", {
        tag: result.tag,
        errorId: result.errorId,
        internalMessage: result.interalMessage,
      })
    }

    return {
      tag: result.tag,
      status: result.statusCode,
      message: result.message
    }
  }
}
In the above, it's hard for future developers to understand which properties are used for internal affairs.
Do:
class InvalidDatabaseObject {
  readonly _tag = "InvalidDatabaseObject";
  readonly _errorId = 123;
  readonly _interalMessage = "To resolve, check a...b...c..."
  readonly statusCode = 422;
  readonly message = "We are unable to process your request at this time";
}

class Controller() {
  create() {
    // Assume this created object was the response
    const result = new InvalidDatabaseObject();

    if (result._tag === "InvalidDatabaseObject") {
      // Implement any observability if we need based on error properties
      logger.error("Failed to do something", {
        _tag: result._tag,
        _errorId: result._errorId,
        _internalMessage: result._interalMessage,
      })
    }

    return {
      _tag: result._tag,
      status: result.statusCode,
      message: result.message
    }
  }
}
In the above code, we can note visually delineate what is useful for internal development and which belongs to things like response objects. Note that we also return metadata with the response with _tag. This enables other systems to make use of the same unified control flow. For client applications, this enables the ability to be able to customize behavior and messages beyond simple status codes.
I normally take this approach in conjunction with the control flow helpers we've explored for the two types of errors, but let me reiterate that the important part here is that you have consistent delineation defined within the engineering cohort. It may be more approach to separate responses and objects into something like metadata and data properties on the object (similar to how AWS does this) or something else completely different.
Please note that if you nail this stuff down, it also becomes a miracle for micro-services. Whenever you write decouple, asynchronously processed code that has an internal, well-defined rule set, you'll find that handling these responses across services, clients and communication lines like websockets becomes increasingly nicer to reason about and manage.
Define your source of truth
If your types come from remote sources, don't define TypeScript types and interfaces and set this as your source of truth. It can and will fall out of sync.
Don't:
interface User {
  name: string;
}

function getUser(): User {
  const response: { data: unknown } = await getUserFromRemote();

  return response.data as unknown as User;
}
Do:
import { z } from "zod";

const UserSchema = z.object({
  name: z.string(),
});

type User = z.infer<typeof UserSchema>;

function getUser(): User {
  const response: { data: unknown } = await getUserFromRemote();
  const userResult = UserSchema.parse(response.data);

  return userResult;
}
Secondly, don't mix up representations for different concerns. For example, if you are writing schemas to represent the query params, have one for the stringified version and another to represent the coercion. This is one of those times were code volume will increase, but also opens you up the better generate that code and not have to manage it in the first place.
const getUserQueryParams = z
.object({
name: z.string(),
age: z.string(),
})
.partial();
const getUserCoercedQueryParams = z
.object({
name: z.string(),
age: z.coerce.number(),
})
.partial();
// In use
const result = getUserQueryParams
.pipe(getUserCoercedQueryParams)
.parse({ name: "Daniel", age: "22" });
This certainly violates the code volume principle, but it is surprising I've required these values to have separation for different purposes. This do/don't falls under the category of "code generation" and well-defined schemas will make generating this separation very easy.
Let controllers tell you everything
I've already touched on this principle with "never throw errors", but I will just re-iterate the guidelines for this one:
Controllers should control all the request received/response flows.
As a developer, from the controller code, you should be able to see and understand route-specific middleware applied, expected incoming data (params, body, headers) and all possible responses (with the possible exception of defects if you handling that at a catch-all middleware handler).
Don't:
class Data {
readonly _tag = "Data";
private myData: string;
constructor(myData: string) {
this.myData = myData;
}
}
class Service {
create() {
// stand-in
const isErr = false;
if (isErr) {
throw new Error("ErrorOne");
}
if (isErr) {
throw new Error("ErrorTwo");
}
// Stand-in for applying actual work
return new Data("Yay");
}
}
class Controller {
private service: Service;
constructor(service: Service) {
this.service = service;
}
create() {
const createResult = this.service.create();
return {
status: 200,
message: "Success",
};
// NO ERROR HANDLING, all sent to the catch-all. BAD.
}
}
Do:
import { ok, err } from "neverthrow";
class ExpectedErrorOne {
readonly _tag = "ExpectedErrorOne";
}
class ExpectedErrorTwo {
readonly _tag = "ExpectedErrorTwo";
}
class Data {
readonly _tag = "Data";
private myData: string;
constructor(myData: string) {
this.myData = myData;
}
}
class Service {
create() {
// Stand-in
const isErr = false;
if (isErr) {
return err(new ExpectedErrorOne());
}
if (isErr) {
return err(new ExpectedErrorTwo());
}
// Stand-in for applying actual work
return ok(new Data("Yay"));
}
}
class Controller {
private service: Service;
constructor(service: Service) {
this.service = service;
}
create() {
const createResult = this.service.create();
return createResult.match(
// Success case
(data) => ({
status: 200,
message: "Success",
}),
// Error case - pattern match on _tag
(error) => {
switch (error._tag) {
case "ExpectedErrorOne":
return {
status: 400,
message: "Bad request",
};
case "ExpectedErrorTwo":
return {
status: 422,
message: "Unprocessable entity",
};
default:
// Optional Exhaustiveness check - will error if we add a new response type
// and forget to handle it.
const _exhaustiveCheck: never = error;
}
}
);
}
}
In regards to the catch-all middleware handler, do not use that as a point to add control flow for different error handling responses outside of the controller.
import { Hono } from "hono";
import { HTTPException } from "hono/http-exception";
const app = new Hono();
// Error handling middleware
app.use("*", async (c, next) => {
try {
await next();
} catch (error) {
// Handle observability here. Log errors, capture with third-party tools like Sentry etc.
// Default case - generic 500 error
return c.json({ message: "Internal server error" }, 500);
}
});
export default app;
In this example, our catch-all is purely for handling defects and recovering with valid responses to the user. Use the catch-all with no control flow and only as a mechanism to notify the developers.
Conversations with AI
Don't rely on AI to give you the best developer experience. While these tools are getting better, without guidelines, they have overcomplicated and over-bloated their answers for queries that I've made before.
AI is great to chat shop with and pass some ideas by, but don't let it take control of your codebase (at least not as it is at the time of writing). For any suggestions that you adopt, scrutinize them and do your own investigations and spikes into it.
Generate as much code as possible.
Such an underrated time-saver. If there are explicit patterns that are repetitive that you can identity, spend the time to write a script to run the generation. Most of the time for myself, I end up git ignoring these files and generating them for local development and as part of the CI pipeline.
An example of this normally comes with generating SDKs for code bases with OpenAPI specs. Thanks to the spec definition, you can relying write code to parse this information and whatever you need.
This is also a place where AI with guardrails can be super useful, but do take care with this. I wouldn't make use of AI generation as part of a pipeline, so I would be committing that code (and likely not running the AI script much).
I also like to use template libraries here personally. It acts as both a way to easily generate code and a guideline for anyone joining the codebase. Whenever I change repetitive standards, it's normally the templates that I am confirming my ideas against.
Write to refactor programmatically
The more you contain the complexity in your managed code, the easier it is to write codemods for when standards change.
Codemods enable you to programmatically change the code within your files. Personally, I find ts-morph the most accessible option, but there are plenty of great AST parsers and codemod tools out there.
As a bonus, if you like "code-as-documentation" in regards to generating diagrams and scripts, then these same tools can be your friend. Just a fair warning that the more complicated your code is to programmatically traverse, the less these things become an option.
Don't go overkill on abstraction layers
"All problems in computer science can be solved by another level of indirection" -- The "fundamental theorem of software engineering".
Some guidelines:
Sparingly use abstract classes and inheritance.
Sparingly extend interfaces. The same rules can apply here for composition over inheritance.
When using generics, do whatever it takes to have generics infer the types instead of supplying them where possible.
Invert control back to the invocation layer where possible.
Use dependency injection.
Keep your internal codebase "shallow".
For the example around interfaces, we can demonstrate what I mean with this very contrived useless code:
In the above, there is a separation of concerns for the interfaces, and understanding the definition of redrive doesn't require us to jump through to inheritance.
"All problems in computer science can be solved by another level of indirection. Except for the problem of indirection."
Conclusion
This wraps up my opinionated list of things. At least this first iteration. I've been sitting here typing away for close to four hours now, so the quality may be diminishing returns.
I want to finish with a couple of "don't forgets":
These are guidelines. They serve me well currently, but may be out-of-date by the end of the year. If you don't agree or have a strong opinion on any of them, I would welcome your critiques.
Even the best developers have moments where they commit cardinal sins with their code. It's a team effort for this to work, so ensure that your design patterns and ideas are reviewed by your team members as they will always have better feedback on your own code than you do.
This is purely about my more recent experiences with TypeScript codebases. What I am speaking to does not apply to other languages that make trade-offs that actively want you to contradict these guidelines.
If I get another moment where I feel like furiously typing away on the keyboard, I would like to talk about team processes, microservices and/or release management.
]]><![CDATA[Better .NET Controllers with OneOf]]>https://blog.dennisokeeffe.com/blog/2025-02-23-better-dotnet-controllers-with-oneof2025-02-23T00:00:00.000Z2025-02-23T00:00:00.000ZIn this blog post, we will be looking at error handling for .NET applications and looking at how we can help write our services to invert control back to our controllers for when it comes to making request responses using the OneOf library, a library that provides F# style unions.
Context setting
For anyone that follows my content, you will know that I am not a C# nor .NET developer. My experience with the language itself is limited to time spent working with C# at university or through hobby projects (game development, Arduino).
That being said, work has recently asked me to make some changes to our old .NET 6 server. Some of the challenges with this legacy code base has been tracking error management and understanding potential return types where the current style of relying on raising exceptions for control flow lacks intellisense for developers working on the codebase.
It should be disclosed that as an unseasoned C# developer, this can make adjudicating good practice and idiomatic C# a little more difficult. On the flip-side of this, one could see it as me looking at C# with a fresh set of eyes.
Reviewing the .NET error handling page
One of the challenges I was facing while reading through the legacy codebase was understanding how our non-2xx error code responses were happening. A lot of responses were returning as 2xx series responses with null values, even in scenarios where the request body itself was invalid.
I opted to first read through the recommendations for error handling that the .NET documentation presents (here I am sharing the latest version of the docs, although I was looking through .NET 6 documentation).
Something that stood out to me was the lambda exception handler where we could pass a C# handler to the app.UseExceptionHandler method:
var app = builder.Build();
if (!app.Environment.IsDevelopment())
{
app.UseExceptionHandler(exceptionHandlerApp =>
{
exceptionHandlerApp.Run(async context =>
{
context.Response.StatusCode = StatusCodes.Status500InternalServerError;
// using static System.Net.Mime.MediaTypeNames;
context.Response.ContentType = Text.Plain;
await context.Response.WriteAsync("An exception was thrown.");
var exceptionHandlerPathFeature =
context.Features.Get<IExceptionHandlerPathFeature>();
if (exceptionHandlerPathFeature?.Error is FileNotFoundException)
{
await context.Response.WriteAsync(" The file was not found.");
}
if (exceptionHandlerPathFeature?.Path == "/")
{
await context.Response.WriteAsync(" Page: Home.");
}
});
});
app.UseHsts();
}
In the example above, the code could be configured within a .NET application to capture raised exceptions and use control flow to act upon them.
In particular, the example code sets the 500 status code and conditionally sends responses from the server based on business logic.
The challenges that raising exceptions presents
The current .NET configuration for the application that I was working with had a version of this configured, but this is where abstract boolean logic itself can take a nasty turn. The file itself is a minefield of nested if/else statements where the final response is "funneled" through that logic based on the type of exception it is (similar to exceptionHandlerPathFeature?.Error is FileNotFoundException above), as well as some business-specific control flow qualifiers (statements not based on the error type).
Contributing to the file itself would be adding to the debt that had built up, but in some cases for legacy code that may be considered fine (and may actually end up being what I am requested to do), but there are two reasons why I struggle with this style of controller management:
Type signatures do not inform the developer of potential raised exceptions.
Controllers should be the entry point and exit point for all expected HTTP responses.
It is of my personal belief that controllers should be the "air traffic controllers" - they should handle the delegating of business logic to the services, while be in control of returning all expected responses.
What I mean by this is that, as a developer, if I am wanting to look at how an endpoint is handled, I should be able to start at the controller in order to grok how data is handled coming in while also understanding all expected responses going out -- not just the "ok" response.
When I say "expected responses", that includes management for all non-200 responses for percievable issues such as request validation failure, unprocessible issues due to dependencies, etc. There is always the possibility for unexpected errors (which I normally refer to as defects), and in my opinion only these errors should fall outside of the domain of controller management.
The code shared above for the recommended app.UseExceptionHandler I find to be appropriate for defects. I consider defects to be the unexpected errors of the application.
I consider the app.UseExceptionHandler to be appropriate for these unforeseen circumstances. Within the lambda, I would configure the 500 internal error response and have any 3rd party error tracking occur in this lambda only. The UseExceptionHandler for me should only contain the business logic around handling these unexpected scenarios. Everything else should be managed by the controller as far as I am concerned.
Return types in .NET
The first of the two reasons that I presented for why raising exceptions is challenging is that the type signatures do not reflect the return type.
Take the following code example:
public async Task<string> DecryptCipherText(string cipherText)
{
if (string.IsNullOrEmpty(cipherText))
{
throw new ArgumentNullException(nameof(cipherText), "Cipher text cannot be null or empty");
}
// ... pretend to process things
return "Processed cipherText";
}
In this code block, we have a contrived example of a function that expects to decrypt some cipher text. In the scenario that the cipherText passed in is null or empty, we raise an ArgumentNullException.
However, if we look at the type signature, all we see is (awaitable) Task<string> CardDataEncryption.DecryptCipherText(string cipherText). There is no indication to anyone from the call site of the function (be it another service or whatever) that an ArgumentNullException can be thrown.
While this is not unique to C# itself, there are alternatives that offer up solutions for us. This is where I want to introduce OneOf.
As mentioned as the beginning of the post, OneOf is a library that provides F# style unions for C#.
If we look at our function again with the return signature Task<string>, then we note that out-of-the-box, there is no "union" style returns where we could indicate different return types. This is where OneOf steps in.
It enables us to be able to alter signatures to indicate multiple return types and provides tools to help us match on those return types.
For example, we could alter our code to the following:
public async Task<OneOf<string, ArgumentNullException>> DecryptCipherText(string cipherText)
{
if (string.IsNullOrEmpty(cipherText))
{
// Note that we are now returning this value
return new ArgumentNullException(nameof(cipherText), "Cipher text cannot be null or empty");
}
// ... pretend to process things
return "Processed cipherText";
}
In the above, instead of raising an exception, we can now return the exception.
Looking at the type signature now, we see it's adjusted to (awaitable) Task<OneOf<string, ArgumentNullException>> CardDataEncryption.DecryptCipherText(string cipherText).
From a developer point-of-view, Intellisense providing more information on potential errors that can go wrong is a powerful to invert control of how to manage results from a function from the caller. This is particularly powerful for developers like myself who stumble into a codebase for the first time.
The library itself provides a number of ways to fetch values from this response type, but the two that I use the most are Match, TryPickT... or directly accessing the value itself with the value property AsT... where the ... in both cases represents a number for the argument order passed to the type signature (i.e. AsT0 for our example would be string while AsT1 would be ArgumentNullException).
For example, with our function defined above we could access the results like so:
const result = await DecryptCipherText('someCipherTextValue');
// Using match to determine to send a 200 or 400
return result.Match(
result => Ok(result),
ArgumentNullException => new BadRequest("...")
);
// Using TryPick - where you might want to pick out the error to return early and bubble up the error
if (thingOrNotFoundOrError.TryPickT1(out ArgumentNullException error, out var remainder)) {
return error;
}
// Accessing the property directly
Console.WriteLine(result.AsT0); // Possibly the string!
The above demonstrates the few ways that I've used the library.
The first example with Match is how I managed the "air traffic controller" for responding from the controller. The Match type is exhaustive and requires you to handle all expected responses.
The second example allows you to "extract" a value to use as required. Normally for myself, this might be early propagation of the error up to where it can be handled (normally at the controller).
Demonstrates access the value directly. I normally use this in tandem with (2) to ensure that the value exists before applying more logic to it (or you could do the opposite and pick out the valid response and return all others!).
The library itself extends possible return values as you have more applied. For a very contrived example of this, the following would have AsTN where N could be 0 to 4:
To nail the point home - the value of having a separation of "expected" and "unexpected" errors is that the former allows you to self-document and manage all expected responses in a matter-of-fact way.
Keeping that separation can even enable things such as more effective testing given that the domain and range of a function makes the testing strongly in favour of "input-output testing". It means functions will no longer contain the side-effects of thrown functions that do not return, which is heavensent when it comes to testing functions orientated around business logic.
Conclusion
Today's blog post introduces the idea of using the library OneOf in order to better manage union response types, enabling the control flow and development of C# to focus on handling expected outcomes.
This was demonstrated by following along an example that I had personally come across where reliance on control flow with throwing exceptions leads to a more difficult developer experience and merging of error state management across different concerns.
]]><![CDATA[AWS Aurora DSQL in Action]]>https://blog.dennisokeeffe.com/blog/2024-12-05-aws-aurora-dsql-in-action2024-12-05T00:00:00.000Z2024-12-05T00:00:00.000ZOn December 3rd, 2024, Amazon announced the preview of Amazon Aurora DSQL, which is introduced as "the fastest serverless distributed SQL database for always available applications".
From all the sources I have read so far, it looks to have been something that the team has had in the works for a long time. It comes in a few different flavours, but this blog post will focus more so on playing around with DSQL and seeing it in action.
To keep things simple, we will be using the AWS console to setup a new cluster and then connecting to it with Bun, TypeScript and Drizzle.
Getting started
First, let's configure the project with Bun and Drizzle.
# Configure git, initialise the project
$ mkdir demo-dsql-drizzle
$ cd demo-dsql-drizzle
$ bun init
$ bun add drizzle-orm pg dotenv
$ bun add -D drizzle-kit @types/pg
$ mkdir -p src/db drizzle
$ touch src/index.ts src/db/schema.ts drizzle.config.ts
We're going to follow a slightly modified version of Drizzle's getting started guide for Postgres. Please note that DSQL is only Postgres-compatible at the time of the announcement.
First, we need to configure our basic schema. Add the following to src/db/schema.ts:
DSQL has limitations around constraints that I won't dive too deep into here, just note that you cannot use the generatedAlwaysAsIdentity() constraint as expected. AWS will respond with an error during the migration. You can read more about the unsupported features here.
At this point, we can pivot to the AWS console and create a new Aurora DSQL cluster. This will be required for filling out the remaining files as we will need some configuration setup.
Creating a new Aurora DSQL cluster
Through the AWS console, you can search and navigate to Aurora DSQL.
Creating a cluster via the console
If you are not currently in a supported region, AWS will prompt you to change regions.
Change region request
Once you are in a supported region, you can select to create a cluster to move forward. Once it's created, go into the details for the cluster and you will see a "connect" button that will give you the endpoint and other details required to connect to the cluster.
Highlighted connect button within the UIAuth details modal
At this point, we'll have a cluster running with some details about the endpoint and cluster ID, etc. Collect the details for the endpoint and we can move forward.
We'll need to configure our drizzle.config.ts file in the root of the project in order to run our migration. Given that this is just a walkthrough, I won't be using any .env configuration files, but the security is back on you to manage. We'll be using the admin configuration in our case, so the default password limit is 15 minutes to add some sense of security. In practice, you'll either need to manage IAM or make use of APIs to generate the configuration required to connect.
import "dotenv/config";
import { defineConfig } from "drizzle-kit";
export default defineConfig({
out: "./drizzle",
schema: "./src/db/schema.ts",
dialect: "postgresql",
dbCredentials: {
host: "<add in the endpoint from the console here>",
port: 5432,
user: "admin",
password: "<add in the entire password string from the console here>",
database: "postgres",
ssl: true,
},
});
By default, the user will be admin and the database will be postgres. The password will be the one you set when creating the cluster.
The password itself includes the host as well. It's a very long string but just note that you need the entire thing in the password field.
Please note that ssl is required for the connection to work.
Running a simple migration
Once this is all configured, we can run the migration:
If everything is successful, you should the following:
$ bunx drizzle-kit push
No config path provided, using default 'drizzle.config.ts'
Reading config file '/Users/dennis.okeeffe/code/okeeffed/demo-dsql-drizzle/drizzle.config.ts'
Using 'pg' driver for database querying
[✓] Pulling schema from database...
[✓] Changes applied
Let's finish by seeding some data and applying some basics calls against the database.
Running some code against the database
We'll modify an example script from Drizzle to run against the database slightly as we will need to provide the integer IDs ourselves. Not having certain key constraints means that we will need to enforce it at the application layer.
In src/index.ts, add the following:
import "dotenv/config";
import { drizzle } from "drizzle-orm/node-postgres";
import { eq } from "drizzle-orm";
import { usersTable } from "./db/schema";
const db = drizzle({
connection: {
host: "<add in the endpoint from the console here>",
port: 5432,
user: "admin",
password: "<add in the entire password string from the console here>",
database: "postgres",
ssl: true,
},,
});
async function main() {
const user: typeof usersTable.$inferInsert = {
id: 1234,
name: "John",
age: 30,
email: "john@example.com",
};
const user2: typeof usersTable.$inferInsert = {
id: 5678,
name: "Tracy",
age: 48,
email: "tracy@example.com",
};
await db.insert(usersTable).values([user, user2]);
console.log("New user created!");
const users = await db.select().from(usersTable);
console.log("Getting all users from the database: ", users);
/*
const users: {
id: number;
name: string;
age: number;
email: string;
}[]
*/
await db
.update(usersTable)
.set({
age: 31,
})
.where(eq(usersTable.email, user.email));
console.log("User info updated!");
await db.delete(usersTable).where(eq(usersTable.email, user.email));
console.log("User deleted!");
}
main();
Similar to before, I'm just dumping in the credentials here for the sake of the walkthrough, but the connection object will look just like what we configured previously in the drizzle.config.ts file.
Running bun src/index.ts, we can finally test our code against the DSQL cluster:
$ bun src/index.ts
New user created!
Getting all users from the database: [
{
id: 1234,
name: "John",
age: 30,
email: "john@example.com",
}, {
id: 5678,
name: "Tracy",
age: 48,
email: "tracy@example.com",
}
]
User info updated!
User deleted!
Conclusion
This blog post was more "show" than "tell". I have plenty more about Aurora DSQL that I need to dive into and understand, but hopefully this will give you some insight into how you can setup and connect to your own DSQL cluster.
Don't forget to tear down your cluster once you are done to avoid any unnecessary costs. As far as I can tell, costs are free during this preview period, but it's always good to be cautious.
]]><![CDATA[Exploring Git Worktree]]>https://blog.dennisokeeffe.com/blog/2024-08-14-exploring-git-worktree2024-08-14T00:00:00.000Z2024-08-14T00:00:00.000ZGit worktree is a feature that allows you to have multiple working directories associated with a single Git repository. This means you can check out different branches or commits into separate directories on your filesystem, all linked to the same repository.
This demo walks through using Git worktree with an example using different npm dependencies to demonstrate a use case for multiple worktrees.
Our demonstration will emulate (albeit contrived and small) a "major" change within the repository. We're going to dumb it down to something contrived like migrating from Lodash to es-toolkit, but you'll need to use your imagination and pretend like our work may take something like a week or so to complete, and that you may need to ship other features while doing the migration.
It really doesn't matter which language you're working with, but I'm using JavaScript to demonstrate here because you have likely found yourself jump between trees and needing to re-install different dependencies at some stage as you switch back-and-forth.
The process will look like this:
Have a base worktree with Lodash.
Create a separate worktree for the migration.
Re-enact the process where we need to need to add a new feature on the base tree.
Perfect! At this stage, you git log should show something like this:
# Show git log
$ git log
commit 3fd5292b0a49ed8a5a6c4a5e2b9ee7394453e290 (HEAD -> main)
Author: Dennis O'Keeffe <hello@dennisokeeffe.com>
Date: Wed Aug 14 08:20:12 2024 +1000
feat: first commit
Now let's emulate our project to migrate over.
Using Git worktree
We're creating a new worktree for this.
Run the following:
# List our worktree
$ git worktree list
/path/to/okeeffed/demo-git-worktree 3fd5292 [main]
# Create a new branch for our migration
$ git branch feat/estoolkit-migration
# Create a new worktree
$ git worktree add ../demo-git-worktree-estoolkit-migration feat/estoolkit-migration
Preparing worktree (checking out 'feat/estoolkit-migration')
HEAD is now at 3fd5292 feat: first commit
# List our trees again
$ git worktree list
git worktree list
/path/to/okeeffed/demo-git-worktree 3fd5292 [main]
/path/to/okeeffed/demo-git-worktree-estoolkit-migration 3fd5292 [feat/estoolkit-migration]
Great! At this point, we now have another directory at ../demo-git-worktree-estoolkit-migration which represents our estoolkit-migration worktree. It is checked out onto feat/estoolkit-migration.
Git operates differently between the main worktree and a linked worktree. It's best to reference the docs, but here are some quick pointers.
The main differences in created linked work trees are:
Separate working directories: Each worktree has its own working directory, allowing you to work on different branches simultaneously without switching.
Shared repository: All worktrees share the same Git repository (objects and refs).
Independent HEAD: Each worktree has its own HEAD, index, and config file.
Branch isolation: You can't check out the same branch in multiple worktrees simultaneously (except for bare repositories).
At this point, we can work separately between the two folders for our changes.
Making our updates for the toolkit migration
Heading into ../demo-git-worktree-estoolkit-migration and make the following changes:
# Change into our linked worktree directory
$ cd ../demo-git-worktree-estoolkit-migration
# Add es-toolkit and remove Lodash
$ npm install es-toolkit
# Remove Lodash
$ npm uninstall lodash
Now let's update index.js:
const { camelCase } = require("es-toolkit");
function main() {
console.log(camelCase("Our crazy big home project"));
}
main();
If we run node index.js again, we'll notice that nothing has changed:
Let's say now that we need to pivot midway through our migration for something else.
Back in the main worktree, let's go through a flow of adding another feature. Again, this will be contrived, but work with me.
# Back to our main worktree
$ cd ../demo-git-worktree
Even though Lodash is used in the repo, notice that if we run index.js, everything still works even though we remove that dependency in the linked worktree:
# Running on our main worktree without re-installations
$ node index.js
ourCrazyBigHomeProject
Great! Let's branch off, create a new feature and then merge back in.
# Create a new branch
$ git branch feat/snakecase
$ git checkout feat/snakecase
Let's update our index.js file:
const _ = require("lodash");
function main() {
console.log(_.camelCase("Our crazy big home project"));
console.log(_.snakeCase("Our crazy big feature update"));
}
main();
# Commit
$ git add index.js
$ git commit -m "feat: added snakecase"
[feat/snakecase ab1e6d5] feat: added snakecase
2 files changed, 173 insertions(+), 1 deletion(-)
# Head back to the target branch
$ git checkout main
# Merge into main
$ git merge feat/snakecase
Updating 3fd5292..37ed0e0
Fast-forward
index.js | 1 +
2 files changed, 174 insertions(+), 1 deletion(-)
Normally in the work setting we would have our pull request made for the merge.
At this point, our target main branch has also differed from our worktree. Let's fix that.
Rebasing from another worktree
We can rebase from our worktree just like we normally would.
Let's head to our worktree and rebase:
# Go back to the linked tree
$ cd ../demo-git-worktree-estoolkit-migration
# Run the rebase
$ git rebase main
Auto-merging index.js
CONFLICT (content): Merge conflict in index.js
error: could not apply 8325647... feat: migrated lodash camelCase
hint: Resolve all conflicts manually, mark them as resolved with
hint: "git add/rm <conflicted_files>", then run "git rebase --continue".
hint: You can instead skip this commit: run "git rebase --skip".
hint: To abort and get back to the state before "git rebase", run "git rebase --abort".
hint: Disable this message with "git config advice.mergeConflict false"
Could not apply 8325647... feat: migrated lodash camelCase
At this point, we have our conflict that we expected from the change.
Let's fix our conflict by using snakeCase from es-toolkit as well. Our code should look like this:
const { camelCase, snakeCase } = require("es-toolkit");
function main() {
console.log(camelCase("Our crazy big home project"));
console.log(snakeCase("Our crazy big feature update"));
}
main();
Again, we can check it works without the need to re-install anything:
# Running the changes
$ node index.js
ourCrazyBigHomeProject
our_crazy_big_feature_update
Perfect! Let's finish the rebase by continuing.
# Continue the rebase
$ git add index.js
$ git rebase --continue
Let's bring this project to a close after merging a our linked tree code to our main tree.
Merging back to main
Head back to the main tree and merge in the branch.
# Make sure we commit from within our merge tree
$ cd ../demo-git-worktree
$ git merge feat/estoolkit-migration
Merge made by the 'ort' strategy.
index.js | 6 +++---
package-lock.json | 10 +++++-----
package.json | 2 +-
3 files changed, 9 insertions(+), 9 deletions(-)
Again, we merged locally but you'd normally have a pull request for this.
At this point, you would notice that if you tried to run index.js, then finally we would run into an issue:
# Demoing the issue
$ node index.js
node:internal/modules/cjs/loader:1147
throw err;
^
Error: Cannot find module 'es-toolkit'
Require stack:
- /path/to/okeeffed/okeeffed/demo-git-worktree/index.js
at Module._resolveFilename (node:internal/modules/cjs/loader:1144:15)
at Module._load (node:internal/modules/cjs/loader:985:27)
at Module.require (node:internal/modules/cjs/loader:1235:19)
at require (node:internal/modules/helpers:176:18)
at Object.<anonymous> (/path/to/okeeffed/okeeffed/demo-git-worktree/index.js:1:34)
at Module._compile (node:internal/modules/cjs/loader:1376:14)
at Module._extensions..js (node:internal/modules/cjs/loader:1435:10)
at Module.load (node:internal/modules/cjs/loader:1207:32)
at Module._load (node:internal/modules/cjs/loader:1023:12)
at Function.executeUserEntryPoint [as runMain] (node:internal/modules/run_main:135:12) {
code: 'MODULE_NOT_FOUND',
requireStack: [ '/path/to/okeeffed/demo-git-worktree/index.js' ]
}
Node.js v20.10.0
Naturally, both of our worktrees maintained a different node_modules folder. That's how we were able to jump between both seamlessly.
All we need to do is update our main worktree to install the latest package.json configuration.
# Install current configuration
$ npm install
added 1 package, removed 1 package, and audited 2 packages in 1s
found 0 vulnerabilities
# Attempt run again
$ node index.js
ourCrazyBigHomeProject
our_crazy_big_feature_update
Happy days! All we have left to do is cleanup.
Cleaning up our linked tree
We can do so with the following:
# Remove the worktree
$ git worktree remove ../demo-git-worktree-estoolkit-migration
$ git worktree list
/Users/dennis.okeeffe/code/okeeffed/demo-git-worktree 8a9f3a1 [main]
At this point, our linked tree has been cleaned up.
If you run git branch --list, you'll notice that although the worktree is gone, our branch remains.
# List our branches
$ git branch --list
feat/estoolkit-migration
feat/snakecase
* main
Given the rules of worktrees, now that our other worktree is gone, we're free to checkout feat/estoolkit-migration from our main worktree now.
]]><![CDATA[Expressing Your Thoughts in Software]]>https://blog.dennisokeeffe.com/blog/2024-07-31-expressing-your-thoughts-in-software2024-07-31T00:00:00.000Z2024-07-31T00:00:00.000ZDo you consider expressing your ideas in software a difficult concept? You are not alone. Expression is hard, but sprinkled in with the many layers of software development, it can be even more challenging.
I personally waiver back and forward between how confident I feel about my ability to express my thoughts. It's something that I've been thinking a lot about more recently as some long-term projects come to a close at my company. Today's post aims to share some of thoughts.
We'll cover why I believe expression to be important, why it feels so hard a software engineer and a strategy that I've come up with to help me improve.
The importance of expression
How often in your daily role in software have you come across a situation where you want to make your opinion known but felt unable to find the words to do so? Worry not. You're not alone.
The ability to either express yourself well or not to have a wide-ranging set of implications.
Some of the positives:
Feeling heard.
Constructive conversations and feedback.
An exponential speedup in learning.
In contrast, the inability to express yourself does not leave one in a neutral state. I find it likely to have the opposite effect:
Feeling like you have no say.
Internal conflict.
A undesirable state of dogmatism.
This could be the point to slam you, my revered reader, with some statistics to back up my claims. However, given that I've never actually looked into this, we're going off a data point of one: me.
And for me, our honorable data point, I find how well I express myself at any given point over my career directly impacts employee happiness and satisfaction.
My expression couldn't lead to constructive conversation? I feel my opinion is not valued and I find myself devaluing theirs. I couldn't adequately disagree with our approach? It festers inside and it can lead to self-imposed stress or irritation. My approach was not understood well and dismissed? Sometimes I could lean harder into my idea without taking a step back to think more holistically about alternatives.
Why is it that we find ourselves going through these motions? It's human nature. Not everyone will have the same responses I feel, but I believe the majority of us to share some common cornerstones:
We are social beings.
We value achievement.
We value contribution.
These three points are a natural extension of communicating effectively. If you ever end up in a situation where you fundamentally disagree with a concept or approach, express it well and followup with an engaging, constructive conversation, the outcome is likely to be positive irrespective of the approach taken. If you've expressed your idea clearly followed up by a well-thought discussion, you are likely to come to an understanding of the other party's perspective while still having the satisfaction of feeling you have made your contribution towards the final result.
All of this is a key part of evaluating our own self-worth. But why does it feel so hard for us to do as software engineers?
Why is expression hard for software engineers?
The obvious answer to my last dramatic question: it is not hard for all software engineers. The key to great communication is the adage of practice makes perfect.
Software engineers who are following their career path often end up in a situation where they often choose between a line towards management/technical lead, or a line towards honing their expertise as an individual contributor.
In my opinion, the former requires you to express yourself more often. The nature of the role is to engage with others and make decisions. The latter, however, naturally tends towards more hours working diligently and less time expressing yourself to others.
Working as an individual contributor in software can have some fundamentally unhealthy side effects:
We spend a lot time at the desk.
We spend a lot of time in our heads.
Unless we find ways to counter this, you'll may come to find (as our have) that if you are not "practicing" good communication, then it becomes a use-it-or-lose-it situation.
So how do we counter this? Without going into a specific approach just yet, I want to share some of the ways that I feel great individual contributors keep up their communication skills: the teach and/or share often.
The method of teaching is also important. For any Duolingo fanatics out there, you may have found yourself surprised to learn that even after 1000 consecutive days of learning Spanish, you still can't speak it. You might be able to read and write incredibly well if you were diligent, but speaking is another dimension to it.
What I'm trying to illustrate here is that although outlets like writing documentation and verbally shouting opinion pieces (like this one) into the void are in themselves very constructive for certain forms of communication, they are not going to result in the same level of improvement for your capability to convey opinions with speech.
This is a fundamental theme behind this post: it's not that as individuals we don't have opinions or thoughts, it's that we fall out of practice with expressing them.
If you've ever watched developers on YouTube or on stream that you feel do an incredibly job of adhoc-explaining their thoughts or processes off-script, then you'll be pleased to know that is a result of practice.
Some things that great individual contributors do that helps them become better at expressing themselves:
Pair programming.
Streaming.
Public speaking.
Video content.
If the chasm towards this still feels untenable or too far a chasm to cross, then even begin to express your thoughts to yourself in the mirror. Refine your thoughts and opinions. Practice makes perfect.
An approach to clear expression
The approach I have working on recent is what I call the CLEAR framework (ba dum tss). It's a simple, easily remember acronym that touches on the key points:
C: Clarity
L: Lens
E: Ease
A: Align
R: Rehearse
How to visualize the CLEAR framework
Imagine you have a glass prism. Light enters the prism and is refracted into a spectrum of colors. For a more vivid version of this, think of The Great Pyramids of Gaza as our glass prism, with the sunlight coming through being refracted out the other side of the pyramid as a gigantic rainbow.
Our light prism, as seen though the lens of an AI prompt.
The light coming into the prism as the input we want to comment on.
The glass prism itself is representational of our opinion forming process.
The spectrum of colors represents our expression of that opinion.
The glass prism is where our CLEAR process comes in. It guides our approach to taking that input, making sense of where we stand on it and how we want to convey it.
Let's walk through each step.
Clarity
Seek clarify on your opinion by asking yourself questions. If open questions are too broad to answer, try to ask yourself closed questions (yes/no). This will help you to refine your stance on the matter.
Lens
You can think about this point in a number of ways:
What is the lens that you are looking through?
What is the lens that your audience is looking through?
What is a "lens" that you could use to simplify what you want to say?
Ease
This in a natural extension of the "lens" property. Simplify the lens that you and others can look through.
I think of this point as being the most integral. For difficult concepts, close that chasm that others need to cross in order to understand your thought process.
In regards to technical terms, concepts like Domain Name Server (DNS) can be simplified to "the phone book of the internet". Examples like this can go a long way to making your opinion more accessible.
This is also true for non-technical terms. If you wish to convey why you dislike certain processes or approaches around project management or team dynamics, seek a way to simplify your opinion to a more relatable viewpoint.
Align
For this point, you can ask yourself these questions:
How will your opinion align with the desired outcome?
How does it align with your values or the values or the greater team?
Keeping the end in mind for your opinion will guide how you speak.
Rehearse
This point speaks to the practice that we mentioned. Of course, this is not always possible in the moment, but you'll often find that the values that drive your opinion are often the same values that drive your current state as a software engineer.
If you have common gripes or event some post-trauma about something that went wrong, then you likely already have strong opinions on those things. Rehearse those opinions. Refine them. Make them more accessible. That preparation will help you in the moment.
Some final points on CLEAR
Here is the reality of forming an opinion: you won't always nail the delivery.
Don't sweat it. Even the best communicators have moments where their delivery doesn't nail the landing.
It's all a process. The more you practice, the better your average delivery will become.
Finally, if CLEAR doesn't work for you or the visual I provided doesn't resonate, then this is a great chance to put this into practice for yourself. Make your own approach that helps you to express your thoughts better.
Conclusion
In conclusion, expressing ideas in software development can indeed be challenging, but it's an essential skill that significantly impacts both personal satisfaction and professional growth. As software engineers, the balance between technical expertise and effective communication is crucial. By recognizing the importance of expression and actively working to improve it, we can enhance our contributions, foster constructive conversations, and ultimately achieve better outcomes in our projects.
The CLEAR framework provides a structured approach to refining our communication skills. By focusing on CLEAR, we can systematically enhance how we articulate our thoughts and opinions. Remember, practice is key. Whether through pair programming, public speaking, or simply rehearsing your ideas, the more you practice, the more proficient you will become at expressing yourself.
Effective communication is not just about being heard but about creating a dialogue that leads to understanding and collaboration. By continuously working on our ability to express our ideas, we not only improve our own satisfaction but also contribute to a more inclusive and innovative working environment. So, take the time to practice, refine your approach, and don't be afraid to express your thoughts. It's a journey worth taking.
Disclaimer: This blog post used AI to generate the images used for the analogy. You may have figured that out when you saw the light not entering the prism as a straight line but shining at the tip. I left it in because it felt cool.
]]><![CDATA[Resource Management in TypeScript]]>https://blog.dennisokeeffe.com/blog/2024-07-15-resource-management-in-typescript2024-07-15T00:00:00.000Z2024-07-15T00:00:00.000Z
Update July 15th 2024: Based on some changes that I made to
the Result type in a previous post, I've implemented changes here as well.
The updated version will be it's own section at the.
Overview
In a previous post, we looked into how we could implement a Result type in TypeScript. This type was designed to represent either a success or a failure in a type-safe manner.
Building on top of that, we are next going to look at how we could use that Result type to implement the Acquire and Release Pattern in TypeScript.
Often, you may need to execute a series of linked operations where the success of each step relies on the success of the previous one. If any step fails, you will want to undo the effects of all the preceding successful steps. The Acquire and Release Pattern is a pattern that we can use to handle this situation.
Implementing the Acquire and Release Pattern
We can implement a version of the acquire and release pattern with the following helper function:
import { Result, ErrorType } from "./alt-result";
type AcquireRelease<A, E extends ErrorType, R = void> = {
resource: A;
release: () => Promise<Result<R, E>>;
};
export class AcquireReleaseError {
readonly _tag = "AcquireReleaseError";
readonly error: Error;
constructor(error: Error) {
this.error = error;
}
}
/**
* Acquires a resource and provides a function to release it.
*
* @template T The type of the resource to be acquired.
* @template E The type of error that might occur during acquire or release (default: Error).
* @template R The type of the result returned by the release function (default: unknown).
*
* @param acquire A function that returns a Promise resolving to a Result containing the resource or an error.
* @param release A function that takes the acquired resource and returns a Promise resolving to a Result of the release operation.
*
* @returns A Promise resolving to a Result containing either an AcquireRelease object or an error.
*
* @remarks
* The R type parameter represents the result type of the release operation.
* It's set to 'unknown' by default, allowing the release operation to potentially return any type.
* This can be useful if the release operation needs to return some specific information or status.
*
* Rejected promises are treated as defects and not handled in this function.
* They are thrown as exceptions.
*/
export async function acquireRelease<T, E extends ErrorType, R = unknown>(
acquire: () => Promise<Result<T, E>>,
release: (resource: T) => Promise<Result<R, E>>
): Promise<Result<AcquireRelease<T, E, R>, E | AcquireReleaseError>> {
try {
const acquireResult = await acquire();
if (acquireResult.isFailure()) {
return Result.fail(acquireResult.error);
}
const resource = acquireResult.data;
return Result.succeed({
resource,
release: () => release(resource),
});
} catch (err) {
return Result.fail(
new AcquireReleaseError(
err instanceof Error ? err : new Error(String(err))
)
);
}
}
This function first attempts to "acquire" a resource by calling the acquire function.
If the acquisition is successful, it then returns an object containing the acquired resource and a release function that can be used to release the resource.
In the situation where the acquisition fails, the function returns the error that occurred during the acquisition.
In the current approach I've taken, it returns the helper function to rollback, but it doesn't explicitly define how we rollback.
I've inverted that control to the caller to define how they want to rollback. We can see what I mean by looking at the following example that aims to create a few AWS resources and then gives us a way to rollback if any of them fail:
import { acquireRelease } from "./alt-acq";
import { ErrorType, Failure, Result } from "./alt-result";
// ... assume we have imported all the helper create and delete functions used below, as well as the custom errors
// Step 1: Create user record
const recordCreateResult = await acquireRelease(
() => createUserRecord(userData),
async (user) => {
console.log(`Releasing user record`);
return await deleteUserRecord(user.userId);
}
);
if (recordCreateResult.isFailure()) {
return Result.fail(new RecordCreateError(recordCreateResult));
}
const { resource: user, release: releaseUser } = recordCreateResult.data;
console.log("User record created:", user);
// Step 2: Create S3 bucket
const s3BucketCreateResult = await acquireRelease(
() => createS3Bucket(`user-${user.userId}-bucket`),
(bucket) => {
console.log(`Releasing S3 bucket`);
return deleteS3Bucket(bucket.bucketName);
}
);
if (s3BucketCreateResult.isFailure()) {
return Result.fail(new S3Error(s3BucketCreateResult, [releaseUser]));
}
const { resource: bucket, release: releaseBucket } = s3BucketCreateResult.data;
console.log("S3 bucket created:", bucket);
// Step 3: Upload record to S3
const uploadToS3Result = await acquireRelease(
() =>
uploadRecordToS3(bucket.bucketName, {
userId: user.userId,
data: userData,
}),
(record) => {
console.log(`Releasing S3 record due`);
return deleteRecordFromS3(bucket.bucketName, record.recordId);
}
);
if (uploadToS3Result.isFailure()) {
return Result.fail(
new S3Error(uploadToS3Result, [releaseBucket, releaseUser])
);
}
const { resource: record, release: rollbackUpload } = uploadToS3Result.data;
console.log("Record uploaded to S3:", record);
// Step 4: Send SQS message
const sendSQSMessageResult = await acquireRelease(
() => sendSQSMessage({ userId: user.userId, recordId: record.recordId }),
() => Promise.resolve(Result.succeed(undefined)) // No specific cleanup for SQS
);
if (sendSQSMessageResult.isFailure()) {
return Result.fail(
new SQSUploadError(sendSQSMessageResult, [
rollbackUpload,
releaseBucket,
releaseUser,
])
);
}
const sqsResult = sendSQSMessageResult.data;
console.log("SQS message sent successfully:", sqsResult);
console.log("Process completed successfully");
return Result.succeed(undefined);
In the code I have above, I am relying on the result returned from the acquireRelease function to determine whether the operation was successful or not. If it was not, I am returning a Result.fail with the error and the rollback functions that I want to execute.
The alternative is that you could rollback directly within that block, but in the case that you have that logic encapsulated in a function, you can against surface things to the top-level to handle the rollback.
An example of surfacing the rollback logic to the top-level might look like this (assume the above code is in a function called processUserData):
In the above code, the functions that we inject will all succeed except for the sendSQSMessage function. When this function fails, we will surface the error to the top-level and then call the rollback function on the error to rollback the operations.
$ node example.ts
# Successes start here
User record created: { userId: 'user123', name: 'John Doe', email: 'john@example.com' }
S3 bucket created: { bucketName: 'user-user123-bucket' }
Record uploaded to S3: { recordId: 'record123' }
# Oopsy! We failed, so the rollback has started
Releasing S3 record due
Releasing S3 bucket
Releasing user record
As you can see, the rollback logic is executed in reverse order of the operations that were successful (thanks to how we defined them).
If we updated out uploadRecordToS3 error to also fail, we can see how our running our code changes:
$ node example.ts
# Successes start here
User record created: { userId: 'user123', name: 'John Doe', email: 'john@example.com' }
S3 bucket created: { bucketName: 'user-user123-bucket' }
# Oopsy! We failed, so the rollback has started
Releasing S3 bucket
Releasing user record
In the above, you'll noticed we've only rolled back the S3 bucket and user record.
Matching on the error type
If we want even more control around the rollback at the top-level, we could even make use of our custom errors and their tags.
Here is a list of what our custom errors from the code could look like:
In the above example, I have an abstract class that could be used to define a custom error that has a rollback function. This function will execute all the rollback functions that were passed to the error.
Because of how the _tag is assigned, we could then use the matchTag logic that we defined in the previous post to determine what kind of error we are dealing with and then execute logic based on what went wrong.
// ... omit code from before
async function main() {
// Run the process
const result = await processUserData(
{ name: "John Doe", email: "john@example.com" },
createUserRecord,
createS3Bucket,
uploadRecordToS3,
sendSQSMessage,
deleteRecordFromS3,
deleteS3Bucket,
deleteUserRecord
);
await Result.matchTag(result, {
Success: () => console.log("Success"),
S3Error: (error: S3Error<ErrorType>) => console.error("S3Error", error),
RecordCreateError: (error: RecordCreateError<ErrorType>) =>
console.error("RecordCreateError", error),
SQSUploadError: async (error: SQSUploadError<ErrorType>) => {
console.error("SQSUploadError", error);
await error.rollback();
},
});
}
main();
In the above logic, we are using the matchTag function to determine what kind of error we are dealing with. If it is an SQSUploadError, we are then calling the rollback function on the error to rollback the operations.
Updated approach (July 15th 2024)
After reviewing some types, I've simplified the Result type from the previous post and made changes to the acquireRelease function to make it a little more type smart:
import { Result } from "./alt-result";
type InferResultTypes<T> = T extends Result<infer A, infer E> ? [A, E] : never;
type AcquireRelease<A, E, R = unknown> = {
resource: A;
release: () => Promise<Result<R, E>>;
};
/**
* Acquires a resource and provides a function to release it.
*
* @template T The type of the resource to be acquired.
* @template E The type of error that might occur during acquire or release (default: Error).
* @template R The type of the result returned by the release function (default: unknown).
*
* @param acquire A function that returns a Promise resolving to a Result containing the resource or an error.
* @param release A function that takes the acquired resource and returns a Promise resolving to a Result of the release operation.
*
* @returns A Promise resolving to a Result containing either an AcquireRelease object or an error.
*
* @remarks
* The R type parameter represents the result type of the release operation.
* It's set to 'unknown' by default, allowing the release operation to potentially return any type.
* This can be useful if the release operation needs to return some specific information or status.
*
* Rejected promises are treated as defects and not handled in this function.
* They are thrown as exceptions.
*/
export async function acquireRelease<
AcquireFn extends () => Promise<Result<any, any>>,
ReleaseFn extends (
resource: InferResultTypes<Awaited<ReturnType<AcquireFn>>>[0]
) => Promise<Result<any, any>>
>(
acquire: AcquireFn,
release: ReleaseFn
): Promise<
Result<
AcquireRelease<
InferResultTypes<Awaited<ReturnType<AcquireFn>>>[0],
InferResultTypes<Awaited<ReturnType<AcquireFn>>>[1],
InferResultTypes<Awaited<ReturnType<ReleaseFn>>>[0]
>,
InferResultTypes<Awaited<ReturnType<AcquireFn>>>[1]
>
> {
try {
const acquireResult = await acquire();
if (acquireResult.isFailure()) {
return acquireResult;
}
const resource = acquireResult.data;
return Result.succeed({
resource,
release: () => release(resource),
});
} catch (error) {
return Result.fail(error);
}
}
In this version:
I've added a InferResultTypes type that will infer the types of the Result type.
I've updated the AcquireRelease type to be more type smart.
I've updated the acquireRelease function to be more type smart.
These are still experimental and being battle tested, but I will post any updated changes as things happen.
Conclusion
Today's post looked at how we could implement the Acquire and Release Pattern in TypeScript in order to handle a sequence of operations and roll them back if need be.
We also looked at how our pattern can surface the control logic to the top-level which can be powerful for decision making.
In your own work, you could also extend this to optionally roll everything back in parallel or in a specific order. You could also extend this to handle more complex scenarios where you might want to roll back a specific operation and then retry it, or even retry the failing operation a number of times before opting to raise the error and rollback.
]]><![CDATA[Creating a Result Type in TypeScript]]>https://blog.dennisokeeffe.com/blog/2024-07-14-creating-a-result-type-in-typescript2024-07-14T00:00:00.000Z2024-12-05T00:00:00.000Z
Update July 15th 2024: I've ended up removing the matchTag
functionality and some types in the previous version to simplify things a
little more. The updated version will be it's own section towards the end.
Overview
When it comes to error management, there are three things that I've been thinking about recently that I really like:
Errors management in Go: I am a big fan of the way Go drives me to handle errors in a very explicit way, right after calling.
Error management in EffectTS: Thinking about errors are expected or unexpected in EffectTS is actually a great paradigm shift as a TypeScript programmer.
In particular with EffectTS, I think their approach to error handling is a fantastic foundation for writing scalable TypeScript.
At my company, I've run into some recent problems that I think EffectTS would solve quite nicely. However, achieving buy-in for it at this point in time is difficult (I won't elaborate on the reasons) and in earnest, I am only hoping to reap the benefits of a few adopted features at this point in time.
So, I've been thinking about how I could implement my own Result type in TypeScript that could nicely return "successes" or "failures" that gives me nice TypeScript intellisense and type checking around errors. The aim would be to have something relatively simple that could be easily adopted at work, but also easily removed if need be.
In this blog post, we will take a look at libraries such as EffectTS, Zod, Valibot and Joi to understand how they approach a Result-like type and how we could approach building our own.
What is a Result type?
As far as I am talking about, I am looking to write a Result type is a type that can represent either a success or a failure.
I want the success type to return data (hopefully via a property like data) and a way to known it's a success, while the failure can safely return an error without throwing an exception.
The aim for failure types is that they will represent the "expected errors" i.e. errors that we expect could happen. This gives me power over how I handle these errors and how I can recover from them. It also can give me great type checking around these errors to improve developer experience.
Anything unexpected (also known as a defect in EffectTS) would be the errors that do end up in the catch part of the try/catch block. My aim here is that this is the stuff that we pay close attention to and aim to patch when these unexpected errors show their face.
Originally, I had a very simple implementation of a Result type that looked like this:
That being said, it felt super basic and like it was missing some stuff that I wanted, so I decided to snoop into some source code and see how the pros do it.
Zod
I started with Zod due to the amount of usage I spend with it on my personal work.
const result = stringSchema.safeParse("billie");
if (!result.success) {
// handle error then return
result.error;
} else {
// do something
result.data;
}
The API is very simple and intuitive, so it gets brownie points from me.
Looking into the source code for safeParse and safeParseAsync, both we returning Promise<SafeParseReturnType<Input, Output>> which is the return type of the handleResult function.
const handleResult = <Input, Output>(
ctx: ParseContext,
result: SyncParseReturnType<Output>
):
| { success: true; data: Output }
| { success: false; error: ZodError<Input> } => {
if (isValid(result)) {
return { success: true, data: result.value };
} else {
if (!ctx.common.issues.length) {
throw new Error("Validation failed but no issues detected.");
}
return {
success: false,
get error() {
if ((this as any)._error) return (this as any)._error as Error;
const error = new ZodError(ctx.common.issues);
(this as any)._error = error;
return (this as any)._error;
},
};
}
};
The unsuccessful route returns a ZodError, which both the docs and ZodError source code show that it is a class that extends Error.
Although it makes perfect sense for Zod's use case, I'm hoping to return a more generic class for my expected errors that do not extend Error. There reason being is that I don't want those errors to be throwable.
Joi
Next, I took a look at Joi, another validation library which is the one heavily used at my current company.
The validate function from Joi is what runs the assertions:
Looking into EffectPrimitiveSuccess led me to the alternative types EffectPrimitive and EffectPrimitiveFailure, where each look to have a similar implementation:
I won't explain too much of this (since it is a tough for me to explain with 100% confidence), but my big assumption here is that the implementation here is required for some important work under the hood, and so for my use case I am likely looking to use something that is simpler in terms of naming conventions, but some of the symbol properties do look important for me to implement.
Although it's a bit of off scope, something else that is really impressive about EffectTS on top of this though is how they make use of readonly tags. This helps with their conditional logic a lot, and I am a fan of some of their patterns that make use of _tag. I am hoping to make use of this myself in the final result.
Implementing a Result type
After reviewing all of the different approaches, I ended up with the following implementation for Result:
export type Success<T> = Result<T, never>;
export type Failure<E extends ErrorType> = Result<never, E>;
export type ErrorType = {
_tag: string;
[key: string]: any;
};
type MatchCases<T, E extends ErrorType, U> = {
Success: (data: T) => U;
} & {
[K in E["_tag"]]: (error: Extract<E, { _tag: K }>) => U;
};
export class Result<T, E extends ErrorType> {
protected constructor(
readonly _tag: "Success" | "Failure",
protected readonly value: T | E
) {}
static succeed<T>(data: T): Success<T> {
return new Result("Success", data) as Success<T>;
}
static fail<E extends ErrorType>(error: E): Failure<E> {
return new Result("Failure", error) as Failure<E>;
}
isSuccess(): this is Success<T> {
return this._tag === "Success";
}
isFailure(): this is Failure<E> {
return this._tag === "Failure";
}
get data(): T {
if (this.isSuccess()) return this.value as T;
throw new Error("Cannot get data from a Failure");
}
get error(): E {
if (this.isFailure()) return this.value as E;
throw new Error("Cannot get error from a Success");
}
map<U>(f: (value: T) => U): Result<U, E> {
return this.isSuccess()
? Result.succeed(f(this.data))
: (this as unknown as Result<U, E>);
}
flatMap<U>(f: (value: T) => Result<U, E>): Result<U, E> {
return this.isSuccess() ? f(this.data) : (this as unknown as Result<U, E>);
}
equals(that: unknown): boolean {
return (
that instanceof Result &&
this._tag === that._tag &&
this.value === that.value
);
}
toJSON() {
return {
_tag: this._tag,
[this._tag === "Success" ? "data" : "error"]: this.value,
};
}
toString(): string {
return JSON.stringify(this.toJSON());
}
[Symbol.for("nodejs.util.inspect.custom")]() {
return this.toJSON();
}
static matchTag<T, E extends ErrorType, U>(
result: Result<T, E>,
cases: MatchCases<T, E, U>
): U {
if (result.isSuccess()) {
return cases.Success(result.data);
} else {
const errorHandler = cases[result.error._tag as keyof typeof cases];
if (errorHandler) {
return errorHandler(result.error as any);
}
throw new Error(`Unhandled error type: ${result.error._tag}`);
}
}
}
Let's break down the code.
Definitions and Types
Success and Failure Types
export type Success<T> = Result<T, never>;
export type Failure<E extends ErrorType> = Result<never, E>;
Success<T> represents a successful result, containing a value of type T.
Failure<E extends ErrorType> represents a failed result, containing an error of type E.
ErrorType defines the structure for errors. Each error has a _tag (string identifier) and can have additional properties.
MatchCases
type MatchCases<T, E extends ErrorType, U> = {
Success: (data: T) => U;
} & {
[K in E["_tag"]]: (error: Extract<E, { _tag: K }>) => U;
};
MatchCases is a utility type for handling different cases when matching on a Result. It includes:
A Success case for handling successful results.
Dynamically creates cases for each error _tag to handle specific error types.
Result Class
Constructor and Static Methods
export class Result<T, E extends ErrorType> {
protected constructor(
readonly _tag: "Success" | "Failure",
protected readonly value: T | E
) {}
static succeed<T>(data: T): Success<T> {
return new Result("Success", data) as Success<T>;
}
static fail<E extends ErrorType>(error: E): Failure<E> {
return new Result("Failure", error) as Failure<E>;
}
Result is a generic class representing either a success (Success<T>) or a failure (Failure<E>).
It has a constructor accepting _tag and value.
succeed and fail are static methods for creating instances of Success and Failure.
Type Guards
isSuccess(): this is Success<T> {
return this._tag === "Success";
}
isFailure(): this is Failure<E> {
return this._tag === "Failure";
}
isSuccess and isFailure are type guards to determine if the result is a success or failure.
Accessors
get data(): T {
if (this.isSuccess()) return this.value as T;
throw new Error("Cannot get data from a Failure");
}
get error(): E {
if (this.isFailure()) return this.value as E;
throw new Error("Cannot get error from a Success");
}
data and error are getters to access the value or error. They throw errors if accessed on the wrong type.
[Symbol.for("nodejs.util.inspect.custom")] customizes how the result is displayed in Node.js inspection.
Pattern Matching
static matchTag<T, E extends ErrorType, U>(
result: Result<T, E>,
cases: MatchCases<T, E, U>
): U {
if (result.isSuccess()) {
return cases.Success(result.data);
} else {
const errorHandler = cases[result.error._tag as keyof typeof cases];
if (errorHandler) {
return errorHandler(result.error as any);
}
throw new Error(`Unhandled error type: ${result.error._tag}`);
}
}
matchTag matches on the result's type and invokes the appropriate handler from cases for Success or the specific error type.
Summary
As you can tell, this does take a lot of inspiration from the EffectTS implementation, but I've tried to simplify it down to the core features that I need as well as using the other validation libraries as inspiration.
This code defines a Result class for handling operations that can either succeed or fail.
It includes type guards, transformations (map, flatMap), and utilities for pattern matching (matchTag).
Success and Failure are specific instances of Result.
ErrorType is a flexible error structure with a _tag for identifying error types.
This approach allows for clear and type-safe handling of operations that may succeed or fail, providing strong guarantees about the types involved.
The best way to get a feel for how this works is to look at the unit tests that I wrote for this type:
import { Result, ErrorType } from "./alt-result";
describe("Result", () => {
// Define some test error types
type TestError =
| { _tag: "TestError1"; message: string }
| { _tag: "TestError2"; message: string };
describe("creation and basic methods", () => {
it("should create a Success result", () => {
const result = Result.succeed(42);
expect(result.isSuccess()).toBe(true);
expect(result.isFailure()).toBe(false);
expect(result.data).toBe(42);
});
it("should create a Failure result", () => {
const error: TestError = { _tag: "TestError1", message: "Test error" };
const result = Result.fail(error);
expect(result.isSuccess()).toBe(false);
expect(result.isFailure()).toBe(true);
expect(result.error).toEqual(error);
});
it("should throw when accessing data of a Failure", () => {
const result = Result.fail({ _tag: "TestError1", message: "Test error" });
expect(() => result.data).toThrow("Cannot get data from a Failure");
});
it("should throw when accessing error of a Success", () => {
const result = Result.succeed(42);
expect(() => result.error).toThrow("Cannot get error from a Success");
});
});
describe("map and flatMap", () => {
it("should map a Success result", () => {
const result = Result.succeed(42).map((x) => x * 2);
expect(result.isSuccess()).toBe(true);
expect(result.data).toBe(84);
});
it("should not map a Failure result", () => {
const error: TestError = { _tag: "TestError1", message: "Test error" };
const result = Result.fail<TestError>(error).map((x) => x * 2);
expect(result.isFailure()).toBe(true);
expect(result.error).toEqual(error);
});
it("should flatMap a Success result", () => {
const result = Result.succeed(42).flatMap((x) => Result.succeed(x * 2));
expect(result.isSuccess()).toBe(true);
expect(result.data).toBe(84);
});
it("should not flatMap a Failure result", () => {
const error: TestError = { _tag: "TestError1", message: "Test error" };
const result = Result.fail<TestError>(error).flatMap((x) =>
Result.succeed(x * 2)
);
expect(result.isFailure()).toBe(true);
expect(result.error).toEqual(error);
});
});
describe("equals", () => {
it("should consider two Success results with the same data equal", () => {
const result1 = Result.succeed(42);
const result2 = Result.succeed(42);
expect(result1.equals(result2)).toBe(true);
});
it("should consider two Failure results with the same error equal", () => {
const error: TestError = { _tag: "TestError1", message: "Test error" };
const result1 = Result.fail(error);
const result2 = Result.fail(error);
expect(result1.equals(result2)).toBe(true);
});
it("should consider Success and Failure results not equal", () => {
const success = Result.succeed(42);
const failure = Result.fail({
_tag: "TestError1",
message: "Test error",
});
expect(success.equals(failure)).toBe(false);
});
});
describe("matchTag", () => {
it("should match Success case", () => {
const result = Result.succeed(42);
const output = Result.matchTag(result as Result<number, TestError>, {
Success: (data) => `Success: ${data}`,
TestError1: (error: TestError) => `Error1: ${error.message}`,
TestError2: (error: TestError) => `Error2: ${error.message}`,
});
expect(output).toBe("Success: 42");
});
it("should match Failure case", () => {
const result = Result.fail<TestError>({
_tag: "TestError1",
message: "Test error",
});
const output = Result.matchTag(result, {
Success: (data) => `Success: ${data}`,
TestError1: (error: TestError) => `Error1: ${error.message}`,
TestError2: (error: TestError) => `Error2: ${error.message}`,
});
expect(output).toBe("Error1: Test error");
});
it("should throw for unhandled error types", () => {
const result = Result.fail({ _tag: "UnhandledError" } as ErrorType);
expect(() =>
Result.matchTag(result as unknown as Result<number, TestError>, {
Success: (data) => `Success: ${data}`,
TestError1: (error: TestError) => `Error1: ${error.message}`,
TestError2: (error: TestError) => `Error2: ${error.message}`,
})
).toThrow("Unhandled error type: UnhandledError");
});
});
});
Updated approach (July 15th 2024)
After playing around a bit more, I've done some refactoring. Right now, my current implementation looks like this:
export type Success<T> = Result<T, never>;
export type Failure<E> = Result<never, E>;
/**
* !!! EXPERIMENTAL !!!
* The following class provides a way to enapsulate the result of an operation that can either succeed or fail.
* It enables the use of functional programming techniques to handle the result of an operation. This can
* be useful in TypeScript for handling expected errors in a more type-safe way.
*
* @experimental
* @see https://blog.dennisokeeffe.com/blog/2024-07-14-creating-a-result-type-in-typescript
*
* @example
* type TestError =
* | { _tag: "TestError1"; message: string }
* | { _tag: "TestError2"; message: string };
*
* // Result<T, E extends ErrorType>.succeed<number>(data: number): Success<number>
* const result = Result.succeed(42);
*
* // Result<T, E extends ErrorType>.fail<{
* // _tag: "TestError1";
* // message: string;
* // }>(error: {
* // _tag: "TestError1";
* // message: string;
* // }): Failure<{
* // _tag: "TestError1";
* // message: string;
* // }>
* const failure = Result.fail<TestError>({
* _tag: "TestError1",
* message: "Test error",
* });
*/
export class Result<T, E> {
protected constructor(
readonly _tag: "Success" | "Failure",
protected readonly value: T | E
) {}
static succeed<T>(data: T): Success<T> {
return new Result("Success", data) as Success<T>;
}
static fail<E>(error: E): Failure<E> {
return new Result("Failure", error) as Failure<E>;
}
isSuccess(): this is Success<T> {
return this._tag === "Success";
}
isFailure(): this is Failure<E> {
return this._tag === "Failure";
}
get data(): T {
if (this.isSuccess()) return this.value as T;
throw new Error("Cannot get data from a Failure");
}
get error(): E {
if (this.isFailure()) return this.value as E;
throw new Error("Cannot get error from a Success");
}
map<U>(f: (value: T) => U): Result<U, E> {
return this.isSuccess()
? Result.succeed(f(this.data))
: (this as unknown as Result<U, E>);
}
flatMap<U>(f: (value: T) => Result<U, E>): Result<U, E> {
return this.isSuccess() ? f(this.data) : (this as unknown as Result<U, E>);
}
equals(that: unknown): boolean {
return (
that instanceof Result &&
this._tag === that._tag &&
this.value === that.value
);
}
toJSON() {
return {
_tag: this._tag,
[this._tag === "Success" ? "data" : "error"]: this.value,
};
}
toString(): string {
return JSON.stringify(this.toJSON());
}
[Symbol.for("nodejs.util.inspect.custom")]() {
return this.toJSON();
}
}
I've removed the matchTag static method as in introduced unnecessary complexity that I think I wanted to think through more. Instead, I'm relying on the _tag property to handle the matching.
I've removed the ErrorType type as it introduced unnecessary complexity. I'm happy to just use E as the error type for now to see how it goes.
There is also another approach I am mulling over to reduce some as casting for the following:
static succeed<T>(data: T): Success<T> {
return new Result("Success", data) as Success<T>;
}
static fail<E>(error: E): Failure<E> {
return new Result("Failure", error) as Failure<E>;
}
That approach would be to convert Result to an abstract class and convert the Success and Failure types into sub classes:
export abstract class Result<T, E> {
protected constructor(
readonly _tag: "Success" | "Failure",
protected readonly value: T | E
) {}
static succeed<T>(data: T): Success<T> {
return new Success(data);
}
static fail<E>(error: E): Failure<E> {
return new Failure(error);
}
abstract isSuccess(): this is Success<T>;
abstract isFailure(): this is Failure<E>;
get data(): T {
if (this.isSuccess()) return this.value;
throw new Error("Cannot get data from a Failure");
}
get error(): E {
if (this.isFailure()) return this.value;
throw new Error("Cannot get error from a Success");
}
map<U>(f: (value: T) => U): Result<U, E> {
return this.isSuccess()
? Result.succeed(f(this.data))
: (this as unknown as Result<U, E>);
}
flatMap<U>(f: (value: T) => Result<U, E>): Result<U, E> {
return this.isSuccess() ? f(this.data) : (this as unknown as Result<U, E>);
}
equals(that: unknown): boolean {
return (
that instanceof Result &&
this._tag === that._tag &&
this.value === that.value
);
}
toJSON() {
return {
_tag: this._tag,
[this._tag === "Success" ? "data" : "error"]: this.value,
};
}
toString(): string {
return JSON.stringify(this.toJSON());
}
[Symbol.for("nodejs.util.inspect.custom")]() {
return this.toJSON();
}
}
export class Success<T> extends Result<T, never> {
constructor(data: T) {
super("Success", data);
}
isSuccess(): this is Success<T> {
return true;
}
isFailure(): this is Failure<never> {
return false;
}
get data(): T {
return this.value;
}
}
export class Failure<E> extends Result<never, E> {
constructor(error: E) {
super("Failure", error);
}
isSuccess(): this is Success<never> {
return false;
}
isFailure(): this is Failure<E> {
return true;
}
get error(): E {
return this.value;
}
}
Both approaches should only require removal of the matchTag tests that I had previously.
Updated approach (Dec 5th 2024)
In a recent data migration, I ended up making use of a Result-ish type again to help capture and propagate any expected errors for my logging to help decide what I needed to do.
I won't go into too many details for the script itself, but in that approach I ended up stripping everything back to a simple set of types and functions:
class Ok<T> {
readonly _tag = "ok";
value: T;
constructor(value: T) {
this.value = value;
}
}
class Err<E> {
readonly _tag = "err";
error: E;
constructor(error: E) {
this.error = error;
}
}
type Result<T, E> = Ok<T> | Err<E>;
function err<E>(e: E): Err<E> {
return new Err(e);
}
function ok<T>(t: T): Ok<T> {
return new Ok(t);
}
This approach omits a lot of the helper functions that I had for the classes, but it felt like a good balance for the use-case that I had. There can be issues with serialization of the errors for the generic passed in, but it relies a lot more on the call site invocation to handle that.
In use, you could set an expected error and then handle it accordingly:
class ExpectedError {
readonly _tag = "ExpectedError";
}
function resultTest(): Result<string, ExpectedError> {
const run = true;
if (run) {
return err(new ExpectedError());
}
return ok("Success");
}
const res2 = resultTest();
switch (res2._tag) {
case "ok":
console.log(res2.value);
break;
case "err":
switch (res2.error._tag) {
case "ExpectedError":
console.log("Handle something here");
break;
}
break;
}
Triggering the ExpectedError within that contrived code demonstrates the use case. It's a bit contrived here with the switch-within-a-switch, but that's purely for demonstration purposes. In reality, you would make use of a more well-thought-out set of conditional logic.
In my particular use-case, I had a number of Node.js streams where I needed to propagate errors up the chain and log them accordingly. An example of one such stream where I needed to bulk insert into a DynamoDB table at that part of the pipeline:
That same _tag property could be applied further for making decisions on what to do for specific errors and help type narrow down even further. It was very nice to work with.
I also ended up implementing a similar Some type inspired by Rust which I might go into detail in for another post which worked well in representing optional values that could also apply the same conditional logic thanks to the _tag property instead of using something like undefined. Once again though, although the developer experience of using this feels enhanced, it's an abstraction that likely comes at a big cost if performance is the number one metric, but I haven't bothered with any benchmarks. It was mostly about having code that was easy to pick up again and reason with.
Conclusion
At the moment, I am content with this implementation. As you'll see in some upcoming posts, it balances the complexity of the implementation with it's use-case power.
Please note that this is still early days and a little raw, which the end-game meaning to be a useful utility that might be a stepping stone towards something more powerful.
If you find some obvious improvements or have some feedback, please feel free to reach out to me on Twitter. I would be very keen to hear your thoughts.
]]><![CDATA[Node.js Streams in Action with the AWS CDK]]>https://blog.dennisokeeffe.com/blog/2024-07-14-nodejs-streams-in-action-with-the-aws-cdk2024-07-14T00:00:00.000Z2024-07-14T00:00:00.000ZOverview
We've come towards the end of the Node.js Streams blog series. Everything we've covered so far will take you a long way in understanding how to work with streams in Node.js.
In this post, we're going to introduce the PassThrough stream type and then take everything that we've learned so far and apply it through a practical (but somewhat contrived) example using the AWS CDK, AWS S3 and AWS Transfer Family.
If you're here because you are most interested in configuring AWS Transfer Family, then jump down to the project implementation.
What are PassThrough streams?
Previously, we covered the four fundamental stream types:
So how does stream.PassThrough fit into the picture?
A PassThrough stream in Node.js is a special type of Transform stream that simply passes data through from its writable side to its readable side without modifying it. It's essentially a "do-nothing" transform stream that can be useful in various scenarios.
In general, Node.js docs describe the PassThrough stream's primary purpose as being for examples and testing, but there are also some novel use cases for PassThrough streams.
Some of these novel uses of a PassThrough stream are:
To provide a placeholder for a transform operation that may be added later.
To delay the piping of data from one stream to another.
To observe data passing through a pipeline without altering it.
(3) is particularly useful when you are tying together third-party stream types that you want to pipe through pipelines or when demultiplexing streams. We will be using the PassThrough stream later in our example to do just that.
For clarity, it's not necessarily a tool that you'll use everyday, but I have found some use cases.
How to think about PassThrough streams
With our four fundamental data types, we've used water-related analogies to help understand how streams work in Node.js.
Readable streams: Think of a water tap.
Writable streams: Think of a water bucket.
Duplex streams: A two-way water pipe (with valves to represent the read/write elements).
Transform streams: A pipe going through a water treatment plant.
So how do we think about PassThrough streams?
We can think of them as a clear, transparent water pipe. The water flows from one end to another without any modification.
We think about Node.js PassThrough streams as a clear, transparent water pipe
To push forward the idea of this analogy:
Like a PassThrough stream, a transparent pipe section allows water to flow through without changing it.
You can observe the water (data) as it passes through.
It can be easily inserted into an existing pipeline without affecting the flow.
It provides a point where you could potentially add a "filter" or other "treatment" later if needed.
With that out of the way, let's move on onto our project.
Uploading and downloading a CSV file to AWS S3 using the AWS CDK
Our project today is to create an "upload" and "download" script to exemplify some of the concepts we've learned throughout the series.
Here is the overview of what we are building:
We will be using the AWS CDK to create an S3 bucket and an AWS Transfer Family server.
We will create a special Duplex stream that will act as a demultiplexer.
Our upload script will have three pipelines: one to generate a CSV stream from an array of objects which is compressed and then demultiplexed, while the other two will be writable from our demux. One will upload the compressed CSV file to S3, and the other will SFTP the CSV file to our Transfer Family Server (and end up in the same bucket).
Our download script will have four pipelines: one to download our S3 upload file, decompress it and then demultiplex it. The two receivers from the demux will write our the CSV file and and YAML file to disk (just for fun). The fourth pipeline will download the compressed CSV file via SFTP from our Transfer Family Server, decompress it then write it to disk.
First step is for us to create an asymmetric SSH key pair. We will use the public key for our SFTP server.
From the root directory of our project, run the following:
$ ssh-keygen -t rsa -b 2048 -f sftp_key
Running this code will generate two files: sftp_key and sftp_key.pub. We will use the public key in our CDK code, while the private key will need to be referenced in our local code.
If you followed my naming convention above and called the project directory demo-stream-to-s3-and-back, then you will have a file lib/demo-stream-to-s3-and-back-stack.ts already created for you.
Update that file with the following:
import * as cdk from "aws-cdk-lib";
import { Construct } from "constructs";
import * as s3 from "aws-cdk-lib/aws-s3";
import * as transfer from "aws-cdk-lib/aws-transfer";
import * as iam from "aws-cdk-lib/aws-iam";
import { readFileSync } from "fs";
import * as path from "path";
const SFTP_PUBLIC_KEY = readFileSync(path.join(__dirname, "../sftp_key.pub"));
export class DemoStreamToS3AndBackStack extends cdk.Stack {
constructor(scope: Construct, id: string, props?: cdk.StackProps) {
super(scope, id, props);
const bucket = new s3.Bucket(this, "StreamToS3AndBackBucket", {
bucketName: "stream-to-s3-and-back",
versioned: true,
encryption: s3.BucketEncryption.S3_MANAGED,
removalPolicy: cdk.RemovalPolicy.DESTROY,
});
// Create an IAM role for SFTP users
const sftpUserRole = new iam.Role(this, "SftpUserRole", {
assumedBy: new iam.ServicePrincipal("transfer.amazonaws.com"),
});
// Grant read/write permissions to the S3 bucket
bucket.grantReadWrite(sftpUserRole);
// Create the SFTP server
const server = new transfer.CfnServer(this, "SftpServer", {
protocols: ["SFTP"],
identityProviderType: "SERVICE_MANAGED",
loggingRole: sftpUserRole.roleArn,
});
// Create an SFTP user
const user = new transfer.CfnUser(this, "SftpUser", {
userName: "testuser",
serverId: server.attrServerId,
role: sftpUserRole.roleArn,
homeDirectory: `/${bucket.bucketName}`,
sshPublicKeys: [SFTP_PUBLIC_KEY.toString()],
});
// Output the SFTP server endpoint
new cdk.CfnOutput(this, "SftpEndpoint", {
value: `${server.attrServerId}.server.transfer.${this.region}.amazonaws.com`,
description: "SFTP Server Endpoint",
});
}
}
The above code does the following:
Import Necessary Modules: Import AWS CDK libraries, Node.js modules for file handling, and necessary AWS services.
Read SFTP Public Key: Read the SFTP public key from a file.
Define the Stack Class: Define a class that extends the CDK Stack to encapsulate all resources.
Create an S3 Bucket: Create an S3 bucket with versioning, encryption, and a removal policy.
Create an IAM Role for SFTP Users: Create an IAM role to be assumed by the SFTP service.
Grant Permissions to the S3 Bucket: Grant read and write permissions to the IAM role for the S3 bucket.
Create the SFTP Server: Create an SFTP server using AWS Transfer Family with the IAM role for logging.
Create an SFTP User: Create an SFTP user associated with the server and provide the SSH public key.
Output the SFTP Server Endpoint: Output the SFTP server endpoint URL for connecting to the server.
We are referencing the same S3 bucket we will use in uploads for our SFTP server to simplify things.
Once this is done, we can deploy our stack with the following command:
$ npx cdk deploy
The above step expects that your AWS credentials are set up correctly. If you have not done so, please follow a guide like this one for the AWS CLI.
Make sure to take note of the output for the SFTP server endpoint.
Once that is done, let's move onto our code to interface with our infrastructure.
Writing our demultiplexer
We covered a version of multiplexing in our Duplex streams post. In this case, we will be writing a demultiplexer.
Our demultiplexer will take in PassThrough stream types in the constructor and ensure that they are written to when we are processing data.
Let's see how that looks. Add the following to src/demultiplexer.ts:
import { Duplex, PassThrough } from "node:stream";
/**
* We create a demultiplexer to write out to two different
* streams.
*
* 1. To handle writing the CSV file.
* 2. To handle writing the JSON file.
*
* Reading is handled by the pipeline implementation.
*/
export class Demultiplexer extends Duplex {
private outputStreams: PassThrough[];
constructor(outputStreams: PassThrough[]) {
super({
objectMode: true,
});
this.outputStreams = outputStreams;
}
_write(
chunk: any,
_encoding: BufferEncoding,
callback: (error?: Error | null) => void
): void {
for (const outputStream of this.outputStreams) {
outputStream.write(chunk);
}
callback();
}
_final(callback: (error?: Error | null) => void): void {
for (const outputStream of this.outputStreams) {
outputStream.end();
}
callback();
}
}
Our demultiplexer has implementations for both _write and _final. The _write method writes the chunk to all the output streams, while the _final method ends all the output streams.
Although this is not use case, a simple example of this in use:
import { PassThrough } from "node:stream";
const outputStream1 = new PassThrough();
const outputStream2 = new PassThrough();
const demux = new Demultiplexer([outputStream1, outputStream2]);
This would configure our multiplex to write messages to both outputStream1 and outputStream2.
The implementation itself isn't super flexible. In hindsight, you would ideally allow anything that is a Writable stream to be passed in. But it will suffice for our example (and refactoring this could be some nice homework).
Writing our upload script
Now that we have our infrastructure set up and our demultiplexer ready, let's write our upload script.
Add the following to src/upload.ts:
import { readFileSync } from "fs";
import { pipeline } from "node:stream/promises";
import { format } from "fast-csv";
import { createGzip } from "node:zlib";
import { S3Client } from "@aws-sdk/client-s3";
import { PassThrough, Readable } from "node:stream";
import { Upload } from "@aws-sdk/lib-storage";
import { Demultiplexer } from "./demultiplexer";
import * as path from "node:path";
import Client = require("ssh2-sftp-client");
const BUCKET_NAME = "stream-to-s3-and-back";
const sftp = new Client();
const s3Client = new S3Client();
const config = {
host: "cdk-output.server.transfer.ap-southeast-2.amazonaws.com",
port: 22,
username: "testuser",
privateKey: readFileSync(path.join(__dirname, "../sftp_key")),
};
async function uploadToS3() {
try {
const data = [
{
flavor: "vanilla",
topping: "sprinkles",
},
{
flavor: "chocolate",
topping: "fudge",
},
{
flavor: "strawberry",
topping: "whipped cream",
},
];
await sftp.connect(config);
console.log("SFTP connected successfully");
// We use a PassThrough to support uploading
// via the pipeline API.
const uploadToS3PassThrough = new PassThrough();
const upload = new Upload({
client: s3Client,
params: {
Bucket: BUCKET_NAME,
Key: "output.csv.gz",
Body: uploadToS3PassThrough,
},
});
// PassThroughs for Demux
const s3UploadPassThrough = new PassThrough({
objectMode: true,
});
const sftpUploadPassThrough = new PassThrough({
objectMode: true,
});
const demux = new Demultiplexer([
s3UploadPassThrough,
sftpUploadPassThrough,
]);
await Promise.all([
pipeline(
Readable.from(data),
format({ quoteColumns: true, headers: ["flavor", "topping"] }),
createGzip(),
demux
),
pipeline(s3UploadPassThrough, uploadToS3PassThrough),
pipeline(
sftpUploadPassThrough,
sftp.createWriteStream(`/${BUCKET_NAME}/sftp-upload.csv.gz`)
),
]);
await sftp.end();
await upload.done();
console.log("File processed and uploaded successfully");
} catch (error) {
console.error("Error:", error);
}
}
async function main() {
await uploadToS3();
}
main();
This script is more complex than the others we've written so far. Although it is a little contrived. Here's a breakdown of what it does:
Import Necessary Modules: Import various Node.js and AWS SDK modules for file handling, streaming, CSV formatting, compression, and S3 operations.
Define Constants: Define the S3 bucket name, SFTP client instance, and S3 client instance.
Read SFTP Private Key: Read the SFTP private key from a file.
Set SFTP Configuration: Set up the SFTP connection configuration.
Define uploadToS3 Function: Define an asynchronous function to handle the data processing and uploading.
Prepare Data: Create an array of data to be uploaded.
Connect to SFTP: Connect to the SFTP server using the configuration.
Create PassThrough Streams: Create PassThrough streams to facilitate the pipeline process.
Create S3 Upload Object: Create an upload object for S3 using the AWS SDK.
Create Demultiplexer: Create a Demultiplexer instance to split the data stream.
Setup Pipelines: Set up parallel pipelines for processing data, compressing it, and sending it to both S3 and SFTP.
End SFTP Connection: End the SFTP connection after the upload is complete.
Log Success or Error: Log the success message or handle errors if they occur.
Define main Function: Define a main function to call uploadToS3.
Execute main Function: Execute the main function to start the process.
You can visualize the process a bit better with the following flow chart:
We are using the pipeline function to chain together our streams.
The first pipeline generates the CSV data, formats it, compresses it, and then demultiplexes it. The second pipeline sends the data to S3. The third pipeline sends the data to the SFTP server.
Our second and third streams are receivers for our demultiplexer. The PassThrough is used as both the destination of our compression pipeline, and is also the source for our second and third pipelines that are doing two very different things.
It is also important for us to await the end of the remote streams in our case. That is where the following code comes into play:
await sftp.end();
await upload.done();
Without it, our script would end prematurely before the data is fully uploaded.
Next, we can run our script with the following command:
At this point, if you jump onto your AWS S3 bucket, you should see a file called output.csv.gz that contains the compressed CSV file as well as a file called sftp-upload.csv.gz that contains the same file that we uploaded through SFTP.
Writing our download script
At this point, we have successfully uploaded a file to S3 and SFTP. Now, let's write a script to download the file from S3 and SFTP, decompress it, and write it to disk.
Add the following to src/download.ts:
import { createWriteStream, readFileSync } from "node:fs";
import { parse } from "fast-csv";
import { createGunzip } from "node:zlib";
import { S3Client, GetObjectCommand } from "@aws-sdk/client-s3";
import { PassThrough, Readable, Transform } from "node:stream";
import { pipeline } from "node:stream/promises";
import { stringify } from "yaml";
import { Demultiplexer } from "./demultiplexer";
import * as path from "node:path";
import Client = require("ssh2-sftp-client");
const BUCKET_NAME = "stream-to-s3-and-back";
const sftp = new Client();
const s3Client = new S3Client();
const config = {
host: "cdk-output.server.transfer.ap-southeast-2.amazonaws.com",
port: 22,
username: "testuser",
privateKey: readFileSync(path.join(__dirname, "../sftp_key")),
};
const yamlTransformStream = new Transform({
objectMode: true,
transform(chunk, _encoding, callback) {
this.push(stringify([chunk]) + "\n");
callback();
},
});
async function downloadFromS3() {
try {
await sftp.connect(config);
console.log("SFTP connected successfully");
const { Body: s3UploadBody } = await s3Client.send(
new GetObjectCommand({
Bucket: BUCKET_NAME,
Key: "output.csv.gz",
})
);
if (s3UploadBody instanceof Readable === false) {
throw new Error("S3 object body is not a readable stream");
}
const csvStreamPassThrough = new PassThrough({
objectMode: true,
});
const csvOutput = createWriteStream("downloaded_output.csv");
const yamlStreamPassThrough = new PassThrough({
objectMode: true,
});
const yamlOutput = createWriteStream("downloaded_output.yaml");
const demux = new Demultiplexer([
csvStreamPassThrough,
yamlStreamPassThrough,
]);
// Create a write stream for the SFTP CSV output
const sftpCsvOutput = createWriteStream("downloaded_sftp_output.csv");
const sftpReadableStream = sftp.createReadStream("output.csv.gz");
// Buffer everything into the demux stream
await Promise.all([
// S3 download streams
pipeline(s3UploadBody, createGunzip(), demux),
pipeline(csvStreamPassThrough, csvOutput),
pipeline(
yamlStreamPassThrough,
parse({ headers: true, objectMode: true }),
yamlTransformStream,
yamlOutput
),
// SFTP download stream
pipeline(sftpReadableStream, createGunzip(), sftpCsvOutput),
]);
await sftp.end();
console.log("File downloaded, decompressed, and processed successfully");
} catch (error) {
console.error("Error:", error);
}
}
async function main() {
await downloadFromS3();
}
main();
Again, you will need to update your SFTP endpoint in the script.
Let's breakdown what we are doing here:
Import Necessary Modules: Import Node.js and AWS SDK modules for file handling, streaming, CSV parsing, decompression, YAML stringifying, and S3 operations.
Define Constants: Define the S3 bucket name, SFTP client instance, and S3 client instance.
Read SFTP Private Key: Read the SFTP private key from a file.
Set SFTP Configuration: Set up the SFTP connection configuration.
Define YAML Transform Stream: Create a transform stream to convert CSV data to YAML format.
Define downloadFromS3 Function: Define an asynchronous function to handle data downloading, decompressing, and processing.
Connect to SFTP: Connect to the SFTP server using the configuration.
Download S3 Object: Use AWS SDK to download the compressed CSV file from S3.
Check S3 Body Type: Ensure the downloaded S3 object body is a readable stream.
Create PassThrough Streams: Create PassThrough streams to facilitate the pipeline process.
Create Write Streams: Create write streams for local CSV and YAML files, and for SFTP CSV output.
Create Demultiplexer: Create a Demultiplexer instance to split the data stream into CSV and YAML streams.
Setup Pipelines: Set up parallel pipelines for decompressing S3 data, splitting streams, and writing to local files.
Decompress SFTP Data: Set up a pipeline to download, decompress, and write SFTP CSV data to a local file.
End SFTP Connection: End the SFTP connection after the download and processing are complete.
Log Success or Error: Log the success message or handle errors if they occur.
Define main Function: Define a main function to call downloadFromS3.
Execute main Function: Execute the main function to start the process.
Another flow chart to help visualize how the code is executing:
Download script flow chart
Again, it's the pipelines that play the most integral role:
Our first three pipelines work with the multiplexer to download the content from S3, then split that content into streams that write a CSV file and a YAML file respectively.
The fourth pipeline downloads the compressed CSV file from SFTP, decompresses it, and writes it to disk.
Please be aware that awaiting the end of the remote streams is important again. We run into the same problem of prematurely ending the stream without it.
Otherwise, we have successfully uploaded a file to S3 and SFTP, downloaded it, decompressed it, and written it to disk!
Teardown
Once you are done with the project, you can tear down the infrastructure with the following command:
$ npx cdk destroy
Please be aware that all the content from the bucket needs to be deleted beforehand. If you get an error teardown, head to the AWS console and manually delete the stack and bucket... and definitely please do. Transfer Family is sadly a bit $$$.
Conclusion
Congratulations on making it through the Node.js Streams blog series! By now, you should have a solid understanding of how to work with streams in Node.js, including the different types of streams and how they can be utilized.
In this post, we introduced the PassThrough stream and demonstrated its use in a practical example involving AWS CDK, AWS S3, and AWS Transfer Family. We explored how to create a pipeline for uploading and downloading files using Node.js streams, showcasing the versatility and power of streams in handling complex data flows.
Our key takeaways and lessons today:
PassThrough Streams: These streams allow data to pass through without modification, making them useful for observing data flow, delaying piping, or providing placeholders for future transformations.
AWS Integration: Leveraging AWS CDK, S3, and Transfer Family, we created a robust data pipeline for handling file uploads and downloads.
Demultiplexer: Implementing a custom demultiplexer stream allowed us to split data streams into multiple outputs efficiently.
Practical Application: By applying these concepts, we demonstrated how to handle real-world scenarios involving data processing and transfer in a scalable and efficient manner.
This journey through Node.js streams, from understanding the basics to implementing advanced pipelines, equips you with the knowledge to tackle various data processing tasks. Streams provide a powerful abstraction for handling data flows, and with the skills you've gained, you can now confidently apply them to your projects.
]]><![CDATA[Stream Pipelines in Node.js]]>https://blog.dennisokeeffe.com/blog/2024-07-13-stream-pipelines-in-nodejs2024-07-13T00:00:00.000Z2024-07-13T00:00:00.000ZOverview
In this post, we are diving into to the pipeline function from the Node.js stream module: how it can be of use and how we can use it for asynchronous operations.
How to think about pipeline streams
The stream.pipeline function is a utility function that allows us to easily pipe streams together. It is very aptly name, so you can think of it as our water network that bridges between the different streams in our analogies that we've used so far.
Water buckets connected by pipes can be used to think of pipeline streams in Node.js
Creating our first pipeline
We can export the pipeline function from the node:stream module and use it to connect streams together.
In the above example, we create a Readable stream from an array of strings and a Writable stream that logs the data to the console. We then use the pipeline function to connect the two streams together.
The follow sequence diagram can you help you visualize how the pipeline is operating:
Sequence diagram for our slightly-more-complex pipeline
Why use the pipeline function?
The pipeline function from the stream module in Node.js offers several important benefits:
Automatic error handling:
pipeline automatically handles errors from any of the streams in the pipeline.
It ensures that if an error occurs in any stream, all streams are properly closed.
This prevents potential memory leaks and resource issues.
Simplified code:
It reduces the boilerplate code needed to properly manage multiple streams.
You don't need to manually handle 'error' and 'end' events for each stream.
Backpressure management:
pipeline automatically manages backpressure between the streams.
It ensures that faster streams don't overwhelm slower ones by pausing and resuming as needed.
Cleanup on completion:
It automatically cleans up resources when the pipeline finishes or errors out.
This includes closing file descriptors and freeing up memory.
Promise support:
When used with util.promisify or when directly imported from node:stream/promises, it can return a Promise, allowing for easier use with async/await syntax.
Multiple streams:
It can handle any number of streams, making it easy to create complex data processing pipelines.
Improved performance:
The internal implementation is optimized for performance, especially when dealing with object mode streams.
Consistent behavior:
It ensures consistent behavior across different types of streams (readable, writable, transform).
Error propagation:
Errors are properly propagated through the pipeline, ensuring that error handling is centralized and reliable.
Ordering guarantee:
It guarantees that data will be processed in the order it's received, which is particularly important for certain types of data processing.
Here's another simple example to illustrate its use with other Node.js modules:
Using pipeline is generally considered a best practice when working with streams in Node.js due to these benefits.
Asynchronous streams
What happens if our streams happen to be asynchronous? We can import pipeline from the node:stream/promises module to handle this.
In this example, we have a NumberSource readable stream that emits numbers from 0 to 9, an AsyncDoubler transform stream that doubles the numbers asynchronously, and a ConsoleWriter writable stream that logs the doubled numbers to the console.
Running the code gives the following:
$ node pipelines/async.js
0 doubled is 0
1 doubled is 2
2 doubled is 4
3 doubled is 6
4 doubled is 8
5 doubled is 10
6 doubled is 12
7 doubled is 14
8 doubled is 16
9 doubled is 18
Pipeline succeeded
We can visualize the asynchronous pipeline as follows:
Sequence diagram for our asynchronous pipeline
If we had tried running the pipeline without supporting async, the code would have executed without waiting:
// WHAT NOT TO DO
const { pipeline, Readable, Transform, Writable } = require("node:stream");
// const { pipeline } = require("stream/promises");
// Simulated async operation
const asyncOperation = (num) => {
return new Promise((resolve) => {
setTimeout(() => {
resolve(num * 2);
}, Math.random() * 1000); // Random delay to simulate varying processing times
});
};
// Source stream
class NumberSource extends Readable {
constructor(options) {
super(options);
this.current = 0;
this.max = 10;
}
_read() {
if (this.current < this.max) {
this.push(this.current.toString());
this.current++;
} else {
this.push(null);
}
}
}
// Async transform stream
class AsyncDoubler extends Transform {
constructor(options) {
super({ ...options, objectMode: true });
}
_transform(chunk, encoding, callback) {
const num = parseInt(chunk, 10);
asyncOperation(num)
.then((result) => {
this.push(`${num} doubled is ${result}\n`);
callback();
})
.catch(callback);
}
}
// Destination stream
class ConsoleWriter extends Writable {
_write(chunk, encoding, callback) {
console.log(chunk.toString().trim());
callback();
}
}
async function runPipeline() {
try {
pipeline(
new NumberSource(),
new AsyncDoubler(),
new ConsoleWriter(),
(err) => {
if (err) {
console.error("Pipeline failed", err);
} else {
console.log("Pipeline succeeded");
}
}
);
console.log("HERE ALREADY");
process.exit();
} catch (err) {
console.error("Pipeline failed", err);
}
}
runPipeline();
Running the above would exit the code before the streams ran.
$ node pipelines/async-incorrect.js
HERE ALREADY
Multiplexer example
We won't go too deep into other pipeline examples in this post as I will be doing so in some follow-up posts, but we will finish off looking at an example using a Duplex stream to create a multiplexer.
In the following example, we create a multiplexer stream that takes two input streams and multiplexes them into a single output stream.
const { Duplex, pipeline, Transform } = require("node:stream");
const { createReadStream, createWriteStream } = require("node:fs");
class Multiplexer extends Duplex {
constructor(options) {
super(options);
this.sources = [];
this.currentSource = 0;
this.activeSourcesCount = 0;
}
_read(size) {
this.readFromSources(size);
}
readFromSources(size) {
if (this.activeSourcesCount === 0) {
this.push(null);
return;
}
let chunk;
do {
const source = this.sources[this.currentSource];
chunk = source.read(size);
if (chunk !== null) {
this.push(chunk);
return;
}
this.currentSource = (this.currentSource + 1) % this.sources.length;
} while (this.currentSource !== 0);
// If we've gone through all sources without reading, wait for more data
this.sources.forEach((source) => {
source.once("readable", () => this.readFromSources(size));
});
}
_write(chunk, encoding, callback) {
// For simplicity, we're not implementing write functionality
callback();
}
addSource(source) {
this.sources.push(source);
this.activeSourcesCount++;
source.on("end", () => {
this.activeSourcesCount--;
if (this.activeSourcesCount === 0) {
this.push(null);
}
});
}
}
const upperCaseTransform = new Transform({
transform(chunk, encoding, callback) {
callback(null, chunk.toString().toUpperCase());
},
});
// Create input streams
const input1 = createReadStream("file1.txt");
const input2 = createReadStream("file2.txt");
// Create output stream
const output = createWriteStream("output.txt");
// Create multiplexer
const multiplexer = new Multiplexer();
multiplexer.addSource(input1);
multiplexer.addSource(input2);
// Use pipeline to connect streams
pipeline(multiplexer, upperCaseTransform, output, (err) => {
if (err) {
console.error("Pipeline failed:", err);
} else {
console.log("Pipeline succeeded");
}
});
In the example above, we have two sources file1.txt and file2.txt that will be multiplexed into a single output stream. The output stream will be transformed to uppercase before being written to output.txt.
If our files are Hello, world! and Streams are fun for file1.txt and file2.txt respectively, then an example output we can get at output.txt is:
HELLO, WORLD!STREAMS ARE FUN
The sequence diagram for the multiplexer pipeline can be visualized as follows:
Multiplexer pipeline
In the current implementation:
The multiplexer attempts to read from each source in turn.
Whichever source has data available first will be read from and its data pushed to the output.
This can lead to interleaving of data from different sources in an unpredictable way, especially if the sources become readable at different times or at different rates.
That means that the output may not be in the order that the data is written to output.txt is not guaranteed.
Usage with other streams from Node.js modules
Finally, let's recap some streams from native Node.js modules that we've seen before in previous posts and how we can use them with pipeline.
In this example, pipeline manages the entire process of reading a file, compressing it, and writing the compressed data to a new file. It handles all the necessary error checking and resource management, significantly simplifying the code compared to manually piping these streams together and handling all the events yourself.
Conclusion
Throughout this blog series, we've delved deeply into the intricate world of Node.js streams, exploring their core concepts, different stream types, and practical use cases. Starting from the fundamentals, we learned about Readable and Writable streams and progressed to more advanced topics like Transform and Duplex streams.
In this post, we focused on the pipeline function, which simplifies the process of connecting multiple streams. We demonstrated how to create basic and complex pipelines, including handling asynchronous streams with ease using stream/pipeline. Additionally, we introduced a multiplexer example to show how multiple input streams can be combined into a single output stream, demonstrating the flexibility and power of Node.js streams.
Streams are a powerful feature in Node.js, providing a way to process data efficiently and effectively. Whether you're working with file I/O, network communication, or any other data processing tasks, mastering streams can significantly enhance your Node.js applications.
In future posts, I will be working through some more specific use cases and examples of how to use streams in Node.js with destinations like S3 buckets.
]]><![CDATA[Transform Streams in Node.js]]>https://blog.dennisokeeffe.com/blog/2024-07-12-transform-streams-in-nodejs copy2024-07-12T00:00:00.000Z2024-07-12T00:00:00.000ZOverview
In this shorter blog post, we will cover the fourth and final fundamental stream type Transform streams in this blog post.
How to think about Transform streams
Transform streams are a special type of Duplex stream (which we covered in the last blog post). We use Transform streams for transforming data (very apt naming) as it passes through the stream.
The water treatment plant is our mental model for Transform streams in Node.js
Some parallels with the analogy to make it memorable:
Dual Nature: Transform streams are both readable and writable. A water treatment plant receives untreated water (input) and outputs clean water (output).
Data Transformation: Modifies input data before passing it as output. Similarly, various processes in the plant (filtration, chemical treatment) change the water's composition.
Streaming Processing: Handles data in chunks, not all at once. We can think of this like how water flows continuously through the plant, not in single large batches.
Backpressure Handling: Manages flow when output is slower than input. Reservoirs or holding tanks regulate water flow when treatment is slower than intake.
Piping: Can be easily connected to other streams. Treatment plants can also be connected to various water sources and distribution systems
Error Handling: Manages issues during transformation. We can think of them like the safety protocols and backup systems in the plant handle treatment failures.
These analogies help tie together the core concepts of Transform streams, as well as a few of the fundamentals that we covered at the start of this series.
With that out of the way, let's see how we can create Transform streams in Node.js.
How to create Transform streams
Similar to all the previous posts, we can create Transform streams using the node:stream module in a few ways:
Using the stream.Transform class: We can extend the stream.Transform class to create our Transform stream.
Using the stream.Transform constructor: We can use the stream.Transform constructor to create a Transform stream.
Extending the stream.Transform class
If we extend the stream.Transform class, we can provide a _transform method that will be called for each chunk of data that passes through the stream.
In the above example, we pipe the process.stdin readable stream to our UpperCaseTransform stream, which converts the input to uppercase. We then pipe the output to process.stdout.
Using the stream.Transform constructor
We could also have implemented the stream calling new Transform directly:
When creating an instance of a Transform stream, we supply a transform function that will be called for each chunk of data that passes through the stream.
The above code works the same as the previous example, but it's a bit more concise.
I won't recap the entire list here, but here are a few examples of where you might use Transform streams:
Compression streams
With zlib, we can create a gzip compression Transform stream. We've covered this example before in the Writable streams blog post.
const zlib = require("node:zlib");
const gzip = zlib.createGzip();
// gzip is a transform stream (both readable and writable) - we cover this more in a future post
Here is the more complete example where we compress a file using gzip and write it out to a new file:
const crypto = require("crypto");
const cipher = crypto.createCipher("aes192", "secret");
// cipher is a transform stream (both readable and writable) - we cover this more in a future post
The Transform stream here is the cipher stream. We can use it to encrypt data as it passes through the stream.
Today's post is a short one that covers the special type of Duplex stream: Transform streams.
We've covered the water treatment plant analogy to help you remember the core concepts of Transform streams, how to create them, and a few use cases where you might use them. You should review the previous posts in this series to get a full understanding of how Transform streams fit into the broader picture of Node.js streams, particularly now that you're understanding of Node.js streams is becoming more complete.
In the next post, we will cover the pipeline API in Node.js, which is a powerful way to connect streams together.
]]><![CDATA[Duplex Streams in Node.js]]>https://blog.dennisokeeffe.com/blog/2024-07-11-duplex-streams-in-nodejs2024-07-11T00:00:00.000Z2024-07-11T00:00:00.000ZOverview
The next fundamental stream type that we're going to look into are Duplex streams.
How to think about Duplex streams
Let's recap our mental model on Duplex streams: the two-way water pipe.
Two-way water pipe: our mental model for Duplex streams
To understand this analogy a bit more, let's place flesh it out a little bit more:
Bidirectional flow: Like a two-way water pipe that allows water to flow in both directions, a Duplex stream enables data to flow both ways.
Separate channels: Imagine the pipe having two separate channels, one for each direction. This represents how Duplex streams manage separate internal buffers for reading and writing.
Valves (methods):
_read() is like opening a valve to allow water (data) to flow out.
_write() is like opening a valve to let water (data) flow in.
Pressure (backpressure):
If water is flowing in faster than it can flow out, pressure builds up. This is analogous to backpressure in streams.
The pipe might have a mechanism to signal when it's full, similar to how streams emit events or return values to indicate backpressure.
Flow control: Imagine regulators on each end of the pipe that can slow down or speed up the flow. This represents how Duplex streams can pause and resume data flow.
Pipe connections (piping): You can connect multiple two-way pipes to create a complex water system, just as you can pipe multiple Duplex streams together.
Closing the pipe: The process of properly shutting off both ends of the pipe is similar to the _final() method ensuring all data is processed before closing.
Leaks (error handling): A leak in the pipe is like an error in the stream, requiring proper handling to prevent data loss.
Water types (modes): The pipe could carry either a continuous flow of water (binary mode) or discrete objects like fish (object mode).
This analogy can help readers visualize the abstract concepts of Duplex streams in a more concrete, familiar context.
Alternatives to this would be to take the analogy of walkie talkies, or a two-way street with cars coming and going in both directions. Choose whatever helps you visualize things best. I stick with the two-way water pipe analogy to fit in better with all the water-themed analogies I used for Node.js streams.
You can also think of Duplex streams as a combination of Readable and Writable streams, meaning that our previous deep-dives analogies for those can also apply to help you solidify your understanding of Duplex streams.
How to create Duplex streams
We can create duplex streams using the node:stream module. There are a number of ways:
If you have followed along with my previous posts, you will notice that the _read and _write methods are similar to the ones we used for Readable and Writable streams. The key difference is that Duplex streams implement both methods.
The above code creates a Duplex stream that reads data from an internal array and writes data to the console.
When you run node script.js, you should see the following output:
$ node duplex/one.js
Received: Some data
Read: Hello
Read: World
Read: Duplex
Read: Stream
Here's a sequence diagram visual:
Visualizing our Duplex stream
Using the new Duplex() constructor
Similar to Readable and Writable, we do not need to extend the class if we choose that we do not want to.
Creating streams that can both encrypt and decrypt data
Compression/Decompression:
Implementing streams that can both compress and decompress data
Parser/Serializer:
Creating streams that can parse incoming data and serialize outgoing data
Protocol implementation:
HTTP/2 streams
Custom bi-directional protocols
Proxy servers:
Forwarding requests and responses between client and server
Telnet-like interfaces:
Creating interactive command-line tools
Middleware in stream processing pipelines:
Implementing transformations that require both read and write capabilities
Testing and mocking:
Simulating complex I/O scenarios in unit tests
Multiplexing/Demultiplexing:
Combining multiple streams into one or splitting one stream into many
Buffering and flow control:
Implementing custom buffering strategies for data flow
Let's go through some simple examples for some of these.
Network sockets
Here we show a TCP server and client operating as Duplex streams:
const net = require("net");
const server = net.createServer((socket) => {
socket.write("Welcome to the server!\n");
socket.on("data", (data) => {
console.log("Received:", data.toString());
socket.write(`Echo: ${data}`);
});
});
server.listen(3000, () => {
const client = new net.Socket();
client.connect(3000, "localhost", () => {
client.write("Hello, server!");
});
client.on("data", (data) => {
console.log("Server says:", data.toString());
});
});
In this example, we create a TCP server and client using Node's net module. The server listens for connections, echoes back any received data, and sends a welcome message. The client connects to the server, sends a message, and logs any responses.
Both the server socket and client socket are Duplex streams, allowing bidirectional communication.
Sequence diagram for how the network socket above works
This example implements a custom Duplex stream for simultaneous file reading and writing. It reads from 'input.txt' and writes to 'output.txt'. The _read method reads chunks from the input file, while the _write method writes data to the output file. This demonstrates how Duplex streams can be used for concurrent file operations.
We have the CipherDuplex stream that encrypts incoming data using AES-256-CBC encryption. It generates a random key and initialization vector (IV) for the encryption. When data is written to the stream, it's encrypted and then pushed as readable data. This shows how Duplex streams can be used for on-the-fly data transformation.
This example uses zlib's built-in Duplex streams for compression and decompression. It sets up a pipeline that compresses input from stdin, immediately decompresses it, and then writes the result to stdout. This demonstrates how Duplex streams can be chained together for complex data processing.
Here we create a JSONDuplex stream that parses incoming JSON strings into JavaScript objects. It operates in object mode, allowing it to push parsed objects directly. This showcases how Duplex streams can be used for data format conversion in both directions, although this example only implements the parsing direction.
Multiplexing/Demultiplexing
const { Duplex, PassThrough } = require("stream");
class MultiplexDuplex extends Duplex {
constructor(options) {
super(options);
this.streams = new Map();
}
_read(size) {}
_write(chunk, encoding, callback) {
const { streamId, data } = JSON.parse(chunk);
if (!this.streams.has(streamId)) {
this.streams.set(streamId, new PassThrough());
}
this.streams.get(streamId).write(data);
callback();
}
getStream(streamId) {
if (!this.streams.has(streamId)) {
this.streams.set(streamId, new PassThrough());
}
return this.streams.get(streamId);
}
}
const multiplexer = new MultiplexDuplex();
const stream1 = multiplexer.getStream(1);
const stream2 = multiplexer.getStream(2);
stream1.on("data", (data) => console.log("Stream 1:", data.toString()));
stream2.on("data", (data) => console.log("Stream 2:", data.toString()));
multiplexer.write(JSON.stringify({ streamId: 1, data: "Hello from stream 1" }));
multiplexer.write(JSON.stringify({ streamId: 2, data: "Hello from stream 2" }));
This example implements a MultiplexDuplex stream that can handle multiple logical streams over a single Duplex stream. It uses a streamId to differentiate between different logical streams. Data written to the multiplexer is routed to the appropriate PassThrough stream based on the streamId. This demonstrates how Duplex streams can be used to implement complex communication protocols.
Conclusion
In this journey through the world of Node.js streams, we've delved into the fundamental concepts of streams, explored Readable and Writable streams in detail, and now, we've uncovered the intricacies of Duplex streams. By understanding Duplex streams through the analogy of a two-way water pipe, we've gained insight into how data can flow bidirectionally, the importance of backpressure, and the mechanisms for controlling this flow.
From extending the Duplex class to using the new Duplex() constructor and Duplex.from, we've seen multiple ways to create Duplex streams. These streams offer a powerful way to handle scenarios where both reading and writing are essential, such as network sockets, file I/O, encryption, compression, and complex protocols.
By exploring practical use cases, we've demonstrated how Duplex streams can be applied to real-world problems, making them an indispensable tool in your Node.js toolkit. Whether you're building a custom network protocol, implementing a parser, or creating a multiplexing system, Duplex streams provide the flexibility and control you need.
As we continue this series, we'll look into other advanced stream types and techniques, helping you master the full spectrum of stream capabilities in Node.js. Stay tuned for more insights and practical examples in our next post on Transform streams. Thank you for following along, and happy streaming!
]]><![CDATA[Writable Streams in Node.js]]>https://blog.dennisokeeffe.com/blog/2024-07-10-writable-streams-in-nodejs2024-07-10T00:00:00.000Z2024-07-10T00:00:00.000ZOverview
Previously, we started that a mental model for remembering Writable streams is to compare them to a water barrel (or a water bucket if that works better for you).
The happy-go-lucky water barrel: our mental starting point for Readable streams
Here is a little more depth to the analogy and things that you need to know:
Bucket (Stream Buffer): The bucket represents the internal buffer of a Writable stream. It has a finite capacity to hold water (data).
Pouring Water (Writing Data): When you write data to a stream, it's like pouring water into the bucket. The write() method is analogous to pouring water.
Bucket Capacity (highWaterMark): The bucket has a maximum capacity, similar to the highWaterMark in Writable streams. This is the point at which the bucket is considered "full".
Overflow (Backpressure): If you try to pour more water when the bucket is already full, it will overflow. In streams, this triggers backpressure, and the write() method returns false.
Draining the Bucket (Processing Data): As the stream processes data, it's like water draining from the bucket. When enough water has drained (data processed), the stream emits a 'drain' event.
Continuous Flow (Flowing Mode): Imagine a system where water is constantly poured in and drained out. This is similar to a stream in flowing mode, where data is written and processed continuously.
Pausing the Flow (Paused Mode): If you pause the water flow, it's like pausing a stream. The pause() method is used to pause the stream. This manual process is useful when you need to control the flow of data.
Sealing the bucket (Ending the Stream): In a Writable stream, calling end() is like saying "This is the last bit of data I'm adding to the bucket, and once it's processed, consider the operation complete." It's more about finalizing the writing process than "closing a source".
Bucket Emptied (Finish Event): When all the water has drained from the bucket, it's empty. This is analogous to the 'finish' event in a Writable stream, indicating all data has been processed.
Leaks (Error Handling): This is more for a mental model, but if there's a leak in the bucket, it's like an error in the stream. Proper error handling is crucial in both cases.
Custom Buckets (Custom Writable Streams): Just as you might have specialized buckets for different liquids, you can create custom Writable streams for specific data types or operations. This is done by extending a class from stream.Writable. See the section on stream.Writable class for more clarification.
Here is a lifecycle sequence diagram to help you visualize the analogy:
Our water bucket/barrel analogy in action
How to create Writable streams
The node:stream module provides a Writable class which you use to create Writable streams.
Extending the stream.Writable class
Creating an instance using the stream.Writable class
Using a factory method from stream.Writable
Extending the stream.Writable class
In this scenario, you create your own class and provide a _write method for handling the data processing.
The res or "response" argument in an HTTP server callback is a Writable stream.
const http = require("node:http");
const server = http.createServer((req, res) => {
// res is a writable stream
res.write("Hello");
res.end("World");
});
We could use it for streaming back simple responses to the client:
const http = require("node:http");
const server = http.createServer((req, res) => {
res.writeHead(200, { "Content-Type": "text/html" });
res.write("<html><body>");
res.write("<h1>Welcome to my server!</h1>");
res.write(`<p>You requested: ${req.url}</p>`);
res.end("</body></html>");
});
server.listen(3000, () => console.log("Server running on port 3000"));
In the above example, we are streaming an HTML response to the client.
process.stdout and process.stderr
Both process.stdout and process.stderr are Writable streams that write to the console.
process.stdout.write("Log to console\n");
process.stderr.write("Log error to console\n");
child_process stdin
child_process provides a way to spawn child processes and interact with them using stdin, stdout and stderr.
const { spawn } = require("node:child_process");
const child = spawn("wc");
// child.stdin is a writable stream
child.stdin.write("Hello World");
child.stdin.end();
For example, we could use child_process to spawn a grep process that searches for the word "hello" in the input stream and logs the output to the console:
Although we haven't covered Transform streams in-depth yet, if you've followed along with the series so far then it will be come trivial to understand how they work.
In the case of zlib, we can create a gzip compression Transform stream that is both readable and writable:
const zlib = require("node:zlib");
const gzip = zlib.createGzip();
// gzip is a transform stream (both readable and writable) - we cover this more in a future post
An example of this in action where we compress a file using gzip compression and write it out to a new file:
Similar to above, cipher in our below example is a Transform stream that is both readable and writable.
const crypto = require("crypto");
const cipher = crypto.createCipher("aes192", "secret");
// cipher is a transform stream (both readable and writable) - we cover this more in a future post
An example of this in action where we encrypt a file using AES-192-CBC encryption and write it out to a new file:
You can also write streams to remote sources like S3 buckets, etc.
Writable stream fundamentals in action
To cap off today's blog post, let's take a look at a Writable stream that covers the fundamentals that we have covered in the series previously (backpressure, buffering etc.).
const { Writable } = require("stream");
const fs = require("fs");
class SlowWriter extends Writable {
constructor(options) {
// 1. Stream types: This is a Writable stream
// 7. Object Mode: We're enabling object mode
super({ ...options, objectMode: true });
// 2. Buffering: We're setting a custom highWaterMark
this.highWaterMark = options.highWaterMark || 2;
this.outputFile = fs.createWriteStream("output.txt", { flags: "a" });
}
_write(chunk, encoding, callback) {
// Simulate slow writing
setTimeout(() => {
// 7. Object Mode: We can write objects directly
const output = `${JSON.stringify(chunk)}\n`;
// 3. Backpressure: This slow write operation may cause backpressure
this.outputFile.write(output, (err) => {
if (err) {
callback(err);
} else {
console.log("Chunk written");
callback();
}
});
}, 1000);
}
_final(callback) {
this.outputFile.end(callback);
}
}
// Usage:
const slowWriter = new SlowWriter({ highWaterMark: 2 });
// 6. Events: Listening for events
slowWriter.on("finish", () => console.log("All writes are complete."));
slowWriter.on("drain", () =>
console.log("Stream is no longer full, can resume writing.")
);
// 5. Piping: Creating a readable stream to pipe into our writable
const { Readable } = require("stream");
const fastReader = new Readable({
objectMode: true,
read() {},
});
// 4. Modes of Operation: This is in flowing mode due to the pipe
fastReader.pipe(slowWriter);
// Simulate fast data production
for (let i = 0; i < 10; i++) {
// 3. Backpressure: This may trigger backpressure due to slow writing
const canContinue = fastReader.push({ data: `Fast data ${i}` });
if (!canContinue) {
console.log("Backpressure detected, waiting for drain");
// In a real scenario, you'd wait for the 'drain' event before continuing
}
}
fastReader.push(null); // Signal the end of the readable stream
In the above example, we demonstrate:
Stream types: It creates a custom Writable stream (SlowWriter) and uses a Readable stream (fastReader).
Buffering: The highWaterMark is set to control the internal buffer size.
Backpressure: The slow writing operation simulated by setTimeout may cause backpressure, which is handled by the stream automatically.
Modes of Operation: The readable stream is put into flowing mode when piped to the writable stream.
Piping: The readable stream is piped to the writable stream, automatically managing data flow.
Events: The code listens for 'finish' and 'drain' events on the writable stream.
Object Mode: Both the readable and writable streams are set to object mode, allowing them to work with JavaScript objects.
For a visual guide on the above:
A sequence diagram of our SlowWriter in action
Conclusion
Understanding Writable streams in Node.js is crucial for managing data flow in your applications. By drawing parallels to everyday concepts like water barrels and buckets, we've explored how Writable streams handle data, manage backpressure, and process data efficiently. We've also demonstrated various ways to implement and utilize Writable streams, from logging and file writing to more advanced use cases like compression and encryption.
As you continue your journey with Node.js streams, remember that mastering these concepts can greatly enhance your ability to build robust, high-performance applications. Whether you're handling large file uploads, streaming data to a client, or processing logs, Writable streams offer a powerful toolset for efficient data handling. Keep experimenting with different stream types and explore the endless possibilities they provide.
Thank you for following along with this series on Node.js streams. Stay tuned for our next post, where we'll dive into Transform streams and further expand our understanding of Node.js stream fundamentals.
]]><![CDATA[Readable Streams in Node.js]]>https://blog.dennisokeeffe.com/blog/2024-07-08-readable-streams-in-nodejs2024-07-08T00:00:00.000Z2024-07-09T00:00:00.000ZOverview
In my previous post, we learned everything we need to know to understand Node.js streams. We covered the four fundamental stream types in Node.js: Writable, Readable, Duplex, and Transform. We also discussed the benefits of using streams, key concepts like buffering, backpressure, and piping, and the importance of events in stream processing.
In this post, we will dive deeper into Readable streams in particular: how they are created, how we can consume data from them, and some a number of examples to get you comfortable.
How to create Readable streams
In our previous post, we started with the mental model that Readable streams are like water taps. In the same way that we can turn on the tap, change the flow rate, or turn it off, a Readable stream provides data in chunks that we can consume, pause, resume, or end.
The glorious water tap: our mental starting point for Readable streams
But how can we create a Readable stream in Node.js? There are a number of ways, but let's start with what the node:stream module provides.
stream.Readable.from()
stream.from()
stream.Readable class
stream.fromWeb()
From top-to-bottom, I've listed out what I think are the most approachable ways to create a Readable stream in Node.js from the node:stream module, so let's go through them each.
stream.Readable.from()
The stream.Readable.from() method creates a Readable stream from an iterable object or an async iterable object. This method is useful when you have an iterable data source, for example an array of strings, that you want to convert into a stream.
In the above example, we create a Readable stream from an array of strings. The Readable.from() method automatically converts the array into a stream that emits each string as a chunk of data.
For the sake of completion, here is a reminder of how that Readable stream could be paired with a Writable stream to pipe data from one to the other:
const { Readable, Writable } = require("node:stream");
const fs = require("node:fs");
// Create a Readable stream from an array of strings
const readableStream = Readable.from(["Hello", " ", "World", "!"]);
// Create a Writable stream (in this case, writing to a file)
const writableStream = fs.createWriteStream("output.txt");
// Pipe the Readable stream to the Writable stream
readableStream.pipe(writableStream);
// Handle the 'finish' event on the Writable stream
writableStream.on("finish", () => {
console.log("Finished writing to file");
});
// Handle any errors
writableStream.on("error", (err) => {
console.error("An error occurred:", err);
});
In the above scenario, our readableStream is piped to the writeableStream that writes to a file output.txt.
The array of ["Hello", " ", "World", "!"] here is considered an iterable object with four chunks. Each element of the array is treated as a separate chunk in the resulting stream.
The writeableStream consumes each chunk of data and writes it to the file output.txt. The finish event is emitted when all data has been written to the file, and the error event is emitted if an error occurs during the writing process.
To solidify this, here is a verbose sequence diagram:
An overview of how the above code is processed chunk-by-chunk
stream.from()
This is function that can be imported directly from the node:stream module and is a shorthand for stream.Readable.from().
const { from, Readable } = require("node:stream");
// These two lines are equivalent:
const stream1 = from(["Hello", "World"]);
const stream2 = Readable.from(["Hello", "World"]);
stream.Readable()
The stream.Readable class is a base class for creating custom Readable streams. You can extend this class to create your own Readable streams by implementing the _read() method.
In the above example, we create a custom Readable stream by extending the stream.Readable class. The _read() method is implemented to push data chunks from the data array to the stream. When all data has been pushed, null is pushed to signal the end of the stream.
stream.fromWeb()
stream.fromWeb() is designed to convert a Web API ReadableStream into a Node.js Readable stream. It's not always "from the web" in the sense of network requests; it's about compatibility between Web API streams and Node.js streams.
const { fromWeb } = require("node:stream/web");
// Create a Web API ReadableStream (this could come from a fetch() response, for example)
const webReadableStream = new ReadableStream({
start(controller) {
controller.enqueue("Hello");
controller.enqueue("World");
controller.close();
},
});
// Convert it to a Node.js Readable stream
const nodeReadableStream = fromWeb(webReadableStream);
// Use the Node.js stream
nodeReadableStream.on("data", (chunk) => {
console.log(chunk.toString());
});
nodeReadableStream.on("end", () => {
console.log("Stream ended");
});
In the above example, we create a Web API ReadableStream that emits two chunks of data ("Hello" and "World") and then closes. We then convert this Web API stream to a Node.js Readable stream using stream.fromWeb().
For advanced more practical example using the web fetch API:
const { fromWeb } = require("node:stream/web");
const { createWriteStream } = require("node:fs");
const { pipeline } = require("node:stream/promises");
async function downloadFile(url, outputPath) {
const response = await fetch(url);
if (!response.ok) throw new Error(`HTTP error! status: ${response.status}`);
// response.body is a Web API ReadableStream
const nodeStream = fromWeb(response.body);
// Create a writable stream to the output file
const fileStream = createWriteStream(outputPath);
// Use pipeline to pipe the data and handle cleanup
await pipeline(nodeStream, fileStream);
console.log(`File downloaded to ${outputPath}`);
}
downloadFile("https://example.com/somefile.txt", "output.txt").catch(
console.error
);
In the above, we use the fetch API to download a file from a URL. The response body is a Web API ReadableStream, which we convert to a Node.js Readable stream using stream.fromWeb(). We then pipe this stream to a Writable stream that writes the data to a file.
Although we haven't touched on it, we make use of the pipeline API from node:stream in the above example.
A visual look at the download sequence:
A sequence diagram of how the above downloadFile function works
Other ways to create a Readable stream
process.stdin
process.stdin provides a built-in Readable stream for standard input that you can hook into thanks streams implementing the EventEmitter class:
The following will be a quick-fire round of examples to help you get comfortable with the concepts we have covered.
const { Readable } = require("node:stream");
// Create a custom Readable stream
class NumberStream extends Readable {
constructor(max, options) {
super(options);
this.max = max;
this.current = 1;
}
_read() {
if (this.current <= this.max) {
const data = { number: this.current };
this.push(JSON.stringify(data));
this.current++;
} else {
this.push(null); // Signal the end of the stream
}
}
}
// Create instances of our custom stream
const numberStream = new NumberStream(5, {
objectMode: false,
highWaterMark: 64, // Buffer size
});
const objectStream = new NumberStream(5, {
objectMode: true,
highWaterMark: 2, // Buffer size
});
// Example 1: Using events (paused mode)
numberStream.on("readable", () => {
let chunk;
while (null !== (chunk = numberStream.read())) {
console.log("Received chunk:", chunk.toString());
}
});
numberStream.on("end", () => {
console.log("Stream ended");
});
// Example 2: Using flowing mode
objectStream.on("data", (chunk) => {
console.log("Received object:", chunk);
});
objectStream.on("end", () => {
console.log("Object stream ended");
});
// Example 3: Demonstrating backpressure
const slowConsumer = new Readable({
read() {},
});
slowConsumer.on("data", (chunk) => {
console.log("Slow consumer received:", chunk.toString());
});
const fastProducer = new Readable({
read() {
for (let i = 0; i < 1000; i++) {
if (!this.push(`Data ${i}\n`)) {
console.log("Backpressure applied");
return;
}
}
this.push(null);
},
});
// Piping with backpressure handling
fastProducer.pipe(slowConsumer);
In the above example, we cover the following concepts:
Buffering: The highWaterMark option is set in the NumberStream constructor, controlling the internal buffer size.
Backpressure: In Example 3, we demonstrate backpressure between a fast producer and a slow consumer.
Modes of Operation:
Example 1 uses the paused mode, manually calling read().
Example 2 uses the flowing mode with the 'data' event.
Piping: Example 3 uses pipe() to connect the fast producer to the slow consumer.
Events: We use readable, data, and end events to interact with the streams.
Object Mode: The objectStream is created with objectMode: true, allowing it to emit JavaScript objects.
On top of this:
The NumberStream class demonstrates how to create a custom Readable stream.
The _read method is called internally by the stream to generate data.
In object mode, we directly push JavaScript objects. In non-object mode, we stringify the objects.
The backpressure example shows how a fast producer will pause when the consumer's buffer fills up.
Piping automatically handles backpressure and data flow between streams.
Conclusion
Readable streams in Node.js offer a powerful and flexible way to handle data in chunks, making it easier to process large datasets efficiently. By understanding the various methods to create readable streams, such as stream.Readable.from(), stream.from(), stream.Readable, and stream.fromWeb(), you can leverage these tools to build robust data processing applications.
We also explored several practical examples, including piping streams, handling HTTP requests, working with child processes, and performing compression and encryption. Each of these examples highlights the versatility of readable streams and their applicability in different scenarios.
As you continue to work with Node.js streams, remember the key concepts of buffering, backpressure, and the importance of event handling to manage your streams effectively. It all takes practice.
For further reading and more advanced use cases, be sure to check out the official Node.js documentation and other related resources. We'll be looking into Writeable streams next time!
Duplex: Streams that are both readable and writeable.
Transform: A type of Duplex stream that can modify or transform the data as it is written and read.
Over the course of this post, we will working through the fundamentals that you should understand about Node.js streams and why they exist.
In this post, we will not deep dive into each of the four stream types. Even though I will be introducing stream code in this blog post, we specifically will focus on the foundational concepts that you should understand about streams. In the posts following, will consolidate our knowledge by diving deeper into each stream type.
How to think about the four fundamental Node.js Stream types
To help you understand the four stream types, I will introduce four analogies to think about each stream type orientated around water so that you connect the dots between the four types, but I will also add an alternative analogy to help consolidate your mental model of the four fundamental stream types. These aim to help bridge the gap between the abstract concept of streams and something more tangible.
1. Writable Streams: The Water Bucket, The Notebook
Writable streams are like water buckets that collect data (water). Just as a bucket can be filled with water from various sources, a writable stream can receive data from different inputs. You can pour data into it chunk by chunk, and it will hold that data until it's full or you're done writing. This makes writable streams perfect for scenarios where you need to collect and store data, such as writing to files or sending responses in a web server.
A water bucket can be used to think about Writeable Streams in Node.js
Alternatively, you could think of Writable streams are like a notebook where you can write information. Just as you can open a notebook and jot down thoughts, ideas, or data page by page, a writable stream allows you to input data chunk by chunk. You control when to write, how much to write, and when you're finished.
Examples of Writable streams include:
File Writing: Writing data to a file using fs.createWriteStream().
HTTP Responses: Sending responses to clients in a web server.
Database Inserts: Streaming large amounts of data into a database.
Console Output: Writing to process.stdout for command-line applications.
A simple example of creating a writable stream to a file output.txt in Node.js and writing in the text Hello, World!:
Readable streams can be thought of as water taps. Like a tap that can be turned on to release a steady flow of water, a readable stream provides a controlled source of data. You can "open" the stream to start receiving data, control its flow, and "close" it when you're done. This makes readable streams ideal for scenarios where you have a source of data that you want to access and process at your own pace, such as reading from a file or receiving a response from an HTTP request. Just as you can adjust a tap to control the water flow, you can also manage how you consume data from a readable stream.
A water tap can be used to think about Readable Streams in Node.js
You could also think about a fantasy novel (or in fact, any published book that you read). As you flip through the pages, you're consuming the story bit by bit, much like how a readable stream provides data in chunks. You can pause your reading (pause the stream), continue where you left off (resume the stream), or decide you're done reading for now (end the stream).
Examples of Readable streams include:
File Reading: Reading data from a file using fs.createReadStream().
HTTP Requests: Receiving data from client requests in a web server.
Database Queries: Streaming large result sets from a database.
User Input: Reading from process.stdin for command-line interfaces.
An example of creating a readable stream from a file input.txt in Node.js:
3. Duplex Streams: The Two-Way Water Pipe, The Walkie-Talkie
Duplex streams are like two-way water pipes. Imagine a pipe system where water can flow in both directions simultaneously. One end of the pipe can receive water (write data), while the other end can release water (read data). This bidirectional flow makes duplex streams perfect for scenarios where you need to both send and receive data, such as in network sockets or inter-process communication.
A two-way pipe can be used to think about Readable Streams in Node.js
Admittedly for me, Duplex streams were the ones that took me more time to understand. My alternative is that Duplex streams are akin to a walkie-talkie. With a walkie-talkie, you can both speak (write data) and listen (read data) through the same device. Similarly, a duplex stream can both accept input and provide output, making it perfect for two-way communication scenarios.
Examples of Duplex streams include:
TCP Sockets: Implementing network communication where data flows both ways.
SSH Tunnels: Establishing secure, bidirectional communication channels.
Websockets: Creating real-time, full-duplex communication in web applications.
Inter-process Communication: Facilitating two-way communication between processes.
An example of creating a duplex stream using a TCP server in Node.js by creating a server that listens on port 8080:
In the above code, we have a socket variable that is a duplex stream. We write to the socket using socket.write() and read from the socket using socket.on("data", ...).
4. Transform Streams: The Water Treatment Plant, The Factory Assembly Line
Transform streams you can think of as water treatment plants. Just as a treatment plant takes in raw water, processes it, and outputs clean water, a transform stream receives input data, manipulates or "transforms" it in some way, and then outputs the modified data. This makes transform streams excellent for scenarios where you need to modify data on the fly, such as compression, encryption, or any kind of data parsing or conversion.
A water treatment plant can be used to think about Transform Streams in Node.js
Transform streams can be likened to a factory assembly line. In a factory, raw materials enter at one end, undergo various modifications or enhancements as they move along the line, and emerge as finished products at the other end. Similarly, a transform stream takes input data, processes or modifies it in some way, and outputs the transformed data.
Examples of Transform streams include:
Data Compression: Compressing or decompressing data on-the-fly.
Encryption/Decryption: Securing data as it's being transmitted.
Data Parsing: Converting between data formats (e.g., CSV to JSON).
Text Encoding: Changing character encodings of text data.
Here is a simple example of a transform stream that converts input text to uppercase:
We could run the following in the terminal to see it in action:
$ echo "Hello" | node basic-transform.js
HELLO
Understanding the difference between Duplex and Transform streams
Transform streams are actually a special type of duplex stream. They can be thought of as duplex streams with a built-in relationship between the input and output. Using out analogy of the factory line or the water treatment plant, we understand that the input and output are related in some way. For Transform streams, data that comes in can be changed in some way before it goes out.
On the other hand, Duplex streams are more general. They can be used for two-way communication, but the input and output are not necessarily related. You can write data in one format and read it in another, or vice versa. In our example of the walkie talkie, what you talk about and what you hear are not necessarily directly related.
The "why" behind Node.js Streams
Node.js streams offer several benefits that make them a powerful tool for data processing and manipulation. Here are some key advantages of using streams in Node.js applications:
Memory Efficiency
Process large amounts of data without loading it all into memory at once.
Ideal for working with files or datasets larger than available Random Access Memory (RAM).
Time Efficiency
Start processing data as soon as it's available, without waiting for the entire dataset.
Reduces overall processing time for large datasets.
Composability
Easily chain multiple stream operations together using .pipe().
Create complex data processing pipelines with modular, reusable components.
Backpressure Handling
Built-in mechanisms to manage the flow of data between fast producers and slow consumers.
Prevents memory overflow and system crashes.
Abstraction of Data Sources and Destinations
Consistent interface for various types of input/output (files, network, etc.).
Write code that works with different data sources without major changes.
Event-Driven Architecture
Aligns well with Node.js's event-driven, non-blocking I/O model.
Enables responsive applications even when dealing with large datasets.
Built-in to Core Modules
Native support in many Node.js core modules (fs, http, crypto, etc.).
Seamless integration with Node.js ecosystem.
Asynchronous Processing
Natural fit for asynchronous operations, allowing for efficient multitasking.
Keeps the event loop free for other operations.
Transformations
Easy to implement data transformations on-the-fly.
Supports operations like compression, encryption, or format conversion as data flows.
Improved Performance in Network Operations
Efficient for sending and receiving data over networks.
Reduces latency in client-server communications.
Customizability
Can create custom streams for specific use cases.
Extend built-in stream classes for tailored functionality.
Interoperability
Works well with other Node.js features and third-party libraries.
Many npm packages provide stream interfaces for various data sources and sinks.
Lazy Evaluation
Process data only when it's needed, improving application responsiveness.
Useful for scenarios where not all data may be used.
Standard Interface
Provides a consistent API across different types of streams.
Reduces the learning curve for working with various data sources and sinks.
These benefits make Node.js streams a powerful tool for efficient, scalable, and flexible data handling in a wide range of applications.
Node.js Streams concepts that you should know
On top of the four fundamental stream types, it is important to keep in mind a few foundational key terms that relate to streams:
Stream types: The already-mentioned four foundational stream types (Writeable, Readable, Duplex, and Transform).
Buffering: Temporary data storage within streams, controlled by highWaterMark to manage memory usage.
Backpressure: Mechanism to balance data flow between fast producers and slow consumers, preventing memory issues.
Modes of Operation: Flowing (automatic data reading) vs Paused (manual data reading) modes for controlling data consumption.
Piping: Connecting streams to automatically manage data flow and backpressure between them.
Events: Asynchronous notifications for stream states and data availability, crucial for stream interaction.
Object Mode: An option with streams that enable the capability to process JavaScript objects instead of just buffers or strings.
Understanding these concepts provides a solid foundation for working with Node.js streams effectively. It helps in making informed decisions about stream usage, handling data efficiently, and avoiding common pitfalls in stream-based applications.
Let's walk through each of these concepts in more detail.
Buffering
Buffering in Node.js streams refers to the process of storing chunks of data in memory while they are being transferred between the source and the destination.
You can think of it like a queue of people waiting to enter a room. The room can only hold a certain number of people at a time, so the manager at the front of the queue (buffer) helps manage the flow of people in and out of the room.
A queue of people can be an analogy for both buffering and backpressure
When data is read from a stream, it is held temporarily in a buffer until it can be processed or written to another stream. It is a mechanism used by streams to manage data flow efficiently.
We can help example buffering by creating a writable stream with a custom highWaterMark.
const { Writable } = require("node:stream");
const myWritable = new Writable({
highWaterMark: 1024, // Set buffer size to 1KB
write(chunk, encoding, callback) {
console.log("Writing:", chunk.toString());
callback();
},
});
Create a writable stream with a 1KB buffer.
Write data to the stream.
If more than 1KB of data is written before it's processed, the write method will return false, indicating the buffer is full.
Here is a more detailed example:
const { Writable } = require("node:stream");
const myWritable = new Writable({
highWaterMark: 1024, // Set buffer size to 1KB
write(chunk, encoding, callback) {
console.log("Writing:", chunk.toString());
// Simulate processing delay
setTimeout(() => {
callback();
}, 100);
},
});
// Write data to the writable stream
const data = Buffer.from("This is some data to write to the stream.");
for (let i = 0; i < 10; i++) {
const canWrite = myWritable.write(data);
if (!canWrite) {
console.log("Buffer is full, applying backpressure.");
} else {
console.log("Data written to buffer.");
}
}
// End the writable stream
myWritable.end();
In the above examples, when you call the write method of the writable stream, the data is added to the internal buffer. If the buffer is not full, the write method will immediately process the chunk. If the buffer is full, the stream will handle the backpressure by signaling the source to slow down or stop sending data until there's enough space in the buffer.
Sequence diagram for our buffering example
Setting the highWaterMark value does not reject chunks smaller than the specified buffer size. Instead, it determines the maximum amount of data that the internal buffer can hold before applying backpressure. I sometimes think of the highWaterMark as a set of go/stop traffic lights.
Backpressure
We touched briefly above on backpressure, but what is it exactly?
Backpressure is a flow control mechanism. It is used in streams to manage the rate at which data is transmitted from the **source (producer) **to the destination (consumer).
Let's continue with our analogy of the queue of people wanting to enter the room. When the room reaches its capacity (buffer is full), the manager stops allowing more people to enter. This is akin to the writable stream applying backpressure because it cannot handle more data at the moment.
It prevents the destination from being overwhelmed by data when it cannot process incoming data as quickly as it is being produced. In the context of Node.js streams, backpressure helps ensure efficient and stable data transfer, preventing memory overflow and maintaining application performance.
For another example, here demonstrate handling backpressure in a pipe operation:
const fs = require("node:fs");
// Create a readable stream from a large file
const readStream = fs.createReadStream("bigfile.txt");
// Create a writable stream to an output file
const writeStream = fs.createWriteStream("output.txt");
// Pipe the readable stream into the writable stream
readStream.pipe(writeStream);
// Listen for the 'drain' event on the writable stream
writeStream.on("drain", () => {
// This event is emitted when the writable stream buffer is drained
console.log("Drained. Resuming read.");
// Resume the readable stream to continue reading data
readStream.resume();
});
Create read and write streams.
Pipe data from read to write stream.
If writeStream's buffer fills up, it emits 'drain' event.
When 'drain' occurs, resume reading to manage backpressure.
Backpressure is managed implicitly by the pipe method, which connects the readable stream (readStream) to the writable stream (writeStream). The pipe method automatically handles the flow control, including backpressure, so you don't need to manually manage it.
When the drain event is emitted, the writeStream signals that it has processed enough data to make room in its buffer. The readStream then resumes reading data and continues the flow.
Sequence diagram for our backpressure example
The two reading modes: Flowing and Paused
Node.js streams can operate in two reading modes: flowing and paused. These modes are separate from object mode (that we will touch on later) and determines how data is read from a readable stream.
In flowing mode, data is read automatically from the stream and emitted as soon as it's available. This mode is suitable for scenarios where you want to consume data as it arrives, such as real-time data processing or streaming media.
In paused mode, data is read manually by calling the read() method. This mode is useful when you need more control over data consumption, such as processing data in batches or pausing and resuming data flow.
In the following example, we switch between flowing and paused modes.
In this scenario, we start in paused mode by listening for the readable event. We then manually read data chunks using the read() method and process them one by one.
Piping
Piping in Node.js streams refers to the process of connecting a readable stream to a writable stream, allowing data to flow automatically from the source (readable stream) to the destination (writable stream). This mechanism simplifies data transfer and handling, making it easy to implement common data processing tasks, such as file copying, HTTP request handling, and more.
Pipe data from read stream through transform stream to write stream.
Data flows automatically, with backpressure handled by Node.js.
Sequence diagram for our piping example
A pipeline can be created by chaining multiple streams together using the .pipe() method or using the pipeline function from the node:stream module. This allows you to create complex data processing workflows with minimal code and effort.
Here is an example using the .pipe() method to create a pipeline:
const fs = require("node:fs");
const zlib = require("node:zlib");
const { Transform } = require("node:stream");
// Create a transform stream to convert data to uppercase
const upperCaseTransform = new Transform({
transform(chunk, encoding, callback) {
this.push(chunk.toString().toUpperCase());
callback();
},
});
// Create a readable stream from a source file
const readStream = fs.createReadStream("source.txt");
// Create a writable stream to a destination file
const writeStream = fs.createWriteStream("destination.txt.gz");
// Create a gzip transform stream
const gzip = zlib.createGzip();
// Pipe the streams together: read -> transform -> gzip -> write
readStream
.pipe(upperCaseTransform) // Transform to uppercase
.pipe(gzip) // Compress with gzip
.pipe(writeStream); // Write to the destination file
// Handle events
writeStream.on("finish", () => {
console.log(
"File has been copied, transformed, and compressed successfully."
);
});
writeStream.on("error", (err) => {
console.error("Error writing to file:", err);
});
readStream.on("error", (err) => {
console.error("Error reading from file:", err);
});
Here is the alternative using pipeline:
const { pipeline } = require("node:stream");
const fs = require("node:fs");
const zlib = require("node:zlib");
const { Transform } = require("node:stream");
// Create a transform stream to convert data to uppercase
const upperCaseTransform = new Transform({
transform(chunk, encoding, callback) {
this.push(chunk.toString().toUpperCase());
callback();
},
});
// Create streams
const readStream = fs.createReadStream("source.txt");
const writeStream = fs.createWriteStream("destination.txt.gz");
const gzip = zlib.createGzip();
// Use pipeline to handle the streams
pipeline(
readStream, // Read from the source file
upperCaseTransform, // Transform to uppercase
gzip, // Compress with gzip
writeStream, // Write to the destination file
(err) => {
if (err) {
console.error("Pipeline failed:", err);
} else {
console.log("Pipeline succeeded.");
}
}
);
Events
Events refer to the various events that streams can emit during their lifecycle. These events allow you to handle different stages and aspects of data processing, such as when data is available, when the stream ends, or when an error occurs.
Under the hood, streams in Node.js can emit events because they are instances of the EventEmitter class (which I may retroactively touch on more in depth in a future blog post).
Different types of streams emit different events, but we will highlight some of the more common events that you can listen for in Node.js streams.
Readable
data: Emitted when a chunk of data is available to be read.
end: Emitted when there is no more data to be read from the stream.
error: Emitted when an error occurs while reading data.
readable: Emitted when the stream has data available to be read. This event is used in paused mode to indicate that you can call read() to get more data.
Writeable
drain: Emitted when the writable stream's internal buffer is emptied and it is ready to receive more data. This is important for handling backpressure.
finish: Emitted when the end() method is called and all data has been flushed to the underlying system.
error: Emitted when an error occurs while writing data.
Stream Events in action
The following is an simple example of hooking to events on a readable stream.
The above hooks into some events for the different streams in the pipeline. This allows you to monitor the progress of the data processing, handle errors, and respond to various stream states.
Object Mode
All streams created by Node.js APIs operate exclusively with strings or Buffer, TypedArray or DataView objects.
Object mode however enables streams to work with other types of JavaScript object values.
In the following, we set objectMode to true in order to process JavaScript objects.
Transform converts Buffer chunks to JavaScript objects.
Output stream receives and logs JavaScript objects.
There are trade-offs for using objectMode as it can impact performance overhead, backpressure handling, buffering constraints and serialization requirements.
Here is another example to more clearly demonstrate the use of objectMode between a readable and writeable stream:
const { Readable, Writable } = require("node:stream");
// Create a readable stream in objectMode
const readableStream = new Readable({
objectMode: true,
read() {
this.push({ id: 1, name: "Alice" });
this.push({ id: 2, name: "Bob" });
this.push(null); // No more data
},
});
// Create a writable stream in objectMode
const writableStream = new Writable({
objectMode: true,
write(chunk, encoding, callback) {
console.log("Received object:", chunk);
callback();
},
});
// Pipe the readable stream to the writable stream
readableStream.pipe(writableStream);
Create a readable stream that emits JavaScript objects.
Create a writable stream that receives and logs objects.
Pipe the readable stream to the writable stream.
Sequence diagram for our object mode example
Conclusion
Understanding Node.js streams is crucial for efficient data handling and manipulation in various applications. This blog post introduced the four fundamental types of streams, Writable, Readable, Duplex, and Transform, using relatable analogies to bridge the gap between abstract concepts and practical implementation.
Streams offer numerous benefits, including memory and time efficiency, composability, backpressure handling, and seamless integration with Node.js's event-driven architecture. They enable the creation of powerful, scalable, and flexible data processing pipelines.
By grasping the foundational concepts of streams, such as buffering, backpressure, piping, and modes of operation, you can unlock the full potential of Node.js for handling large datasets, network communication, and real-time data processing.
With this solid foundation, you're now equipped to explore the more complex aspects of Node.js streams and leverage their capabilities to build robust and performant applications.
Future posts will delve deeper into each stream type, providing detailed insights and advanced techniques to further enhance your Node.js applications.
A Buffer in Node.js is a temporary storage area in memory used to hold raw binary data. It is a fixed-length sequence of bytes, similar to an array of integers, but corresponds to a raw memory allocation outside the V8 JavaScript engine.
Buffers are essential for handling raw binary data efficiently in Node.js. They serve as the backbone for many operations involving file I/O, networking, and streams. Understanding Buffers is key to mastering Node.js streams and dealing with data at a low level.
What does it mean to be allocated outside of the V8 engine?
V8 is the JavaScript engine used by Node.js. It is responsible for executing JavaScript code and managing memory allocation for JavaScript objects, such as strings, arrays, and objects. This memory is managed within a structure called the heap, which the V8 engine controls.
Buffers, on the other hand, are allocated in** Node.js's C++ layer**, which interfaces with the operating system directly. They are designed to handle binary data and are more efficient for certain operations, such as reading files or handling network protocols. To achieve this efficiency, Buffers allocate memory outside the V8 heap.
This means:
Direct Memory Access: Buffers provide direct access to memory outside of V8's managed heap, allowing for faster and more efficient handling of raw binary data. This is especially useful for operations that require manipulation of large amounts of data, such as file I/O and networking.
Fixed-Size Allocation: When a Buffer is created (as you will see in another section), it allocates a fixed-size block of memory. This block is not subject to the garbage collection process that manages the rest of the JavaScript objects in V8. As a result, Buffers can avoid the overhead associated with garbage collection, leading to better performance in memory-intensive operations.
Native Code Interoperability: Allocating memory outside the V8 heap allows Node.js to interact more easily with native code (C/C++ libraries) and system-level resources, which often require access to raw binary data.
When you create a Buffer, the Node.js runtime allocates a block of memory from the system's memory pool. This is done using methods provided by the operating system, such as malloc in C. The allocated memory is then managed by Node.js but remains outside the control of the V8 engine.
How should I think of a Buffer?
To mentally visualize a Buffer, you can think of a water bucket outside of a house.
A house with a bucket outside. The house represents the V8 heap, while the bucket represents the Buffer in system memory.
The house itself represents the V8 heap, where JavaScript objects like strings, arrays, and objects live.
The bucket outside the house represents the Buffer. It is a separate container for raw binary data that is not subject to the same rules and restrictions as the objects inside the house.
As for using the bucket (Buffer), you can think of a hose (data source) that can fill the bucket (Buffer) with water (data).
A hose filling a bucket with water. This represents the binary data held within a Buffer.
To start connecting the dots, let's start walking through some examples of what we can do with Buffers and round out our analogy.
Working with Buffers
To create a Buffer, you can use the Buffer class provided by Node.js. The buffer documentation recommends explicitly importing the Buffer class, although it is available in the global scope.
const { Buffer } = require("node:buffer");
// Create a Buffer of 8 bytes
const buf1 = Buffer.alloc(8); // <Buffer 00 00 00 00 00 00 00 00>
// Create a Buffer from a string
const buf2 = Buffer.from("Hello, World!"); // <Buffer 48 65 6c 6c 6f 2c 20 57 6f 72 6c 64 21>
// Create a Buffer from an array of integers
const buf3 = Buffer.from([1, 2, 3, 4, 5]); // <Buffer 01 02 03 04 05>
In the above example, if is buf1 that we can think of as our empty bucket without water, while buf2 and buf3 are our buckets that are already filled with water.
In order to fill buf1, we could also make use of the write method:
Note that every time we convert the Buffer back into a JavaScript object data type supported by V8, we are effectively bring it back into the house (V8 heap) which is managed by the V8 JavaScript engine.
This process of conversion has some important implications:
Performance: Converting large Buffers to strings or other V8 types can be computationally expensive and may cause memory pressure on V8's heap.
Memory usage: The converted data now exists in two places - the original Buffer (outside V8) and the new string or object (inside V8).
Garbage collection: While the Buffer itself is managed outside of V8, any strings or objects created from it are subject to V8's garbage collection.
Immutability: When you convert a Buffer to a string, you get an immutable JavaScript string. Any changes you make to this string will create a new string, not modify the original Buffer.
To demonstrate, consider the following:
const buf = Buffer.from("Hello, World!");
// buf is allocated outside V8's heap
const str = buf.toString();
// str is a new string in V8's heap
str[0] = "h"; // This doesn't modify str or buf
console.log(str); // Still "Hello, World!"
const str2 = buf.toString(); // Still "Hello, World!" but as a new string in V8's heap
buf[0] = 0x68; // This modifies the Buffer directly
const str3 = buf.toString(); // Now "hello, World!" as a new string in V8's heap
While looking at the above, I believe it is important to keep comparing what is happening to the analogy of the bucket outside the house.
Hexadecimal representation
For all of the code example above, I have added the hexadecimal representation of the Buffer in the comments.
For those unfamiliar with hexadecimal representation, each pair of characters in this representation corresponds to a single byte, represented in hexadecimal (base-16) notation.
In hexadecimal, each digit can be 0-9 or A-F, where A-F represent the decimal values 10-15 respectively.
For the byte values in my buf1 example, we have 48 65 6c 6c 6f 21 21 21 where each of these is a byte value in hex.
These hex values in this example correspond to ASCII characters:
48 -> 'H'
65 -> 'e'
6c -> 'l'
6c -> 'l'
6f -> 'o'
21 -> '!'
21 -> '!'
21 -> '!'
If we convert this buffer back into a string, it would return to again be "Hello!!!":
For example, reading from and writing to files, especially when dealing with binary data.
const fs = require("node:fs");
// Reading a file into a Buffer
const buffer = fs.readFileSync("example.bin"); // <Buffer ... >
// Writing a Buffer to a file
fs.writeFileSync("output.bin", buffer);
Network communications
For example, handling raw data in network protocols.
const net = require("node:net");
const server = net.createServer((socket) => {
socket.on("data", (buffer) => {
console.log(buffer.toString());
});
});
Cryptography
This includes things like hashing, encryption, and decryption.
Efficiently processing large amounts of data. We will touch more on this throughout the series.
const fs = require("fs");
const readStream = fs.createReadStream("largefile.txt");
readStream.on("data", (chunk) => {
// chunk is a Buffer
console.log(chunk.length);
});
The highs and lows of using Buffers
Here a some highs of using Buffers:
Efficient Binary Data Handling: Buffers are designed to handle raw binary data efficiently, making them ideal for file I/O, network communication, and other scenarios requiring direct manipulation of binary data.
Direct Memory Allocation: Buffers allocate memory outside the V8 heap, allowing for more efficient use of memory and avoiding the overhead of garbage collection.
High Performance: Direct access to memory and efficient handling of binary data result in high performance, especially for operations involving large amounts of data.
Interoperability with Native Code: Buffers facilitate interoperability with native code (C/C++ libraries) and system-level resources, making it easier to integrate with existing systems and perform low-level operations.
Flexibility in Data Encoding: Buffers support various data encodings (e.g., UTF-8, ASCII, Base64), making it easy to convert between different formats.
In contrast, here are some of the gotchas to look out for:
Fixed Size: Once a Buffer is created, its size cannot be changed. This means you need to allocate the correct amount of memory upfront, which can be difficult to estimate accurately.
Complexity: Using Buffers requires a decent understanding of binary data manipulation, memory management, and encoding/decoding, which can add complexity to the code.
Potential Security Risks: Improper handling of Buffers, such as misuse of Buffer.allocUnsafe, can lead to security vulnerabilities.
Less Readable Code: Code that deals with Buffers can be harder to read and understand compared to using higher-level abstractions, especially for developers not familiar with binary data manipulation.
Buffers do not work with objects directly: The type must be of type string or an instance of Buffer, ArrayBuffer, or Array or an Array-like Object. This means that you cannot pass an object directly to a Buffer (nor certain other types like booleans).
Conclusion
Buffers are a fundamental component in Node.js for handling raw binary data efficiently. By allocating memory outside the V8 heap, Buffers provide direct access to memory, enabling high performance for operations involving large data sets, such as file I/O and network communication. Understanding how Buffers work, including their fixed size and manual memory management requirements, is crucial for writing efficient Node.js applications.
In today's blog post, we've covered a the fundamental ideas behind Buffers in Node.js and we gave ourselves an analogy of a bucket outside a house to help us mentally visualize the concepts around Buffers.
While Buffers offer numerous advantages, including interoperability with native code and flexibility in data encoding, they also introduce complexity. Properly managing buffer allocation, avoiding common pitfalls, and ensuring memory is correctly handled are essential practices for developers working with Buffers.
By mastering Buffers, you'll be well-prepared to dive deeper into Node.js streams and handle data at a low level, paving the way for building robust and high-performance applications.
]]><![CDATA[Dependency Injection with InversifyJS]]>https://blog.dennisokeeffe.com/blog/2024-04-25-dependency-injection-with-inversifyjs2024-04-25T00:00:00.000Z2024-04-25T00:00:00.000ZOverview
Today's post will walk through how we can use InversifyJS to help with dependency injection in our TypeScript projects.
It is expected that you are familiar with a package manager (like npm or pnpm, the latter of which I will use today) and have Node.js installed on your machine.
You should also be familiar with TypeScript and experimental decorators.
I will be using Node.js v20+ for this demo.
Getting started
Let's start by creating a new project:
# Create a new project
$ mkdir demo-inversifyjs
$ cd demo-inversifyjs
$ pnpm init
# Install dependencies
# Required for TypeScript
$ pnpm add -D typescript tsx @tsconfig/node20 @types/node
# Required for InversifyJS
$ pnpm add inversify reflect-metadata
# We will create a few config files, a main entry file and two different class files
$ touch tsconfig.json index.ts
Some notes on the above:
We install some TypeScript defaults and @tsconfig/node20 for our TypeScript configuration.
We install inversify and reflect-metadata for InversifyJS.
We create a tsconfig.json file for our TypeScript config, and an index.ts entry file. We will add more files as required.
Next, let's add some configuration to our tsconfig.json:
The extra compiler options added are required for InversifyJS to work. You will see the use of decorators in the section where we implement the code.
What problem is InversifyJS trying to solve
Directly from the InversifyJS documentation:
Our goal is to write code that adheres to the dependency inversion principle. This means that we should "depend upon Abstractions and do not depend upon concretions". Let's start by declaring some interfaces (abstractions).
Let's take a simple example of a file reader without InversifyJS. Let's say we have a FileReader class that reads from a file.
In the above example, we have a FileReader class that reads from a file. It has a parse method that takes in a string and returns a string.
The FileReader class has a dependency on a parser object that implements the IParser interface.
In our case, we use dependency injection to pass in the parser object to the FileReader class.
In a contrived example where we want one FileReader instance to be able to parse JSON while another simply returns the text, we could use the classes as follows:
import path from "node:path";
// ... omit existing code
class JsonParser implements IParser {
parse(data: string) {
return JSON.parse(data);
}
}
class FileParser implements IParser {
parse(data: string) {
return data;
}
}
async function main() {
const jsonParser = new JsonParser();
const jsonFileReader = new FileReader(jsonParser);
const fileParser = new FileParser();
const fileReader = new FileReader(fileParser);
const jsonFile = await jsonFileReader.read(
path.resolve(process.cwd(), "./data/example.json")
);
const file = await fileReader.read(
path.resolve(process.cwd(), "./data/example.txt")
);
console.log(jsonFileReader.parse());
console.log(fileReader.parse());
}
main();
If we now run the above code (let's assume it's in file-reader.ts), we get the following:
# Running the file
$ node file-reader.ts
{ example: 'data' }
Lorem ipsum dolor sit amet, consectetur adipiscing elit, sed do eiusmod tempor incididunt ut labore et dolore magna aliqua. Ut enim ad minim veniam, quis nostrud exercitation ullamco laboris nisi ut aliquip ex ea commodo consequat. Duis aute irure dolor in reprehenderit in voluptate velit esse cillum dolore eu fugiat nulla pariatur. Excepteur sint occaecat cupidatat non proident, sunt in culpa qui officia deserunt mollit anim id est laborum.
In the above example, we displayed how to inject dependencies into a class. However, this can become cumbersome as the number of dependencies grows.
The full code is as follows:
import { readFile } from "node:fs/promises";
import path from "node:path";
interface IParser {
parse(data: string): string;
}
class JsonParser implements IParser {
parse(data: string) {
return JSON.parse(data);
}
}
class FileParser implements IParser {
parse(data: string) {
return data;
}
}
interface IFileReader {
read(filepath: string): Promise<string>;
parse(data: string): string;
}
class FileReader implements IFileReader {
private parser: IParser;
private contents?: string;
constructor(parser: IParser) {
this.parser = parser;
}
async read(filepath: string) {
this.contents = await readFile(filepath, "utf-8");
return this.contents;
}
parse() {
if (!this.contents) throw new Error("No contents to parse");
return this.parser.parse(this.contents);
}
}
async function main() {
const jsonParser = new JsonParser();
const jsonFileReader = new FileReader(jsonParser);
const fileParser = new FileParser();
const fileReader = new FileReader(fileParser);
await jsonFileReader.read(path.resolve(process.cwd(), "./data/example.json"));
await fileReader.read(path.resolve(process.cwd(), "./data/example.txt"));
console.log(jsonFileReader.parse());
console.log(fileReader.parse());
}
main();
InversifyJS helps us manage these dependencies by providing an inversion of control container.
An approach with InversifyJS
Let's refactor the above example to use InversifyJS. Copy the contents of file-reader.ts into another file file-reader-inversify.ts.
InversifyJS needs to use the type as identifiers at runtime. We use symbols as identifiers but you can also use classes and or string literals.
To do this, let's simply declare variable TYPES for the symbols of our interfaces. We will also add TAGS for our different parsers.
// ... omitted
// Our existing interfaces
interface IParser {
parse(data: string): string;
}
interface IFileReader {
read(filepath: string): Promise<string>;
parse(data: string): string;
}
// Our new symbols
const TYPES = {
IParser: Symbol.for("IParser"),
// Not entirely necessary for this example, but just to demonstrate how it works.
IFileReader: Symbol.for("IFileReader"),
};
const TAGS = {
JsonParser: "JsonParser",
FileParser: "FileParser",
};
// ... omitted
The next step is to use some decorators to help InversifyJS understand how to inject dependencies.
This is done with the injectable and inject decorators. We also use the named decorator to help with the TAGS we defined earlier.
import { injectable, inject, Container, named } from "inversify";
import "reflect-metadata";
import { readFile } from "node:fs/promises";
import path from "node:path";
// ... code omitted
// We update our classes
@injectable()
class JsonParser implements IParser {
parse(data: string) {
return JSON.parse(data);
}
}
@injectable()
class FileParser implements IParser {
parse(data: string) {
return data;
}
}
@injectable()
class FileReader implements IFileReader {
private parser: IParser;
private contents?: string;
constructor(@inject(TYPES.IParser) @named(TAGS.FileParser) parser: IParser) {
this.parser = parser;
}
async read(filepath: string) {
this.contents = await readFile(filepath, "utf-8");
return this.contents;
}
parse() {
if (!this.contents) throw new Error("No contents to parse");
return this.parser.parse(this.contents);
}
}
The @named decorator is used to help InversifyJS understand which parser to inject. We default to the FileParser in this case.
Next, we need to create a container and bind our interfaces to our classes.
// ... code omitted
// Create the container
const container = new Container();
container
.bind<IParser>(TYPES.IParser)
.to(JsonParser)
.whenTargetNamed(TAGS.JsonParser);
container
.bind<IParser>(TYPES.IParser)
.to(FileParser)
.whenTargetNamed(TAGS.FileParser);
container.bind<IFileReader>(TYPES.IFileReader).to(FileReader);
async function main() {
// Get the container with the tagged parser
const jsonFileReader = container.getNamed<IFileReader>(
TYPES.IFileReader,
TAGS.JsonParser
);
const fileReader = container.getNamed<IFileReader>(
TYPES.IFileReader,
TAGS.FileParser
);
await jsonFileReader.read(path.resolve(process.cwd(), "./data/example.json"));
await fileReader.read(path.resolve(process.cwd(), "./data/example.txt"));
console.log(jsonFileReader.parse());
console.log(fileReader.parse());
}
main();
In the above code, we configure the container to bind our interfaces to our classes. We also use the whenTargetNamed method to help InversifyJS understand which parser to inject.
Usually, this container configuration would be abstracted into another file (e.g. ioc.ts or something), but for the sake of this example, we have it all in one file.
Finally, we use the container.getNamed method to get the correct instance of the IFileReader class.
Once this is done, we can run the file:
# Running the file
$ npx tsx file-reader-inversify.ts
{ example: 'data' }
Lorem ipsum dolor sit amet, consectetur adipiscing elit, sed do eiusmod tempor incididunt ut labore et dolore magna aliqua. Ut enim ad minim veniam, quis nostrud exercitation ullamco laboris nisi ut aliquip ex ea commodo consequat. Duis aute irure dolor in reprehenderit in voluptate velit esse cillum dolore eu fugiat nulla pariatur. Excepteur sint occaecat cupidatat non proident, sunt in culpa qui officia deserunt mollit anim id est laborum.
As we expected, the output is the same as before.
The final code for the file using InversifyJS is as follows:
In today's post, we went through a small example on how to use InversifyJS to help with dependency injection in our TypeScript projects. We initially wrote it without InversifyJS to have a comparison.
For myself, this was a review to better understand InversifyJS as it is used heavily within my new company.
In cases where dependencies increase and we need to manage them, InversifyJS can be a great tool to help manage these dependencies. That being said, I am yet to be sold on the approach.
Using getNamed() and tagging seems like it is adding a bit too much magic for my liking. I prefer to be explicit in my code and have the dependencies passed in directly.
There are a ton of extra features that I have not delved into with InversifyJS such as lifecycle management, middleware and more. I would recommend checking out the InversifyJS documentation for more information, which I will also do myself to get a better understanding of what is possible.
The commit graph is also lacking a little bit these days, but maybe they consider this project feature complete. I am a little wary of treading too far away from the JS/TS mainstream ecosystem, but I am also open to new ideas and ways of doing things.
]]><![CDATA[Up and running with Go 1.22's new built-in router]]>https://blog.dennisokeeffe.com/blog/2024-02-18-up-and-running-with-go-1-22s-new-built-in-router2024-02-18T00:00:00.000Z2024-02-18T00:00:00.000Z
Getting started with Go 1.22
This is a small approach to getting started with Go 1.22. This walkthrough is for MacOS.
The aim is to create a basic "Hello, World" API with the new mux router option from the Go 1.22 release.
Once installed, you can confirm the version with go version.
Initialize a Go project
You can use the go mod init function in order to initialize a new go.mod file.
# Init the project
$ go mod init github.com/okeeffed/go-1-22-mux
go mod is a helper for manager modules. go mod help can display more information about this.
$ go mod help
Go mod provides access to operations on modules.
Note that support for modules is built into all the go commands,
not just 'go mod'. For example, day-to-day adding, removing, upgrading,
and downgrading of dependencies should be done using 'go get'.
See 'go help modules' for an overview of module functionality.
Usage:
go mod <command> [arguments]
The commands are:
download download modules to local cache
edit edit go.mod from tools or scripts
graph print module requirement graph
init initialize new module in current directory
tidy add missing and remove unused modules
vendor make vendored copy of dependencies
verify verify dependencies have expected content
why explain why packages or modules are needed
Use "go help mod <command>" for more information about a command.
Configuring the Makefile
A Makefile is a special file used in software development projects, particularly in Unix-like operating systems, to automate the process of compiling and building software. It contains a set of instructions (written in a format called "Makefile syntax") that define how to build the project and its various components.
Here's a simple explanation of a Makefile for someone who's not familiar with it:
# Makefile for a Go project
# Assumes entry point at project/cmd/server/server.go
# Binary output name
BINARY_NAME=hello_world
# Default make command
all: build
# Build the binary
build:
@echo "Building..."
go build -o $(BINARY_NAME) ./cmd/server
# Run the server
run: build
@echo "Running..."
./$(BINARY_NAME)
# Test your application
test:
@echo "Testing..."
go test ./...
# Clean up binaries
clean:
@echo "Cleaning..."
go clean
rm -f $(BINARY_NAME)
# Help command to display available commands
help:
@echo "Makefile commands:"
@echo "all - Build the application"
@echo "build - Build the binary"
@echo "run - Build and run the application"
@echo "test - Run tests"
@echo "clean - Remove binaries"
@echo "help - Display this help"
# Mark commands that don't correspond to files as .PHONY
.PHONY: all build run test clean help
Warning: Make sure you use the correct indentation.
The following explains the different parts of this file.
Variables
BINARY_NAME: Represents the name of the binary executable.
Default Target (all)
When you run make without specifying a target, it executes the build target.
Build Target
Compiles the Go source files and generates the binary executable specified by BINARY_NAME.
Clean Target
Removes any generated binary executable and cleans up any temporary files created during the build process.
Test Target
Runs all the tests in the project.
Dependencies Target
Installs any dependencies the project might have.
Run Target
Builds and runs the executable.
Help Target
Provides a helpful message listing available targets and their descriptions.
To use this Makefile, place it in your Go project directory and run make. You can also use make clean to remove the generated binary, make test to run tests, make deps to install dependencies, and make run to build and run the executable.
This Makefile is a little more complex than it needs to be (for this simple project), but understanding it will also help you when you see other Makefiles. It is not just used for Golang applications.
Add the example code above into a Makefile.
Setting up our remaining files and folders
The Go project layout project on GitHub is a great place to help understand a layout for Go projects. That being, a lot of it can be overkill. We will follow these standards for the sake of today's example, but please note that this is not necessary for such a small project.
It may help in future if you are build up a large application.
For now, we will use the following folder structure:
Please note: this is very much overkill for the size of the project.
For this, add a few folders:
# Make the folders and add the files
$ mkdir -p cmd/server internal/model api/v1
$ touch cmd/server/server.go internal/model/user.go api/v1/goodbye.go api/v1/hello.go
We are ready to add some code.
Adding our User model
We will be writing the code in this order:
Adding our User model.
Adding our GET routes for /v1/hello and /v1/goodbye.
Adding our main function (using the http.NewServeMux export from Go 1.22).
Even though I say User model, really it will be a barebones struct to demonstrate using it across files. The actually implementation of it will be a bit rogue and not-for-a-user.
That being said, our internal/model/user.go file will look like this:
package model
// User is a simple model for a user.
type User struct {
// Name is the name of the user.
Name string
}
He, we are create a package model that we can use later in our imports as the following:
import (
model "github.com/okeeffed/go-1-22-mux/internal/model"
)
Naming the struct with a capital letter (User) makes the struct public and will be importable from other files.
We can then use this in our application.
Configuring our GET route handlers
Inside of api/v1/hello.go, add the following:
package api
import (
"net/http"
model "github.com/okeeffed/go-1-22-mux/internal/model"
)
// HelloHandler is a simple HTTP handler that writes a response.
func HelloHandler(w http.ResponseWriter, r *http.Request) {
// Create a new user.
user := model.User{
Name: "World",
}
// Write a response to the client.
w.Write([]byte("Hello, " + user.Name + "!"))
}
Here we are using the http import helping us type our arguments for the response writer and the request, while the model import is used so we can create our new user with the name "World" (just to stick to hello world convention for now).
In practice, you may see variables denoted with shorthand e.g. user would be u.
Similar to before, we've used our keyword package to define our api package and HelloHandler with a capital to make it public.
We can do something similar for api/v1/goodbye.go:
package api
import (
"net/http"
model "github.com/okeeffed/go-1-22-mux/internal/model"
)
// HelloHandler is a simple HTTP handler that writes a response.
func GoodbyeHandler(w http.ResponseWriter, r *http.Request) {
// Create a new user.
user := model.User{
Name: "World",
}
// Write a response to the client.
w.Write([]byte("Goodbye, " + user.Name + "!"))
}
Configuring our main application
As seen in our Makefile, our main entry point is cmd/server/server.go.
The convention cmd/<app-name>/<app-name>.go is common across larger projects, although you would normally just see a simple main.go at the root directory for small applications.
In our code, we are using Go 1.22's NewServeMux function to serve our routers. We also import v1 to use both our HelloHandler and GoodbyeHandler functions that we wrote.
Running our router
With out Makefile sorted, we can run either make run or simple make to build out our binary hello_world.
For now, run make run.
Once built, our server will be running on port 8080.
To test, we can use curl on another terminal window:
# Test /v1/hello
$ curl http://localhost:8080/v1/hello
Hello, World!%
# Test /v1/goodbye
curl http://localhost:8080/v1/goodbye
Goodbye, World!%
Success!
Conclusion
In today's post, we used the Golang project layout convention to help test drive out the Go 1.22 built-in mux router.
We did this from the process of installing Go on Mac until we had a running server.
]]><![CDATA[Type-safe usage of React as a prop for flexible components]]>https://blog.dennisokeeffe.com/blog/2024-01-03-typescript-react-as-prop-for-flexible-components2024-01-03T00:00:00.000Z2024-01-03T00:00:00.000ZIntroduction
For example, image an API like the the following that will render a span instead of a button.
<Button as="span">I am a span</Button>
But how does this magic work? There are some articles on popular blog posts such as robinwieruch and Developer Way, but I think most miss the mark on how to implement this in a type-safe way.
Let's dive deeper into how we can implement this ourselves (with TypeScript).
Prerequisites
Working knowledge of React.
Working knowledge of TypeScript.
Setting up the Vite project
We will use Vite to spin up a quick project to work with.
In the terminal, run the following:
pnpm create vite@latest blog-react-ts-as-prop --template react-ts
cd blog-react-ts-as-prop
pnpm install
pnpm dev
At this point, you're app should be up and running (mine was at http://localhost:5173/), so we are ready to move forward!
Understanding React.ElementType
As of writing, the definition for this type comes from here.
type ElementType<
P = any,
Tag extends keyof JSX.IntrinsicElements = keyof JSX.IntrinsicElements,
> =
| { [K in Tag]: P extends JSX.IntrinsicElements[K] ? K : never }[Tag]
| ComponentType<P>;
The tl;dr on this section is that ElementType is a type that can be either a ComponentType or a keyof JSX.IntrinsicElements where the keyof JSX.InstrinsicElements can be any valid HTML attribute key e.g. p or button.
This is the magic ingredient for an as prop, so let's implement that now.
Implementing the as prop
Within src/App.tsx, let's create a Button component that will take an as prop near the top of the file.
Great! We have a working as prop. But what about TypeScript? Right now, we can tell our button what component to render, but we cannot actually infer the props so that TypeScript can help at the call site.
Making our types a little more flexible
At this point, we need to dive into generics to help us out.
Side note: I have another post that also works through generics more in-depth.
Our problem is this: we want to be able to pass in a component and have TypeScript infer the props for us.
We can solve this problem by abstracting the button type, introducing React.ComponentPropsWithoutRef and making it generic.
Let's update our Button component to the following:
type ButtonProps<T extends React.ElementType> = T extends React.ElementType
? { as: T } & React.ComponentPropsWithoutRef<T>
: never;
function Button<T extends React.ElementType>({ as, ...props }: ButtonProps<T>) {
const Component = as;
return <Component {...props} />;
}
In the above, we have introduced a generic T that extends React.ElementType. We then use this generic to create a ButtonProps type that will take in a T and return a type that is either the as prop or never.
We then use React.ComponentPropsWithoutRef to infer the props for the T type and then use the as prop to render the component.
Let's test this out by creating a ValidDivComponent that takes in a name prop and then render it with our Button component.
function ValidDivComponent({ name }: { name: string }) {
return <div>{name}</div>;
}
Update the entire file code now to the following:
import React from "react";
import "./App.css";
type ButtonProps<T extends React.ElementType> = T extends React.ElementType
? { as: T } & React.ComponentPropsWithoutRef<T>
: never;
function Button<T extends React.ElementType>({ as, ...props }: ButtonProps<T>) {
const Component = as;
return <Component {...props} />;
}
function ValidDivComponent({ name }: { name: string }) {
return <div>{name}</div>;
}
function App() {
return (
<>
<Button as="p">p tag</Button>
<Button as="button" href="#">
actual button
</Button>
<Button as="a" href="#">
anchor tag
</Button>
<Button as={ValidDivComponent} />
</>
);
}
export default App;
Once you save, you'll notice that we now have two TypeScript errors (this is assuming your IDE is set up to use TypeScript).
Our <Button as="button" href="/"> renders an error because href is not valid.
Our <Button as={ValidDivComponent} /> renders an error because we are missing the name prop.
As an added bonus, you'll notice that our <Button as="a" href="/">anchor tag</Button> component does not render an error as href is a valid prop for an a tag.
Hooray for generics! Now we have a type-safe as prop that we can use to render any component we want.
If we update the App function code, we will be back in business with no errors:
]]><![CDATA[Mounting Your Own Cloud Storage With Cloud Mounter and AWS]]>https://blog.dennisokeeffe.com/blog/2023-11-28-mounting-your-own-cloud-storage-with-cloud-mounter-and-aws2023-11-28T00:00:00.000Z2023-11-28T00:00:00.000ZIntroduction
My partner and I have a few side projects that rely on storage of large video fails. After one too many hard drives failed over time, I decided that we would opt for moving things to cloud storage.
That being said, there were a few issues with doing this using out-of-the-box solutions:
Options like iCloud and Google Drive are not cost-effective for the amount of storage we need.
There was a limit to the amount of storage we could get on a single account.
That being said, we wanted a way to mount storage directly on our machines like we do with external hard drives. This would allow us to use the storage as if it were a local drive.
I was already trialling out SetApp for subscriptions on my Mac, with one such app being Cloud Mounter, an app which fulfills our need of mounting the S3 bucket as a remote drive.
This post will cover how I set up the S3 bucket using AWS CDK and mounted it using Cloud Mounter.
Prerequisites
Working knowledge of AWS CDK.
Working knowledge of AWS S3.
Working knowledge of TypeScript.
Install Node.js and npm (Node Package Manager). AWS CDK requires Node.js. You can download it from the Node.js official website.
If you also want to use CloudMounter, ensure you have a SetApp subscription or have purchased CloudMounter.
This guide will walk you through the steps to set up a new application using the AWS Cloud Development Kit (CDK) in TypeScript, then we will add an S3 bucket that we can mount using Cloud Mounter.
Installation Steps
1. Install AWS CDK
Install the AWS CDK globally using npm:
npm install -g aws-cdk
2. Set Up AWS Credentials
Ensure your AWS credentials are configured:
Install the AWS CLI.
Run aws configure and enter your AWS Access Key ID, Secret Access Key, and default region.
For what it's worth, I use aws-vault to store my different AWS account credentials and work from there.
3. Create a New CDK Project
Create a new CDK project in TypeScript:
# First, create a folder for your project
mkdir mac-cloud-storage-s3-cdk-app
cd mac-cloud-storage-s3-cdk-app
# Initialise the AWS CDK stack
cdk init app --language typescript
# or using npx
npx aws-cdk@latest init app --language typescript
At the time of writing, I am using aws-cdk@2.111.0.
Development
1. Explore and Modify Your CDK App
The main file for defining AWS resources is lib/<your-project-name>-stack.ts.
If you followed the same project folder name that I did, you will find the code within lib/mac-cloud-storage-s3-cdk-app-stack.ts.
2. Bootstrap Your AWS Environment (if necessary)
Bootstrap your environment to set up an S3 bucket for storing assets:
npx cdk bootstrap
3. Deploy Your CDK App
We are not ready quite yet, but you could now deploy your AWS CDK app by running:
npx cdk deploy
Configuring the S3 Bucket and credentials
Update the code in lib/mac-cloud-storage-s3-cdk-app-stack.ts to the following:
import * as cdk from "aws-cdk-lib";
import { Construct } from "constructs";
import * as s3 from "aws-cdk-lib/aws-s3";
import * as iam from "aws-cdk-lib/aws-iam";
export class MacCloudStorageS3CdkAppStack extends cdk.Stack {
constructor(scope: Construct, id: string, props?: cdk.StackProps) {
super(scope, id, props);
const bucket = new s3.Bucket(this, "IntelligentTieringBucket", {
lifecycleRules: [
{
id: "IntelligentTieringRule",
enabled: true,
transitions: [
{
storageClass: s3.StorageClass.INTELLIGENT_TIERING,
transitionAfter: cdk.Duration.days(0), // Transition immediately to Intelligent-Tiering
},
],
},
],
});
const user = new iam.User(this, "MyBucketUser");
// Policy allowing access to the specific bucket
const bucketPolicy = new iam.PolicyStatement({
actions: ["s3:*"],
resources: [bucket.bucketArn, `${bucket.bucketArn}/*`],
effect: iam.Effect.ALLOW,
});
// Attach the policy to the user
user.addToPolicy(bucketPolicy);
// Output the username
new cdk.CfnOutput(this, "UserNameOutput", {
value: user.userName,
description: "The name of the IAM user",
});
// Output the bucket name
new cdk.CfnOutput(this, "BucketNameOutput", {
value: bucket.bucketName,
description: "The name of the S3 bucket",
});
}
}
The construct has comments jotted throughout to denote what is happening, but as a summary:
We create a new S3 bucket with a lifecycle rule that will transition files to the Intelligent-Tiering storage class immediately.
We create a new IAM user and attach a policy that allows access to the bucket.
We output the username and bucket name to the console.
Generating Credentials For The Created User
In AWS, best practices dictate that you should never display or expose IAM user credentials (like Access Keys) in clear text, especially in your infrastructure code or logs. This is to maintain security and prevent unauthorized access.
However, if you need to create and retrieve IAM user credentials, such as for a newly created user in an automated fashion, you can do this carefully through the AWS Management Console or programmatically using the AWS SDK or CLI. Here's a general approach:
Using AWS Management Console
Navigate to IAM: Log into the AWS Management Console and go to the IAM service.
Find the User: Go to the 'Users' section and find the user you created.
Create Access Key:
Select the user.
In the 'Security credentials' tab, you can create an access key by clicking the "Create access key" button.
This will provide you with the Access Key ID and Secret Access Key. Make sure to download or copy these credentials, as the Secret Access Key won't be shown again.
Using AWS CLI or SDK
Install AWS CLI or SDK: If not already installed, install the AWS CLI or configure the AWS SDK in your preferred programming language.
Use CLI or SDK to Create Access Key:
With the AWS CLI, you can run a command to create a new access key for a user.
The command aws iam create-access-key --user-name <username> will output the Access Key ID and Secret Access Key.
Programmatically, you can use the corresponding function in the AWS SDK of your choice.
Handling Credentials Securely
Never Hardcode Credentials: Avoid hardcoding credentials in your code or CDK scripts.
Store Securely: If you must store these credentials, use a secure method like AWS Secrets Manager or another encrypted storage solution.
Use IAM Roles: For applications running on AWS services (like EC2, Lambda), prefer to use IAM roles for granting permissions. This avoids the need to manage and rotate access keys.
CDK Consideration
AWS CDK does not have built-in mechanisms to handle the creation and retrieval of IAM user credentials because of the security implications. You should handle such operations outside of your infrastructure as code, ensuring that any sensitive data is securely managed.
Follow whichever approach works best, but in my case, I simply used the CLI to generate the credentials and jot them down somewhere safe for the next part.
Connecting Using CloudMounter
The final part is quite trivial.
Open CloudMounter and you will see a screen like the following:
CloudMounter
Click on the + button and select Amazon S3 from the list of options. This will lead you to a screen where you can input the bucket name, username, access key and secret key.
CloudMounter S3 option
Once you have filled in the details, click Mount and you will be able to access the bucket as if it were a local drive through Finder.
CloudMounter drive on Finder
You now have a connection to the S3 drive that you can use as external storage. Happy days!
Final Considerations
AWS CDK uses AWS CloudFormation to provision resources.
Be aware of AWS costs associated with the resources you deploy.
If you know the expectation or lifecycle of the resources you create, you can set up a deletion policy to automatically delete resources or manually handle transitions instead of the intelligent tiering.
If you do not require the stack that we created today, be sure to tear it down with cdk destroy.
]]><![CDATA[Using Prisma For Migrations And DrizzleORM For Querying]]>https://blog.dennisokeeffe.com/blog/2023-11-29-prisma-migrations-drizzle-orm-querying copy2023-11-28T00:00:00.000Z2023-11-28T00:00:00.000ZIntroduction
I love the Prisma developer experience, but some of the performance issues have left things to be desired.
I wanted to experiment a bit more with DrizzleORM and see how it compared to Prisma. I also wanted to see how easy it was to migrate from Prisma to DrizzleORM.
This post will look at the idea of using Prisma for migrations and DrizzleORM for the application after using introspection on the database. I won't speculate too much on the DX (developer experience) of doing things this way, but it may be a useful experiment that is worth sharing.
Prerequisites
Working knowledge of Prisma.
Working knowledge of DrizzleORM.
Working knowledge of NextJS (we are simply using that as a layer to run the code).
This post assumes that you have a working configuration of Postgres set up on your machine.
There will be a few prompts. Chose whatever you like here.
Afterwards, change into the directory and install the following dependencies:
cd demo-prisma-migrate-drizzle-introspection
# For Prisma
pnpm add prisma@latest
# We then initialize Prisma
pnpx prisma init
# For DrizzleORM
pnpm add drizzle-orm
# For Drizzle Kit (used for introspections)
pnpm add -D drizzle-kit
# Install the lib to connect with postgres
pnpm add postgres pg
Configuring Prisma
We are going to update the schema for a basic blog application. We will have an Author and Post model.
Update prisma/schema.prisma to the following:
// This is your Prisma schema file,
// learn more about it in the docs: https://pris.ly/d/prisma-schema
generator client {
provider = "prisma-client-js"
}
datasource db {
provider = "postgresql"
url = env("DATABASE_URL")
}
// Model for Author
model Author {
id String @id @default(cuid())
name String
email String @unique
posts Post[]
}
// Model for Post
model Post {
id String @id @default(cuid())
title String
content String?
published Boolean @default(false)
authorId String
author Author @relation(fields: [authorId], references: [id])
}
At this stage, I am assuming you already have a Postgres database set up (as per the prerequisites).
In production instances, do not inline everything into one page like I have done for the spike. In practice, you will likely want to abstract out the database connection and queries into a separate file and maybe take advantage of server actions.
Something worth noting is that where Prisma uses ?schema=public, Drizzle uses ?search_path=public.
At this point, you should be able to run the application and see the authors displayed on the page.
Running The Application
To run the application, run the following:
pnpm dev
Head to the browser and go to http://localhost:3000 (or whatever port is provided in the console).
You should see the authors displayed on the page.
Home page
Conclusion
In this post, we have looked at how we can use Prisma for migrations and DrizzleORM for querying the database using Drizzle Kit introspection.
]]><![CDATA[Node.js --prof and --process-prof flags]]>https://blog.dennisokeeffe.com/blog/2023-10-27-nodejs-profile-flag2023-10-27T00:00:00.000Z2023-10-27T00:00:00.000ZIntroduction
Node.js --prof and --process-prof flags allow you to profile your Node.js application to identify performance bottlenecks.
The --prof and --prof-process flags in Node.js provide a streamlined way to profile the performance of a JavaScript program. Here are some scenarios and advantages of using these flags:
Performance Analysis:
Identify Bottlenecks: Easily find performance bottlenecks in your code by identifying functions or operations that consume the most CPU time.
Optimize Code: By identifying hot spots, you can focus your optimization efforts where they will have the most impact.
Simplicity:
Easy to Use: The --prof and --prof-process flags are straightforward to use, making it easy to generate and process profiling data without a steep learning curve.
Quick Setup: There's no need for additional setup or external tools; you can start profiling your application with just a couple of commands.
Low Overhead:
Minimal Impact: The --prof flag enables a sampling profiler, which has relatively low overhead compared to instrumenting profilers. This allows for profiling in scenarios where minimizing performance impact is crucial.
Cross-platform Profiling:
Platform Agnostic: The profiling is built into the Node.js runtime, making it a cross-platform solution that works on various operating systems and environments.
Offline Analysis:
Post-Execution Analysis: The --prof-process flag allows for offline processing of profiling data, which can be beneficial for analyzing performance post-execution, sharing profiling data with others, or archiving for later analysis.
Built-in Tooling:
Integrated with V8: The profiling flags leverage the built-in V8 profiler, ensuring tight integration with the JavaScript engine powering Node.js.
Baseline Profiling:
Initial Assessment: It's a good starting point for performance analysis before possibly moving to more sophisticated profiling tools if necessary.
Learning and Education:
Understanding Performance: It's a useful tool for learning about the performance characteristics of JavaScript and the Node.js runtime, especially for educational purposes or self-learning.
However, while --prof and --prof-process provide valuable insights, they might lack some of the more advanced features, user-friendly interfaces, and detailed visualizations offered by other profiling tools and environments such as Chrome DevTools. Depending on the depth of analysis and the level of detail required, developers might choose to use these flags for quick performance assessments or opt for more advanced profiling tools for deeper analysis.
It is important to note that these flags are not the same as the --inspect flag, which opens a debugging session that allows for more interactive profiling and debugging using DevTools.
Profiling Using --prof and --prof-process Flags
The --prof flag enables V8's built-in sampling CPU profile. Here's how you would use the --prof and --prof-process flags to profile your Node.js application:
Enable Profiling: Run your Node.js script with the --prof flag to generate a log file containing profiling data.
NODE_ENV=production node --prof script.js
This will create a file named isolate-0xnnnnnnnnnnnn-v8.log (the nnnnnnnnnnnn part will be different each time).
Note: it's recommended to run your script in production mode to avoid unnecessary overhead from development-related features.
Process the Profiling Data: Use the --prof-process flag to process the log file and generate a human-readable report.
This will create a file named processed-profile.txt containing the processed profiling data.
Analyze the Data: Open processed-profile.txt and review the profiling data to understand where most of the CPU time is being spent in your script. You'll see function names, file names, and the number of ticks spent in each function.
[Summary]:
ticks total nonlib name
100 10.0% 10.5% JavaScript
90 9.0% 9.5% C++
10 1.0% 1.1% GC
20 2.0% Shared libraries
780 78.0% Unaccounted
[Bottom up (heavy) profile]:
Note: percentage shows a share of a particular caller in the total
amount of its parent calls.
Callers occupying less than 1.0% are not shown.
ticks parent name
^^^^^ ^^^^^^ ^^^^^^^^
Comparison with --inspect Profiling
Type of Profiling:
--prof and --prof-process: These flags enable and process sampling CPU profiling.
--inspect: This flag opens a debugging session which allows for more interactive profiling and debugging using DevTools.
Ease of Use:
--prof and --prof-process: These flags are straightforward for generating and processing profiling data quickly.
--inspect: This may require a bit more setup, but offers a richer, more interactive profiling experience through DevTools.
Detail Level:
--prof and --prof-process: These provide a high-level overview of where time is being spent in your script.
--inspect: This provides a more detailed and interactive view, allowing you to drill down into call stacks, view memory allocation, and more.
Output:
--prof and --prof-process: Output is a text-based report.
--inspect: Output is viewed in a graphical interface, providing visual insights and allowing for more in-depth analysis.
Example: Profiling a Node.js Application
We are going to use the --prof and --prof-process approach with a de-optimized getUniqueElements function example.
To get started, we will create two files script-slow.js and script-fast.js to compare profile results.
touch script-slow.js script-fast.js
1. Create Your Script:
Add the following to the script-slow.js file:
function getUniqueElements(arr) {
let uniqueArr = [];
for (let i = 0; i < arr.length; i++) {
let isUnique = true;
for (let j = 0; j < uniqueArr.length; j++) {
if (arr[i] === uniqueArr[j]) {
isUnique = false;
break;
}
}
if (isUnique) {
uniqueArr.push(arr[i]);
}
}
return uniqueArr;
}
// Create a large array to amplify the issue
const largeArr = Array(10000)
.fill()
.map((_, idx) => idx % 100);
const uniqueArr = getUniqueElements(largeArr);
console.log(uniqueArr.length); // Output: 100
2. Run the Profiler:
Run the script with the --prof flag to generate a profiling log:
node --prof script-slow.js
3. Process the Profiling Data:
After running the script, you'll find a log file named isolate-0xnnnnnnnnnnnn-v8.log in your directory. Process this log file using the --prof-process flag:
Open the processed-profile.txt file and look for the getUniqueElements function. You'll be able to see the number of ticks spent in this function, which represents the amount of time spent executing it.
// ... other parts of the profile
ticks parent name
^^^^ ^^^^^^ ^^^^^^^^^^^^^^^^^^^^^^^^^^
... ...% getUniqueElements ...
// ... other parts of the profile
This simplified analysis should give you an idea of the time spent in the getUniqueElements function, indicating a performance bottleneck.
The biggest thing takeaway that we are going to demonstrate for the slow script is the fact that getUniqueElements shows up at all in this profile.
In this de-optimized version of getUniqueElements, the logic for checking uniqueness is implemented in JavaScript within your function. Before elaborating more on this, let's add the optimized version.
Optimized Version
Add the following to the script-fast.js file:
function getUniqueElements(arr) {
return [...new Set(arr)];
}
// Create a large array to amplify the issue
const largeArr = Array(10000)
.fill()
.map((_, idx) => idx % 100);
const uniqueArr = getUniqueElements(largeArr);
console.log(uniqueArr.length); // Output: 100
In this code, we are using the Set data structure to get unique elements from the array. This and the array spread are both native JavaScript features, so the logic is implemented in C++ and executed by the JavaScript engine.
Follow a similar process from steps 2 to 4 to profile the optimized version of the script.
Once this is done, you'll notice something peculiar in the processed-process.txt file - the getUniqueElements function is no longer present in the profiling data.
This is because the logic for getting unique elements is implemented in C++ and executed by the JavaScript engine, so it doesn't show up in the profiling data.
In fact, JavaScript is 0% of the total ticks in the optimized version of the script:
[Summary]:
ticks total nonlib name
0 0.0% 0.0% JavaScript
137 68.8% 99.3% C++
1 0.5% 0.7% GC
61 30.7% Shared libraries
1 0.5% Unaccounted
Compared that to what happened prior:
[Summary]:
ticks total nonlib name
1 0.9% 1.2% JavaScript
81 73.0% 96.4% C++
1 0.9% 1.2% GC
27 24.3% Shared libraries
2 1.8% Unaccounted
A More Detailed Analysis
When you optimize the getUniqueElements function by using the Set object, the bulk of the work is offloaded to the underlying Node.js or V8 engine implementations which are highly optimized. The Set object is part of the ECMAScript standard and its operations are implemented in native code within the V8 engine, which powers Node.js. This native code is optimized for performance and is compiled to machine code, making operations like adding elements to a set or checking for uniqueness very fast.
In the de-optimized version of getUniqueElements, the logic for checking uniqueness is implemented in JavaScript within your function. This logic involves nested loops, which have a time complexity of O(n^2) in the worst case. This is why the function shows up in the profiling data when using the --prof and --prof-process flags - the JavaScript engine spends a significant amount of time executing this function.
On the other hand, in the optimized version of getUniqueElements, the logic for checking uniqueness is handled by the Set object, which likely has a time complexity closer to O(n) or even better for these operations due to its native, optimized implementation. As a result, the getUniqueElements function itself does very little work – it merely creates a new Set object and then creates an array from that set. The heavy lifting is done by native code within the V8 engine, outside of the JavaScript execution environment.
When profiling, the --prof and --prof-process flags are capturing the CPU time spent executing JavaScript code. Since the optimized getUniqueElements function offloads most of the work to native code, the function itself consumes very little CPU time in the JavaScript execution environment, and hence, may not show up in the profiling data or may show up with a significantly reduced number of ticks compared to the de-optimized version.
hyperfine --warmup 10 --runs 100 'NODE_ENV=production node ./script-slow' 'NODE_ENV=production node ./script-fast'
Benchmark 1: NODE_ENV=production node ./script-slow
Time (mean ± σ): 84.0 ms ± 42.8 ms [User: 51.8 ms, System: 13.8 ms]
Range (min … max): 54.5 ms … 343.4 ms 100 runs
Warning: Statistical outliers were detected. Consider re-running this benchmark on a quiet system without any interferences from other programs. It might help to use the '--warmup' or '--prepare' options.
Benchmark 2: NODE_ENV=production node ./script-fast
Time (mean ± σ): 71.7 ms ± 18.9 ms [User: 47.2 ms, System: 13.3 ms]
Range (min … max): 49.7 ms … 238.2 ms 100 runs
Warning: Statistical outliers were detected. Consider re-running this benchmark on a quiet system without any interferences from other programs. It might help to use the '--warmup' or '--prepare' options.
Summary
NODE_ENV=production node ./script-fast ran
1.17 ± 0.67 times faster than NODE_ENV=production node ./script-slow
Take this with a grain of salt. Our implementation would only make significant impacts over a large number of iterations. This is just to show that the optimized version is faster.
Conclusion
In summary, the --prof and --prof-process flags provide a quick and easy way to identify performance bottlenecks, while --inspect provides a more interactive and detailed profiling experience.
We did this using two versions of a getUniqueElements function, one that was de-optimized and one that was optimized. The de-optimized version showed up in the profiling data due to its implementation details, while the optimized version did not.
At the very least, it is a good reminder that we should opt to use the built-in features of JavaScript and Node.js where possible, as they are likely expected to be more performant than our own implementations.
For a more real-world scenario, you may want to consider exploring other profiling tools or libraries that provide a more detailed and visual representation of the profiling data, such as the Chrome DevTools, node-inspect, or others. Depending on your needs and the level of detail required, you may choose one approach over the other.
]]><![CDATA[Explaining CJS vs AMD vs UMD vs ESM]]>https://blog.dennisokeeffe.com/blog/2023-10-26-explaining-cjs-vs-amd-vs-umd-vs-esm2023-10-26T00:00:00.000Z2023-10-26T00:00:00.000ZIntroduction
Something that I think we can all agree on though is our mutual hurt for the module system. Since ES6 (or even before...), the pain has mainly been felt by library maintainers, with the majority of pain being abstracted behind bundlers and transpilers.
However, as the ecosystem has continued to grow (along with ways to support these module systems), it is no longer just library maintainers that feel the pain. It is now also developers who are trying to understand the differences between each module system, how to use them and wtf is happening when you see that dreaded ERR_REQUIRE_ESM message and attempt padding it over with a "type": "module" file extension in package.json to only find out it does not work and you do not truly understand why.
If you are yet to truly understand their differences, then do not despair: this post is for you (and me when I inevitably forget how it works again).
We will explore the module types, follow that up with understanding how package.json and file extensions affect Node.js and then finish on how bundlers have abstracted away the pain for us mere non-library maintainers for so long.
What Are CJS, AMD, UMD, and ESM?
CommonJS (CJS), Asynchronous Module Definition (AMD), Universal Module Definition (UMD) and ES Modules (ESM) are all module systems in JavaScript, allowing developers to organize and structure their code better.
Let's break down each, then demonstrate how to use them in Node.js and with (and without) bundlers like Webpack and Rollup.
CJS (CommonJS)
Introduced for use in Node.js.
Synchronous require and module.exports for importing/exporting.
Synchronous vs. Asynchronous: CJS is synchronous while AMD is asynchronous. UMD can handle both.
Environment: CJS is mainly for Node.js, AMD is for browsers, UMD is universal, and ESM is the new standard for both browser and server.
Syntax: Different keywords and approaches (e.g., require vs. import).
Static vs. Dynamic: ESM is static (better for tree shaking and optimization), while others like CJS are dynamic.
With the growing adoption of ES6 and beyond, ESM is becoming the most commonly used module system, especially with build tools and bundlers like Webpack and Rollup which can handle various module systems and transpile them to a chosen format.
Node.js: Using CJS or ESM
As you may have grokked from above, CJS comes from Node.js, and both UMD and ESM since have been approaches to unify the browser and server.
With the introduction of ESM in ES6, Node.js has been working on supporting it natively.
There are few ways to tell Node.js which module system to use. In Node.js, the module system (CommonJS vs. ESM) can be determined by either the file extension or by specifying the module type in the package.json file.
1. By File Extension
.mjs: By using the .mjs extension, you tell Node.js to treat the file as an ES module, regardless of other settings.
.cjs: This extension forces Node.js to treat the file as a CommonJS module.
2. Specifying "type" within package.json
"type": "module": By adding this line to your package.json, you inform Node.js to treat .js files in your project as ESM.
For example:
{
"type": "module"
}
If you don't specify the "type": "module" entry (or if it's set to "commonjs"), then .js files are treated as CommonJS modules by default.
3. Dynamic Import
Regardless of the module system in place, you can always use dynamic imports in Node.js to load ESM:
Important note: If you're using "type": "module" in your package.json, but still need to include a CommonJS file, you can use the .cjs extension for that specific file.
Using Bundlers Like Webpack and Rollup
When you're using bundlers like Webpack or Rollup, you generally don't need to specify the module type via file extension or package.json for the following reasons:
Bundlers Handle Module Resolution: Tools like Webpack and Rollup have their own mechanisms to resolve and bundle modules. They can handle a mix of module types (CJS, ESM, AMD, etc.) and transpile them into a format of your choice.
Configuration Files: These bundlers come with configuration files (webpack.config.js for Webpack and rollup.config.js for Rollup) where you define how modules are resolved, loaded, and bundled. You have extensive control over the bundling process, including specifying loaders, plugins, and output formats.
Transpilers: Often, bundlers are used in tandem with transpilers like Babel. With Babel, you can use the latest ECMAScript features and transpile them down to a version compatible with your target environments. This also allows you to write in ESM and then compile to CJS or another format if needed.
Let's create a simple example where we have an ES module and want to bundle it using Webpack and Rollup to output it in a different format (e.g., CommonJS).
Directory Structure:
src/
|- index.js
In index.js:
export const greet = () => {
console.log("Hello from the module!");
};
In our example above, the code is written in ESM. We want to bundle it using Webpack + Babel and Rollup + Babel and output it in CommonJS format to demonstrate how bundlers can handle module resolution and transpilation.
Example: Webpack
For a working Webpack example, we first need to install the necessary dependencies for Webpack and Babel and create a configuration file.
# Install Necessary Dependencies
npm install --save-dev webpack webpack-cli babel-loader @babel/core @babel/preset-env
# Create a `webpack.config.js` in the root
touch webpack.config.js
Inside of webpack.config.js:
const path = require("path");
module.exports = {
entry: "./src/index.js",
// This tells Webpack to output the bundle in CommonJS format into the `dist` folder as `bundle.js`
output: {
filename: "bundle.js",
path: path.resolve(__dirname, "dist"),
libraryTarget: "commonjs2",
},
module: {
rules: [
{
// This targets all `.js` files in the project
test: /\.js$/,
exclude: /node_modules/,
use: {
loader: "babel-loader",
options: {
presets: ["@babel/preset-env"],
},
},
},
],
},
};
Finally, you can run the bundler:
npx webpack
You'll get a bundle.js in the dist folder, which is in CommonJS format.
Example: Rollup
Like the previous Webpack example, we first need to install the necessary dependencies for Rollup and Babel and create a configuration file.
# Install Necessary Dependencies
npm install --save-dev rollup @rollup/plugin-node-resolve @rollup/plugin-babel @babel/core @babel/preset-env
# Create a `rollup.config.js` in the root
touch rollup.config.js
Inside of rollup.config.js, we can put the following:
Again, you'll get a bundle.js in the dist folder, which is in CommonJS format.
In both examples, we're using Babel to transpile our code. The configurations above will take the ES module from src/index.js, transpile it using Babel to make it compatible with older JavaScript versions, and bundle it in CommonJS format in the dist folder.
This example specifically demonstrated valid ESM code in a .js file and outputting it to valid CJS in another .js file, but you can use the same approach to bundle other module types (e.g., AMD, UMD, etc.) and output them in a format of your choice.
A Worthy Mention About Bundlers
However, there are a few things to keep in mind:
If you're developing a library or a package that you want to publish to npm, and you want it to be usable both in Node.js and in the browser, you might still consider specifying module types or providing both CJS and ESM builds.
Even if you're using a bundler, your Node.js specific code (like server-side code or scripts) that isn't being bundled might still require you to specify module types based on how you intend to use modules.
While using a bundler, the need to specify module type via file extension or package.json becomes less critical for the bundled output. However, depending on your project's structure and target environments, there might still be scenarios where you'd specify module types.
This may be why, if you've been using more recent versions of Node, you've seen .cjs or .mjs file extensions (particularly for configuration files), you may have been confused about how they fit into the process when there is still a bundler targets other files for transpiling (such as .ts, .tsx, or more confusingly, other .js files).
Conclusion
In this post, we covered the different module systems in JavaScript, how to use them in Node.js, and how bundlers like Webpack and Rollup can handle them.
It's not a fire blanket to douse the fire (the ecosystem is much bigger than this), but it will cover you up at night and help you sleep a little easier.
As Node.js continues to evolve, it's always a good idea to consult the official documentation to understand the current behavior and best practices regarding modules.
Finally, while not covered, understanding this will also help you as alternative JavaScript runtimes such as Deno and Bun implement the solutions around the module system and continue their march forward in this space.
]]><![CDATA[Mastering API Testing with Supertest, Express.js, and Jest]]>https://blog.dennisokeeffe.com/blog/2023-10-27-testing-express-apps-with-jest-and-supertest2023-10-26T00:00:00.000Z2023-10-26T00:00:00.000ZIntroduction
Supertest is a highly efficient and flexible testing library designed for testing HTTP assertions.
Working hand in hand with frameworks like Express.js, Supertest makes it easy to write assertions for your APIs, ensuring they respond as expected. Coupled with Jest, a delightful JavaScript Testing Framework with a focus on simplicity, you can ensure that your APIs are robust and reliable. In this tutorial, we will dive into setting up a simple Express.js application and write tests using Supertest and Jest.
In this blog post, we will set up a basic Express app and write tests using Supertest and Jest.
At first, the tests will be straight forward on validating the response status. Then, we will dive into asserting the response body and its values.
All code from today can be found remotely on this repo.
Setting Up The Repository
Before we dive into writing our application and tests, we need to set up our repository. Here are the steps to do that:
# Create a new directory for your project
mkdir demo-express-jest-supertest
cd demo-express-jest-supertest
# Initialize a new Node.js project
pnpm init
# Install necessary dependencies
pnpm i express
pnpm i -D jest supertest
Once our repository is set up, we can start writing our application and tests.
Crafting The Demo Express App
Let's build a simple Express.js application to demonstrate how we can test it using Supertest and Jest.
Firstly, create a new file app.js at the root of the project directory using touch app.js and add the following:
// app.js
// 1. Require express
const express = require("express");
// 2. Create the new express app instance for our API
const app = express();
// 3. Define the route for the GET /greet endpoint
app.get("/greet", (req, res) => {
const name = req.query.name || "World";
res.json({ message: `Hello, ${name}!` });
});
// 4. Export the app for testing later
module.exports = app;
In the above code, we add the following:
We require the express module.
We create a new instance of the Express app.
We define a route for the GET /greet endpoint that returns a JSON response with a message property.
We export the app instance for testing later.
This will set up our baseline Express app, but it does not start the server. If we want to do that, we need to create a new file server.js at the root of the project directory using touch server.js and add the following:
// 1. Import our app from the app.js file
const app = require("./app");
// 2. Start the server on port 3000
app.listen(3000, () => {
console.log("Server is running on port 3000");
});
At this point, we could run our app using node server.js on the terminal and test it using a tool like curl or Postman.
To confirm, we can run curl http://localhost:3000/greet on the terminal and get the following response:
At this point, we are ready to write our first tests. You can stop running the server in the first terminal using Ctrl + C and move onto the next section.
Writing Tests with Supertest and Jest
Now that we have our Express app ready, it's time to write some tests to assert the response and value of the body.
First, create a new file app.test.js at the root of the project directory using touch app.test.js and add the following:
// app.test.js
const request = require("supertest");
const app = require("./app");
describe("GET /greet", () => {
it("should greet the world when no name is provided", async () => {
const res = await request(app)
.get("/greet")
.expect("Content-Type", /json/)
.expect(200);
expect(res.body.message).toBe("Hello, World!");
});
it("should greet the user when a name is provided", async () => {
const res = await request(app)
.get("/greet?name=John")
.expect("Content-Type", /json/)
.expect(200);
expect(res.body.message).toBe("Hello, John!");
});
});
In the code above, we are using Supertest to send HTTP requests to our app and Jest to write and run the test assertions.
The expect method is used to check the response status and headers, while Jest's expect function is used to assert the value of the response body.
Running The Tests
To run the tests, let's jump into the package.json file that was initialized with pnpm init and update the scripts > test property to the following:
{
"scripts": {
"test": "jest"
}
}
You can now run pnpm test to run the tests. You should see the following output:
$ pnpm test
> demo-express-jest-supertest@1.0.0 test /Users/dennisokeeffe/code/projects/demo-express-jest-supertest
> jest
Determining test su
PASS ./app.test.js
GET /greet
✓ should greet the world when no name is provided (45 ms)
✓ should greet the user when a name is provided (14 ms)
Test Suites: 1 passed, 1 total
Tests: 2 passed, 2 total
Snapshots: 0 total
Our tests are passing, happy days!
Conclusion
This setup provides a solid foundation to further explore and understand the capabilities of Supertest, Express.js, and Jest in the realm of API testing. As you delve deeper, you'll discover the power and flexibility this combination offers to ensure the reliability and correctness of your APIs.
We demonstrated how to set up a basic Express.js application and write tests using Supertest and Jest. We started with simple tests to assert the response status and then moved onto asserting the response body and its values.
Supertest can be used for far more things than I demonstrated in today's post. It is also great for asserting headers, cookies, and more. I encourage you to check out the Supertest documentation.
]]><![CDATA[Diving Into Typescript's Type System: Type Operators]]>https://blog.dennisokeeffe.com/blog/2023-06-26-diving-into-typescripts-type-system-type-operators2023-06-26T00:00:00.000Z2023-06-26T00:00:00.000ZIntroduction
TypeScript, a statically typed superset of JavaScript, introduces several advanced type operators that can significantly improve your code's reliability and predictability. Among these powerful tools, keyof, index types, and index signatures stand out for their versatility and utility. In this post, we will deep-dive into these type operators, demonstrating their usage with practical examples that you can try out in the TypeScript Playground.
TypeScript keyof
The keyof operator in TypeScript can be used to create a type representing the property names of another type.
Here's a simple illustration:
type Person = {
name: string;
age: number;
};
type PersonKeys = keyof Person; // "name" | "age"
In the above example, PersonKeys is a type that represents the keys of Person - i.e., name and age.
Now, let's leverage the keyof operator in a function:
function getProperty<T, K extends keyof T>(obj: T, key: K): T[K] {
return obj[key];
}
const person: Person = {
name: "John",
age: 30,
};
console.log(getProperty(person, "name")); // "John"
In the getProperty function, T is the type of object, and K extends keyof T, meaning it has to be a key of the object type T. The function returns a property of the object of type T[K].
TypeScript Index Types
Index types are a powerful feature of TypeScript that allow you to create types dynamically based on other types.
Here's a basic example:
type Person = {
name: string;
age: number;
};
type ValueOf<T> = T[keyof T];
type PersonValues = ValueOf<Person>; // string | number
In this example, ValueOf<T> represents the type of values that the properties of T can have. In this case, PersonValues is a type representing any value a Person can have - i.e., string or number.
A practical example involving index types might look like this:
In the function getValues, it returns an array of values of type ValueOf<T>[], which represents an array of any values that the properties of T can have.
TypeScript Index Signatures
TypeScript index signatures allow you to declare types for object properties with unknown names.
In the above example, StringDictionary is an interface with an index signature that indicates that when a StringDictionary is indexed with a string, it will return a string.
A more complex, practical use-case might involve manipulating a data structure:
In this example, RecordKeeper<T> is an interface with an index signature. It is a generic type, allowing any type to be stored in the record. The addRecord function adds a Person to the record with a particular ID.
Summary
In TypeScript, keyof, index types, and index signatures are powerful tools that allow you to interact with the structure of types, offering a degree of dynamism and precision to your type definitions. These type operators provide ways to enhance your TypeScript projects, making them more type-safe and robust.
Remember, it's crucial to understand your tools to make the most out of them. So, take the time to explore these concepts, experiment with them on the TypeScript Playground, and watch your TypeScript proficiency grow.
]]><![CDATA[Typescript And Promises: Conquering Asynchronous Programming]]>https://blog.dennisokeeffe.com/blog/2023-06-25-typescript-and-promises-conquering-asynchronous-programming2023-06-25T00:00:00.000Z2023-06-25T00:00:00.000ZThis post will is 11 of 20 for my series on intermediate-to-advance TypeScript tips.
TypeScript, a statically typed superset of JavaScript, has brought a new level of robustness to web development. One of the areas where TypeScript shines is in handling asynchronous programming, particularly with Promises. This blog post will explore how TypeScript and Promises work together to conquer asynchronous programming, providing you with practical examples that you can try out on the TypeScript Playground.
This is a basic example of a Promise in TypeScript. A Promise is an object that represents the eventual completion or failure of an asynchronous operation. In this case, we create a new Promise that resolves with a string after 2 seconds. The then method is used to specify what should happen when the Promise is resolved.
Example 2: Promise with Error Handling
let promise = new Promise<string>((resolve, reject) => {
setTimeout(() => {
reject("Promise rejected!");
}, 2000);
});
promise
.then((value) => {
console.log(value);
})
.catch((error: unknown) => {
console.error(error);
// We can type narrow to handle different error types
if (error instanceof Error) {
console.log(error.message); // we now know this is of type `Error` with the message property
}
});
This example is similar to the previous one, but with one key difference: instead of resolving the Promise, we reject it. This simulates an error occurring during the asynchronous operation. We use the catch method to specify what should happen if the Promise is rejected.
In the example, I an also using type narrowing to handle different error types. This is a powerful feature of TypeScript that allows you to write code that is more robust and easier to maintain. See more on type narrowing in my blog post here.
With errors, it is better to set the type to unknown and use narrowing to handle the different types of errors that can occur.
This example demonstrates Promise chaining. After the first Promise (promise1) is resolved, its result is passed to the next Promise in the chain (promise2). This allows you to perform multiple asynchronous operations in a specific order.
Example 4: Promise.all
let promise1 = new Promise<string>((resolve, reject) => {
setTimeout(() => {
resolve("Promise 1 resolved!");
}, 2000);
});
let promise2 = new Promise<number>((resolve, reject) => {
setTimeout(() => {
resolve(2);
}, 3000);
});
Promise.all([promise1, promise2]).then((values) => {
// `values` is type [string, number]
console.log(values);
});
This example demonstrates the use of Promise.all. This method takes an array of Promises and returns a new Promise that resolves when all of the input Promises have resolved. The result is an array of the values that the input Promises were resolved with.
It understands the return type as provided by the generic, so we can use the values as we would expect (in this case it is [string, number]).
Summary
Promises are a powerful tool for handling asynchronous operations in TypeScript. They allow you to write code that is easier to understand and reason about, especially when dealing with complex asynchronous workflows. Whether you're fetching data from an API, reading a file from disk, or waiting for a timer to finish, Promises can help you manage these operations in a robust and efficient manner.
]]><![CDATA[Typescript And Functional Programming]]>https://blog.dennisokeeffe.com/blog/2023-06-24-typescript-and-functional-programming2023-06-24T00:00:00.000Z2023-06-24T00:00:00.000ZThis post will is 10 of 20 for my series on intermediate-to-advance TypeScript tips.
Functional programming is a programming paradigm that treats computation as the evaluation of mathematical functions and avoids changing state and mutable data. In the world of JavaScript and TypeScript, functional programming concepts have become increasingly popular due to their ability to make code more readable, maintainable, and testable.
One of the key concepts in functional programming is the use of higher-order functions. A higher-order function is a function that takes one or more functions as arguments, returns a function, or both. This post will explore how to leverage higher-order functions in TypeScript.
Practical Example: Using map Function
Let's start with a simple example of a higher-order function that you've likely used before: the map function. Here's how you might use it in TypeScript:
let numbers = [1, 2, 3, 4, 5];
let squares = numbers.map((num) => num * num);
console.log(squares); // Output: [1, 4, 9, 16, 25]
In this example, map is a higher-order function that takes a function as an argument. This function is applied to each element in the numbers array, and a new array is returned.
Expanding the Example: Creating a Custom map Function
Now, let's create our own version of the map function. This will help us understand how higher-order functions work under the hood.
function map<T, U>(array: T[], transform: (value: T) => U): U[] {
let result: U[] = [];
for (let value of array) {
result.push(transform(value));
}
return result;
}
let numbers = [1, 2, 3, 4, 5];
let squares = map(numbers, (num) => num * num);
console.log(squares); // Output: [1, 4, 9, 16, 25]
In this example, we've defined a map function that takes an array and a transform function as arguments. The transform function is applied to each element in the array, and the results are collected into a new array.
Complex Example: Using reduce to Implement map
Now, let's take things a step further by implementing our map function using another higher-order function: reduce.
function map<T, U>(array: T[], transform: (value: T) => U): U[] {
return array.reduce((result, value) => {
result.push(transform(value));
return result;
}, [] as U[]);
}
let numbers = [1, 2, 3, 4, 5];
let squares = map(numbers, (num) => num * num);
console.log(squares); // Output: [1, 4, 9, 16, 25]
In this example, reduce is a higher-order function that takes a function (the reducer) and an initial value as arguments. The reducer function is called for each element in the array, with the result of the previous call passed as the first argument and the current element passed as the second argument.
Summary
Higher-order functions are a powerful tool in functional programming, and TypeScript's static typing features make them even more powerful. By using higher-order functions, we can write code that is more reusable, testable, and readable.
In this post, we've explored how to use and implement higher-order functions in TypeScript. We started with a simple example using the map function, then created our own version of map, and finally implemented `
map using reduce. Each step of the way, we leveraged the power of higher-order functions to make our code more declarative and less imperative.
]]><![CDATA[Advanced Union And Intersection Types In Typescript]]>https://blog.dennisokeeffe.com/blog/2023-06-23-advanced-union-and-intersection-types-in-typescript2023-06-23T00:00:00.000Z2023-06-23T00:00:00.000ZThis post will is 9 of 20 for my series on intermediate-to-advance TypeScript tips.
Introduction
In TypeScript, one of the powerful features that allow us to create complex types are Union and Intersection types. These types provide us with the ability to create new types from existing ones, leading to more flexible and reusable code. This post will delve into the practical use of these advanced types, with examples that you can try out in the TypeScript Playground. For a more detailed explanation, you can refer to the TypeScript Handbook's section on Unions and Intersection Types.
Union Types
Union types are a way of declaring a type that could be one of several types. We use the vertical bar (|) to separate each type.
Here's an example of a function that uses a union type:
In this function, the padding parameter can be either a string or a number. This is a simple yet powerful way to handle multiple types in a single function. You can try this out in the TypeScript Playground.
Intersection Types
Intersection types are another powerful feature in TypeScript. They allow you to combine multiple types into one, resulting in a type that has all the properties of the combined types.
Here, ArtworksResponse is an intersection type that combines ArtworksData and ErrorHandling. An object of type ArtworksResponse will have all the properties of ArtworksData and ErrorHandling.
Now, let's create a function that takes an ArtworksResponse object and processes it:
function handleArtworksResponse(response: ArtworksResponse) {
if (!response.success) {
console.error(response.error?.message);
return;
}
console.log(response.artworks);
}
In the handleArtworksResponse function, we first check if the response was successful. If not, we log the error message and return early. If the response was successful, we log the artworks.
Here's an example of how you might call this function:
In this example, response is an object that satisfies the ArtworksResponse type, so we can pass it to handleArtworksResponse without any issues. If you run this code in the TypeScript Playground, you should see the array of artworks logged to the console.
This example demonstrates how intersection types can be used to create complex types that ensure our functions are used correctly.
Representing Network State example
Let's dive into a more complex example using both union and intersection types.
Consider a network request scenario where we have different states for our request - it could be in a loading state, a success state, or a failed state. Each of these states has different properties associated with them. Here's how we might model this:
In this example, NetworkState is a union of NetworkLoadingState, NetworkFailedState, and NetworkSuccessState. Each of these types has a state property that can be used to determine the current state of the network request.
Now, let's create a function that takes a NetworkState object and processes it:
function networkStatus(state: NetworkState): string {
switch (state.state) {
case "loading":
return "Downloading...";
case "failed":
return `Error ${state.code} downloading`;
case "success":
return `Downloaded ${state.response.title} - ${state.response.summary}`;
}
}
In the networkStatus function, we use a switch statement to handle each possible state. The TypeScript compiler can infer the type of state in each case clause. This is known as "discriminant union types", a pattern where TypeScript can narrow down the type based on a certain property (in this case, state).
This example demonstrates how union and intersection types can be used together to create complex and robust type definitions. You can try this out in the TypeScript Playground.
Summary
Union and Intersection types are powerful tools in TypeScript that allow us to create complex types from existing ones. Union types let us declare a type that could be one of several types, while Intersection types allow us to combine multiple types into one. These features make our code more flexible and reusable, and they are essential for writing complex TypeScript applications.